gd1 reads its Information from the Standard Input Unit. You will normally use two or more xterms to operate gd1. In one of the xterms you edit an Inputfile that describes your Device, in the other xterm you iteratively start gd1 and try out how gd1 reacts to your Input.
gd1 reads the Description of the Device that you are interested in
from stdin or from a File that you specify via include(filename).
gd1 generates the Mesh and computes the resonant Fields or time dependent
Fields.
The Results are written to a Database that can be read by gd1.pp.
In the Section -general, you specify the Name of the File where the Results shall be written to.
In the Section -mesh, you have to specify the Borderplanes of the computational Volume, and the default Mesh Spacing. You also define the boundary Conditions at the Borderplanes here.
In the Section -material, you specify the electric Properties of the Materials.
 ##############################################################################
 # Flags: nomenu, noprompt, nomessage,                                        #
 ##############################################################################
 # gdfidl (32) (V 3.8) (compiled Thu Sep  9 09:20:05 GMT 2021 on Host wb041a) #
 #  VshzpnIb 210909                                                           #
 ##############################################################################
 # -general        -- Output File, Annotations.                               #
 # -mesh           -- Bounding Box, Spacing, fixed Meshplanes,                #
 #                 -- Boundary Conditions.                                    #
 # -material       -- Material Properties.                                    #
 # -lgeometry      -- Load a previously used Geometry.                        #
 # ***** Geometric primitives ****                                            #
 # -brick          -- Simple rectangular Brick.                               #
 # -gccylinder     -- Circular Cylinder in general Direction.                 #
 # -ggcylinder     -- General Cylinder in general Direction.                  #
 # -gbor           -- Body of Revolution in general Direction.                #
 # -stlfile        -- CAD Import via STL-File.                                #
 # -geofunction    -- Analytic Function.                                      #
 # -transform      -- Rotations etc                                           #
 #     ( -translate, -rotate )                                                #
 # ***** Solver Sections ****                                                 #
 #  -eigenvalues   -- Resonant Fields                                         #
 #     ( -ports, -linitialfields )                                            #
 #  -fdtd          -- Time dependent Fields                                   #
 #     (-time, -ports, -pexcitation, -lcharges, -voltages, -dipole, -clouds   #
 #      -storefieldsat, -linitialfields, -fexport, -fmonitor, -smonitor       #
 #      -pmonitor, -windowwake, -decaytime )                                  #
 #  -magnetostatic -- Magnetostatic Fields (rudimentary)                      #
 #     ( -lcurrent )                                                          #
 # *******                                                                    #
 #  -volumeplot    -- Displays Mesh Filling.                                  #
 #  -cutplot       -- Displays Mesh Filling in a single Plane                 #
 # ***** Miscellanea ******                                                   #
 #  -debug         -- Specify Debug Levels                                    #
 #                                                                            #
 ##############################################################################
 # ?, end, help, __mdoit, __hwinfo                                            #
 ##############################################################################
The Menu shows all Sections. There are some Subsections, which you may also enter from within any Section, these are shown in Brackets (). You enter a Section by specifying its Name.
-general, you say:
-generalAs all Commands may be abbreviated, you may also say:
-ge
 ##############################################################################
 # Flags: nomenu, noprompt, nomessage,                                        #
 ##############################################################################
 # Section: -general                                                          #
 ##############################################################################
 # outfile    = /tmp/--username--/--SomeDirectory--/Results                   #
 # scratchbase= /tmp//gdfidl-scratch-pid=000014129-                           #
 # restartfiles= -none-                                                       #
 #   t1restartfiles=  1440         -- Minutes. When to write the first Set.   #
 #   dtrestartfiles=  1440         -- Minutes. Distance between writing.      #
 #   stopafterrestartfiles=1000000000   -- Stop after writing so often.       #
 #   singlesetofrestartfiles= no        -- yes: Write always the same Set.    #
 # text( 1)= ' '                                                              #
 # text( 2)= ' '                                                              #
 # text( 3)= ' '                                                              #
 # text( 4)= ' '                                                              #
 # text( 5)= ' '                                                              #
 # text( 6)= ' '                                                              #
 # text( 7)= ' '                                                              #
 # text( 8)= ' '                                                              #
 # text( 9)= ' '                                                              #
 # text(10)= ' '                                                              #
 # text(11)= ' '                                                              #
 # text(12)= ' '                                                              #
 # text(13)= ' '                                                              #
 # text(14)= ' '                                                              #
 # text(15)= ' '                                                              #
 # text(16)= ' '                                                              #
 # text(17)= ' '                                                              #
 # text(18)= ' '                                                              #
 # text(19)= ' '                                                              #
 # text(20)= ' '                                                              #
 # uslices= auto       -- PVM/MPI: [yes|no|auto|1length]:                     #
 #                     -- if [yes|1length] : Partition in x,y or z only.      #
 # ndpw   = auto       -- PVM/MPI: Number of Dice per Worker                  #
 # iodice = no         -- PVM    : yes: Each Worker writes its own Results.   #
 # nrofthreads= 32     -- SMP and PVM/MPI: Nr of Threads per Worker.          #
 # ngangs= 16          -- How many Teams.                                     #
 # fmeshing= no        -- [yes|no|auto]:                                      #
 #                     -- Use Files while building the Mesh.                  #
 # affinity= yes       -- SMP: yes: Enforce Core Affinity.                    #
 # spinwait= yes       -- SMP: yes: Do not release CPU when a Thread waits.   #
 # hyperthreading= yes -- SMP: no: Schedule on real Cores.                    #
 ##############################################################################
 # 2dplotopts= -geometry 690x560+10+10                                        #
 #  linecolor= 0              -- 0: foreground, 3: yellow                     #
 #  foreground= black         -- black, white                                 #
 #  background= white         -- blue, white, black                           #
 # showtext     = yes         -- (yes | no)                                   #
 # onlyplotfiles= no          -- (yes | no)                                   #
 ##############################################################################
 ## Syntax:                                                                   #
 #  weightpoint= (Ui, Wi)                                                     #
 ##############################################################################
 # ?, return, help, clearweights, weightpoint= (..)                           #
 ##############################################################################
TMPDIR set,
gd1 will as Default set scratchbase to the String
$TMPDIR/gdfidl-scratch-pid=XXXXX-
Here $TMPDIR is the Value of the Environment Variable TMPDIR,
and XXXXX
is the numerical Value of the Process-id of gd1.
The Size of the Scratchfiles is sometimes more than the Amount of RAM that gd1 itself needs. The Scratchfiles should be located on a Disk which is directly attached to the compute Nodes. If the Scratchfiles are located on a Network attached Storage, a somewhat longer computation Time is to be expected.
If you are preparing a System for using GdfidL, have about ten Times more directly attached Scratch-Space than installed RAM on each compute Node.
restartfiles must be a valid Filename in a
Filesystem, which survives a System Crash, ie. a Filesystem which is not
cleared at Boot Time.
If a Value for restartfiles is given,
the Solver will write a Set at selected Times.
There will be up to two Sets of Restartfiles.
There are two Sets, because according to Murphy's Law it will happen that a
System Crash occurs just while one Set is being written. In such a Case,
the older Set still can be used. When the Restartfiles are written,
a Comment is given about how to use the Restartfiles.
Essentially this is: you have to restart the Computation
on the same computer System (if using a parallel System: with the same
number of Tasks, using the same Nodes, using the same Executable), with
an additional Parameter on the Command Line of the Master Task.
The additional Command Line Parameter is
-restartfiles=NAME-OF-SET .
Writing Restartfiles and Recovering also works with PVM/MPI.
You can also use this Facility to trick out Batch Systems. You can specify that Restartfiles are to be written eg. after one Hour, and the Computation after writing the Restartfiles shall stop. You then restart such a Computation. This Way, you can have long running GdfidL Computations in a batch Queue which only accepts Jobs with less than two Hours Wall Clock Time.
Periodically gd1 checks whether a File $HOME/gdfidl.WriteRestartFilesNowAndStop
exists. If it exists, its Content is read. If the first Line contains a NonZero Number,
all running Computations will write their Restartfiles and stop afterwards.
If the running Computations did not have a Restartfile specified, the Content of the
second Line of $HOME/gdfidl.WriteRestartFilesNowAndStop will be used
as the BaseName of the Restartfiles.
The Content of such a $HOME/gdfidl.WriteRestartFilesNowAndStop File:
    4711 # Some Nonzero Number will enforce writing of Restartfiles.
    /scratch/Forced-Restartfile
text()= ANY STRING, NOT NECESSARILY QUOTED
text(NUMBER)= ANY STRING, NOT NECESSARILY QUOTED ANY STRING, NOT NECESSARILY QUOTED:
NUMBER:
NUMBER, the String following
text()=
is placed in the next free Line.
In the Case with NUMBER, it is guaranteed, that the String
is placed in the NUMBER.st Line.
You can specify up to 20 Annotation Strings,
the maximum Length of each Annotation String is 80 Characters.
[auto|NUMBER]
When computing on a Cluster,the computational Volume is subdivided in NUMBER Subvolumes per Task.
If ndpw=auto, the Number of Subvolumes (dice) is chosen such
that each Subvolume contains about 1 Million Grid Cells and the total
Number of Subvolumes is larger than the total Number of Threads to use.
The total Number of Threads to use is NROFTHREADS times the number of Nodes
used for the parallel Run.
[yes|no]
When computing on a Cluster,the Result of each Subvolume is stored on the local Disk of each Node.
For this to work, OUTFILE must be a legal Filename on each Node.
For this to be useful, OUTFILE must be on a locally attached Filesystem.
This leads to faster writing of the Results, but longer Time
for postprocessing of the Results.
This might be needed for very large parallel Computations where the
computed electromagnetic Fields must be loaded into the Postprocessor
for computing, eg. the Q-value.
For very large parallel Computations, it can happen that the computed
Datasets are so large, that the Postprocessor cannot handle the Amount of
Data in its limited Address space (32 bit Processors).
Even on 64 bit Processors, the required Memory might be larger than
what is available on the used System.
When iodice= yes, the Results are written to the local
Disks of the compute Nodes. When the Results shall be analysed by
gd1.pp, on each compute Node an instance of gd1.pp will be started to handle
the local Amount of Data.
Only the PVM version of gd1.pp can be run in parallel. There is no MPI version of gd1.pp, as MPI lacks some needed Functionality.
NTHREADS
The Number of Threads to use. Each Thread uses one CPU-Core.
The really used Number of Cores will not be larger than the Number of really
available Cores on the used System.
[yes|no]
If yes,
gd1 attempts to schedule the Workload such that
always the same Cores are used. That gives better Performance on NuMA-Systems,
if the used System runs only one Instance of gd1, and essentially
no other Load is present.
[yes|no]
If yes, the Threads do not release their Cores when they
are waiting. This spin-wait gives better Performance
if the used System runs only one Instance of gd1, and essentially
no other Load is present.
/Data/UserName/restartfile.
 -general
     outfile= /Data/UserName/resultdirectory
     scratch= /tmp/UserName/delete-me-
     restartfiles= /Data/UserName/restartfile
     t1restart= 24 * 60, dtrestart= 24 * 60

 define(PARAMETER, 45)
     text(1)= Parameter is PARAMETER
     text(2)= 2*Parameter is eval(2*PARAMETER)
Example
Tell GdfidL that every XX Minutes, all Data describing the
current State of Computation shall be written to Files.
From these Data, a Computation can be restarted.
There is an Option, that after eg. two Datasets written, the Computation
shall stop.1.2 A Script, which restarts as long as GdfidL has not yet signalled that
the Job is finished, is:
#!/bin/sh
#
# The Input for GdfidL shall contain a Specification
# for Restartfiles. In this Example, we do that
# via creating the './gdfidl.solver-profile', which is
# read and interpreted at the Start of Run.
 (cat > ./gdfidl.solver-profile) << UntilThisMarker
   -general
     # Write a Set of Restartfiles every 60 Minutes.
     restartfiles= /Data/UserName/restartfiles  # Where to write the Restartfiles
     t1restart= 60        # When to write the first Set of Restartfiles
     dtrestart= 60        # Wall Clock Time Difference between writing Restartfiles
     stopafterrestart= 2  # Stop after writing the second Set of Restartfiles.
UntilThisMarker
#
# The initial Run.
# Use '>' instead of '| tee Logfile' to get the Returncode of GdfidL.
# If 'tee' is used the Returncode would be the Returncode of 'tee'.
 gd1 -DWhateverYourOptions=... \
        < Inputfile > Logfile-restart
 RETURNCODE=$?
 echo RC ist $RETURNCODE
#
# While GdfidL signals that a Restart is useful, restart.
 while [ "$RETURNCODE" -eq "1" ]
 do
    gd1 -restartfiles=/Data/UserName/restartfiles.iMod-2 \
        >> Logfile-restart
    RETURNCODE=$?
 echo RC ist $RETURNCODE
    if [ "$RETURNCODE" -eq "0" ]; then
       exit 0
    fi
 done
#
 exit 0
 #######
Writing Restartfiles is useful anyway.
If Restartfiles are written, one has the Chance to restart a
crashed Computation which crashed because of some Failure of the
Computersystem. To restart a Computation, the Restartfiles must be
accessible, of course. So the Restartfiles should not be written
to /tmp, or some other Filesystem which might be cleaned at System
Boot Time or so.
When writing Restartfiles for the Possibility of recovering from some Failure of the System, you would not specify
-general, stopafterrestart= 2
The writing of the Restartfiles takes some Time, Minutes or so.
So the '-general, dtrestart= XX' Parameter should be significantly
larger than '1'. We suggest '-general, dtrestart= 24*60'.
That says: Write Restartfiles once per 24 Hours.
If such a Computation crashed, inspect the Logfile. You shall find Lines similar to:
 ###############
 # Restartfiles are to be written.
 #########################################################################
 # A Set of Restartfiles has been written.
 # To restart this Computation, start with the same Command,
 # on the same Computer System, but with the additional Parameter
 #    -restartfiles=/Data/UserName/restartfiles.iMod-1
 #########################################################################
This '
start with the same Command, on the same Computer System,'
is for Safety. A Restart will work as long as the same Executables
are used, the same PVM/MPI-Parameters are used, and the Restartfiles
are accessible from every used Node.
 ##############################################################################
 # Flags: nomenu, noprompt, nomessage,                                        #
 ##############################################################################
 # Section -mesh                                                              #
 ##############################################################################
 ## Bounding Box:                                                             #
 #   pxlow = undefined      , pylow = undefined      , pzlow = undefined      #
 #   pxhigh= undefined      , pyhigh= undefined      , pzhigh= undefined      #
 #  volume= (undefined, undefined, undefined, undefined, undefined, undefined)#
 #      __zlowref = undefined                                                 #
 #      __zhighref= undefined                                                 #
 ## Boundary Conditions:                                                      #
 #   cxlow = electric, cylow = electric, czlow = electric                     #
 #   cxhigh= electric, cyhigh= electric, czhigh= electric                     #
 ## Periodic BC's for loss-free Eigenvalues:                                  #
 #   xperiodic= no , xphase= undefined                                        #
 #   yperiodic= no , yphase= undefined                                        #
 #   zperiodic= no , zphase= undefined                                        #
 #  fillfrom= (undefined, undefined, undefined)                               #
 # # # # #                                                                    #
 # xspacing= undefined, xminspacing= undefined                                #
 # yspacing= undefined, yminspacing= undefined                                #
 # zspacing= undefined, zminspacing= undefined                                #
 # graded  = no                                                               #
 #   xgraded= no , ygraded= no , zgraded= no                                  #
 # xqfgraded= 1.20, xdmaxgraded= undefined                                    #
 # yqfgraded= 1.20, ydmaxgraded= undefined                                    #
 # zqfgraded= 1.20, zdmaxgraded= undefined                                    #
 # perfectmesh= no                                                            #
 # geoscale= 1.0                                                              #
 ## Commands: # # # # # # # # # #                                             #
 # xfixed(N, X0, X1)  -- N fixed Meshplanes between X0 and X1                 #
 # yfixed(N, Y0, Y1)  -- N fixed Meshplanes between Y0 and Y1                 #
 # zfixed(N, Z0, Z1)  -- N fixed Meshplanes between Z0 and Z1                 #
 ##############################################################################
 # listplanes, return, help                                                   #
 ##############################################################################
__zlowref and above __zhighref
is translational invariant.
electric, magnetic.
yes, no.
These Parameters toggle the Application of periodic Boundary Conditions
between the lower and upper Boundary Planes in x-, y- or z-Direction.
You can compute with more than one ?periodic= yes.
This is only implemented for Eigenvalue Computations.
For Time-Domain Computations, these Parameters should be set to no.
bricks, and where you enforce them via
xfixed, yfixed, zfixed,
if the Distance between such fixed Meshplanes is more than
minspacing.
Otherwise, one of these fixed Meshplanes is deleted.
The deleted one is the Meshplane with the higher Coordinate Value.
If this Parameter minspacing is not given, gd1 uses the Value of spacing/10 instead.
yes, no.
graded= yes, the Space between fixed Meshplanes will be filled
with a graded Mesh. The Ratio of adjacent Mesh-Spacing will be approximately
the Value given for qfgraded.
The largest Mesh-Spacing will be less or equal dmaxgraded.
graded, but only that the Grid Planes with x-, y- or z-constant
are considered for Grading.
yes, the Material Boundaries are approximated
as smooth Patches. If specified as no, the Material Distribution
in a Cell is approximated for each Cell as one out of 73 possible
Material Distributions.
The Meshing and Computation with perfectmesh= no is somewhat faster
and is more thoroughly tested.
In both Cases, the Error in computed Resonant Frequencies is
reduced by about a Factor of Ten, as compared to the common known
Approximation with diagonal Fillings.
Unfortunately, in some Configurations unphysical Fields are computed
when perfectmesh= yes, so use with Care.
The Default is perfectmesh= no.
graded= no).
It is only guaranteed, that the Borders of (not transformed) bricks
lie on Meshplanes.
If you have a Geometry with items other
than Bricks you sometimes can improve the Mesh by enforcing Meshplanes with
these Commands.
xfixed(NUMBER, LOW, HIGH)
yfixed(NUMBER, LOW, HIGH)
zfixed(NUMBER, LOW, HIGH)
NUMBER:
LOW, HIGH.
The total Number of meshplanes enforced
by such a Command is exactly NUMBER.
In the Case of xfixed,
the Meshplanes are positioned at Positions 
LOW, HIGH:
NUMBER NUMBER = 1, in this Case
a single Meshplane at LOW is enforced.
LOW is really lower
than HIGH.
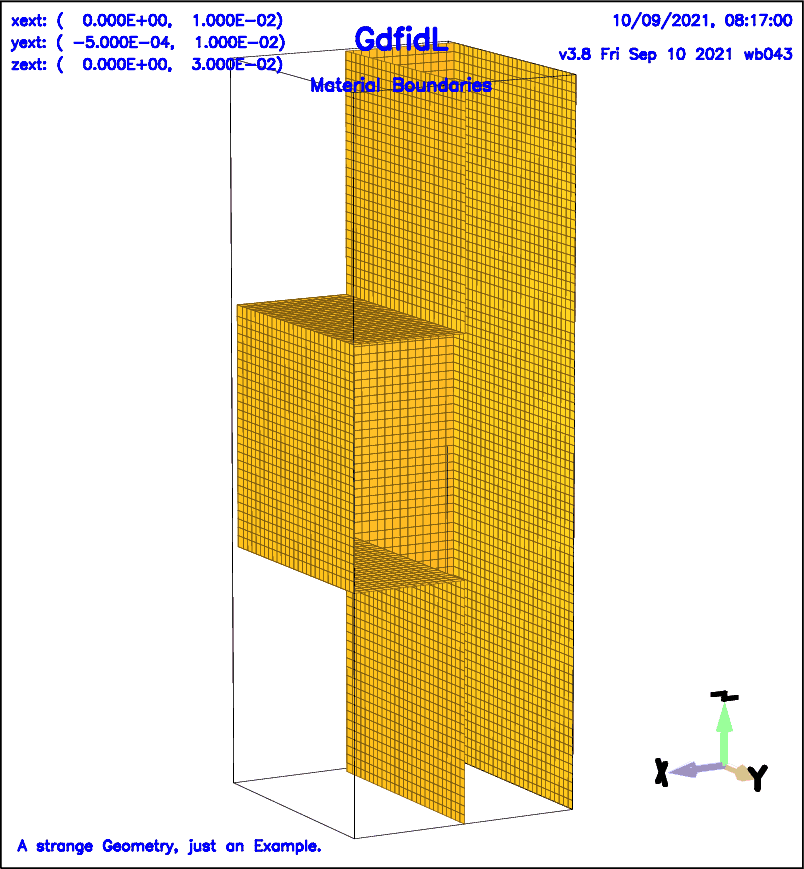
It is normally counterproductive to specify Regions of fixed Meshplanes. Better only specify selected Meshplanes, eg xfixed(2, X0, X1), or xfixed(1, X0, X0). Let the Solver compute on an as homogeneous Mesh as possible.
 -mesh
     spacing= 1e-3
     pxlow= 1e-2, pxhigh= 0
     pylow= 2e-2, pyhigh= 0
     pzlow= 3e-2, pzhigh= 0

     cxlow= ele, cxhigh= mag
     cylow= ele, cyhigh= mag
     zperiodic= yes, zphase= 120
type= electric),
perfect magnetic conducting (type= magnetic),
electric conducting with Impedance Boundary Conditions applied
(type= impedance) (type= coating),
or may be loss-free or lossy Dielectrics with anisotropic Values for
type= normal).
Dielectrics may have up to 10 LORENTZ-Resonances in their permittivity
and permeability Functions.
 ##############################################################################
 # Flags: nomenu, noprompt, nomessage,                                        #
 ##############################################################################
 # section -material                                                          #
 ##############################################################################
 # material=  3, type= undefined                                              #
 #      ckappa= undefined        , cthickness= undefined                      #
 #                     epsr    = undefined      kappa    = undefined          #
 #                        xepsr= undefined        xkappa = undefined          #
 #                        yepsr= undefined        ykappa = undefined          #
 #                        zepsr= undefined        zkappa = undefined          #
 #                     muer    = undefined      mkappa   =       0.0          #
 #                        xmuer= undefined        xmkappa=       0.0          #
 #                        ymuer= undefined        ymkappa=       0.0          #
 #                        zmuer= undefined        zmkappa=       0.0          #
 # # Dispersion Parameters.                                                   #
 #                 feps(1)   = undefined     fmue(1)   = undefined            #
 #                   xfeps(1)= undefined       xfmue(1)= undefined            #
 #                   yfeps(1)= undefined       yfmue(1)= undefined            #
 #                   zfeps(1)= undefined       zfmue(1)= undefined            #
 #                 aeps(1)   = undefined     amue(1)   = undefined            #
 #                   xaeps(1)= undefined       xamue(1)= undefined            #
 #                   yaeps(1)= undefined       yamue(1)= undefined            #
 #                   zaeps(1)= undefined       zamue(1)= undefined            #
 #                 fegm(1)   = undefined     fmgm(1)   = undefined            #
 #                   xfegm(1)= undefined       xfmgm(1)= undefined            #
 #                   yfegm(1)= undefined       yfmgm(1)= undefined            #
 #                   zfegm(1)= undefined       zfmgm(1)= undefined            #
 ##############################################################################
 # flow  =  undefined                   -- Plot feps(f) & fmue(f) from this f #
 # fhigh =  undefined                   -- upto this f.                       #
 #  thickness=       100.0              -- .. assuming this Thickness.        #
 #   xlog= no                           -- f-Axis logarithmic.                #
 ##############################################################################
 # 2dplotopts= -geometry 690x560+10+10                                        #
 #  linecolor= 0              -- 0: foreground, 3: yellow                     #
 #  foreground= black         -- black, white                                 #
 #  background= white         -- blue, white, black                           #
 # showtext     = yes         -- (yes | no)                                   #
 # onlyplotfiles= no          -- (yes | no)                                   #
 ##############################################################################
 # return, showfeps, help                                                     #
 ##############################################################################
electric", "magnetic",
"impedance", "coating", "normal".
An "electric" Material is treated as perfect electric conducting
for the Field Computation and a "magnetic" Material is treated as
perfect magnetic conducting in the Field Computation.
At "impedance" or "coating" Materials,
Impedance Boundary Conditions are applied
when performing a Time Domain Computation.
type= impedance are treated as perfectly
conducting.
lossy= no
in the Section -eigenvalues is selected,
only the "epsr"
and "muer" of a "normal" Material are used for
the Field Computation, ie. no Losses, and no dispersive
Parameters are modeled for Eigenvalue Computations.
The Parameters "kappa" and "mkappa" of
Materials with "type= normal" may be used by the
Postprocessor,
gd1.pp,
to compute dielectric Losses via a perturbation Formula.
lossy= yes
in the Section -eigenvalues is selected,
Losses due to finite electric and magnetic Conductivities,
and the dispersive Parameters of Materials with type= normal
are taken into Account. Materials with type= impedance
are treated as perfectly conducting.
epsr", "muer",
"kappa" and "mkappa"
as well as the dispersive Parameters of a "type= normal"
Material are used for the Field Computation.
At Material-Boundaries to Materials with type= impedance
or type= coating
Impedance-Boundary-Conditions are applied.
type= electric" are considered perfectly conducting, and
Materials with
type= magnetic" are considered perfectly magnetic conducting.
Any specified electric Conductivities for Materials with
"type= electric" or "type= impedance" are used in the
Postprocessor,
gd1.pp,
to compute Wall Losses via a perturbation Formula.
type= coating".
The Conductivity of the Background-Material.
type= coating".
The Thickness of the Coating.
The used Scheme assumes a Conctivity of kappa in a Thickness of
cthickness, then a Conductivity of bkappa.
type= normal".
The relative Permittivity of the Material.
If you specify eg. epsr= 3,
all three epsr Values xepsr, yepsr and zepsr
are set to the Value 3.
epsr Matrices can be specified.
type= normal".
The relative Permeability of the Material.
If you specify eg. muer= 4,
all three muer Values xmuer, ymuer and zmuer
are set to the Value 4.
muer Matrices can be specified.
kappa= 5,
all three kappa Values xkappa, ykappa and zkappa
are set to the Value 5.
kappa Matrices can be specified.
mkappa= 6,
all three kappa Values xmkappa, ymkappa
and zmkappa
are set to the Value 6.
mkappa Matrices can be specified.
feps(1)= 3e9,
all three feps(1) Values xfeps(1), yfeps(1)
and zfeps(1)
are set to the Value 3 GHz.
showfeps creates Plots of the frequency dependend
Materialparameters and of the analytical Reflection
flow and fhigh, assuming a Length L=Thickness.
Here:
 ,
,
epsr, aeps(n), feps(n), fegm(n).
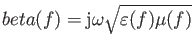
The Permittivity for an ![]() .th Order LORENTZ Medium with resonant
Frequencies
.th Order LORENTZ Medium with resonant
Frequencies ![]() and damping Frequencies
and damping Frequencies ![]() reads
reads
 |
(1.1) |
| (1.2) | |||
| (1.3) | |||
| (1.4) | |||
| (1.5) |
epsr and
muer are 1. This is Vacuum.
type= impedance Materials
is performed, every 500 Timesteps the absorbed Energy in that Materials
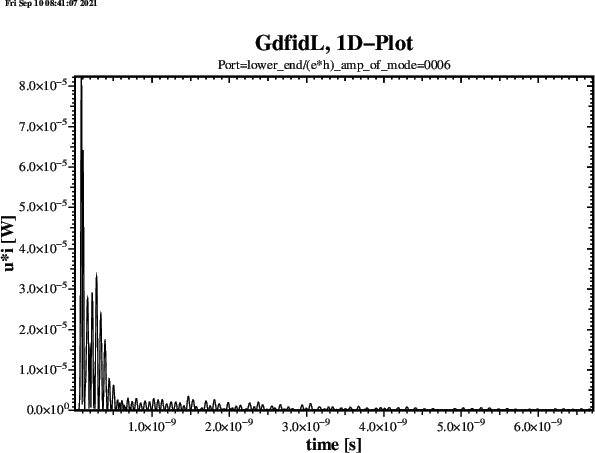
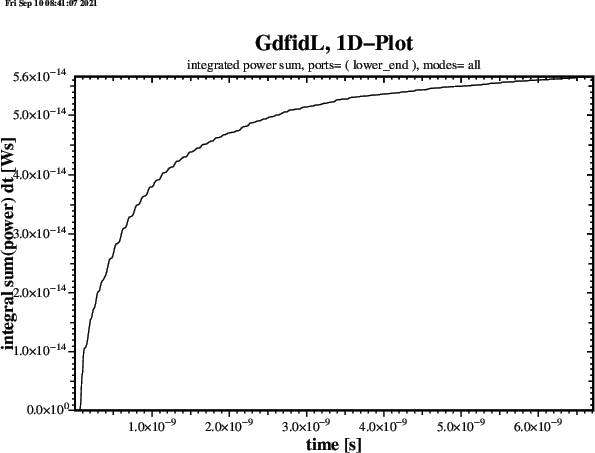
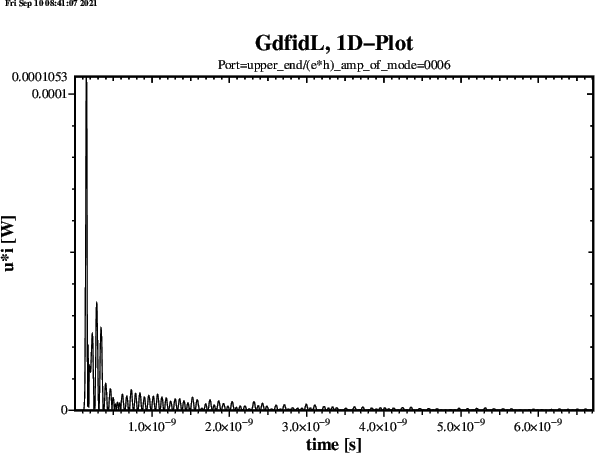
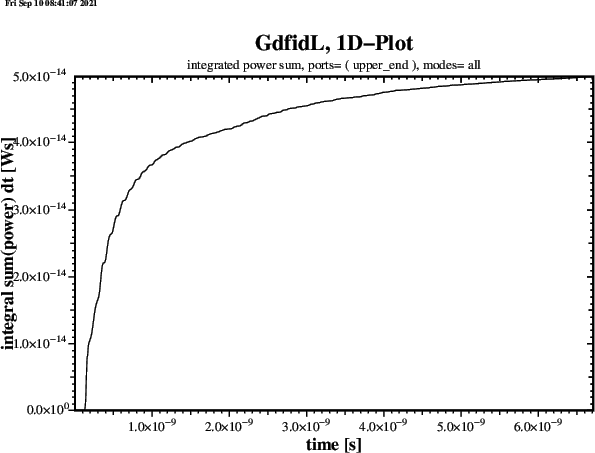
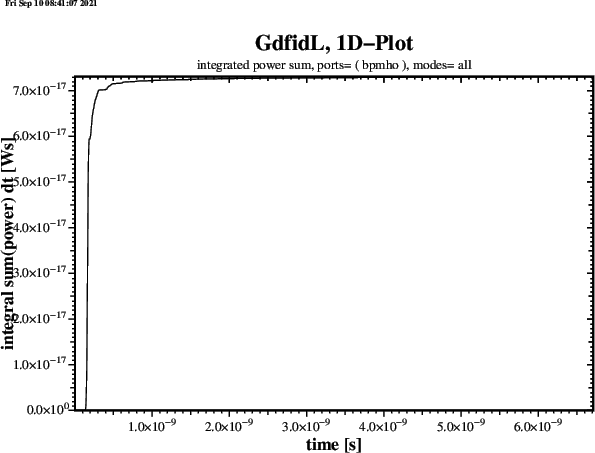
is written to GdfidL's stdout. For a Computation with four
such Materials (3,5,6,8) that Output is similar to
     1.61138828e-9     1.53411444e-9  <= Time [s], IntegratedSumPowerAll [J]
     1.61138828e-9   303.51498474e-12 <= Time [s], IntegratedSumPowerMat003 [J]
     1.61138828e-9     4.27840722e-12 <= Time [s], IntegratedSumPowerMat005 [J]
     1.61138828e-9    15.01830736e-12 <= Time [s], IntegratedSumPowerMat006 [J]
     1.61138828e-9     1.21130274e-9  <= Time [s], IntegratedSumPowerMat008 [J]
The Format is such that one can grep for IntegratedSumPowerMatXXX and
create without much Hassle a Datafile for further Inspection.
 -material
    material= 3
       type= magnetic
    material= 4
       type= normal, epsr= 3, kappa= 1, muer= 1
-material
# Dispersive Materials and Losses.
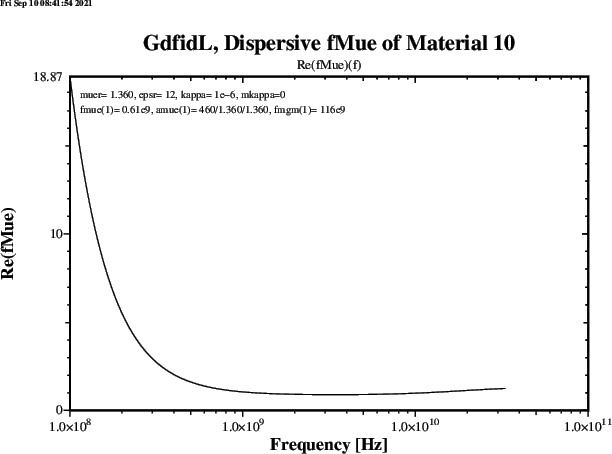
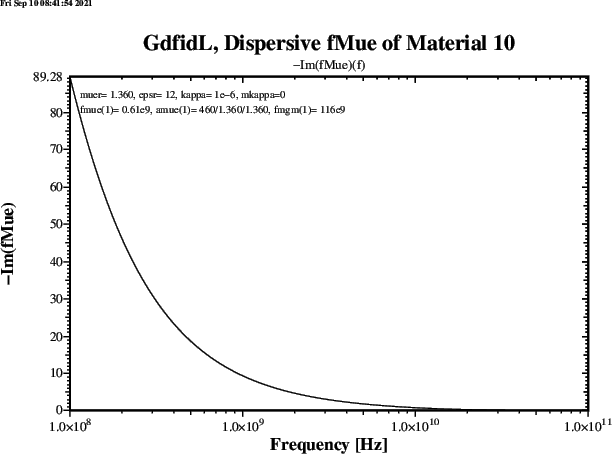
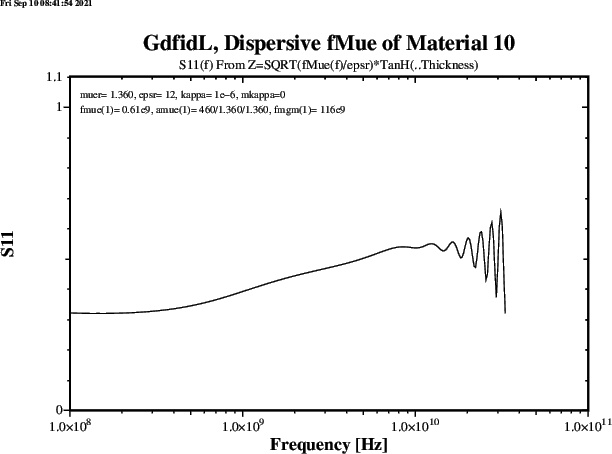
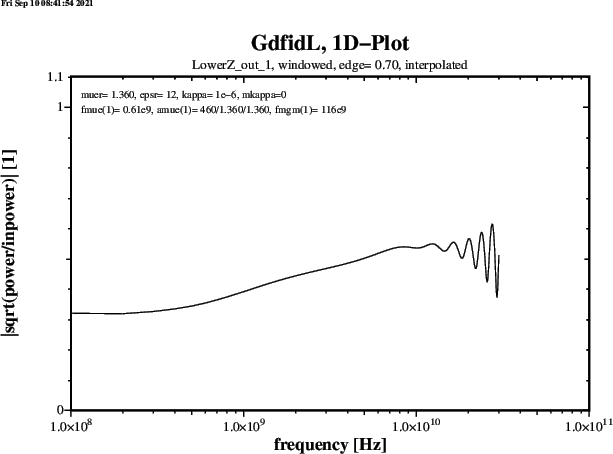
material= 10, type= normal
define(MUR, 1.36)
muer= MUR, epsr= 12, kappa= 1e-6, mkappa=0
fmue(1)= 0.61e9, amue(1)= 460/MUR/MUR, fmgm(1)= 116e9
flow= 0.1e9, fhigh= 10e9, thickness= 0.1, xlog= yes,
showfeps # Show the resulting fEps & fMue
To compute the Time Domain Field with dispersive Materials:
gd1 < /usr/local/gd1/examples-from-the-manual/dispersiveMue-TEM.gdf | tee logfileWe get three Plots. Figure 1.1 shows the real Part, figure 1.2 shows the imaginary Part of the frequency dependent Muer(f). Figure 1.3 shows the Reflection that a Slab of finite Thickness L=0.1 Metres of such a Material gives for a perpendicular incident TEM-wave. The numerically computed Reflection of a such a Slab is given in Figure 1.4.
Example
The following specifies that the Material with Index 3 shall be treated
as a dispersive Dielectric with four LORENTZ Resonances.
The frequency Dependence of the epsr and the S11 of a 0.1 Metres thick Slab of such a
Material shall be plotted.
 -material
# Dispersive Materials and Losses.
# To have Re(epsr) about 10 and Im(epsr) about 1 in 10-40GHz:
 define(EPSQ, 10**2)
     material= 3, type= normal, epsr= 10, muer= 1, kappa= 1
 kappa= 0
 define(i, 0)
 define(i, i+1) feps(i)= 10e9, aeps(i)= 1.1/EPSQ, fegm(i)= 100e9
 define(i, i+1) feps(i)= 20e9, aeps(i)= 0.42/EPSQ, fegm(i)= 100e9
 define(i, i+1) feps(i)= 30e9, aeps(i)= 0.26/EPSQ, fegm(i)= 100e9
 define(i, i+1) feps(i)= 40e9, aeps(i)= 0.28/EPSQ, fegm(i)= 100e9

     flow= 1e9, fhigh= 70e9, showfeps
To compute the Time Domain Field with dispersive Materials:
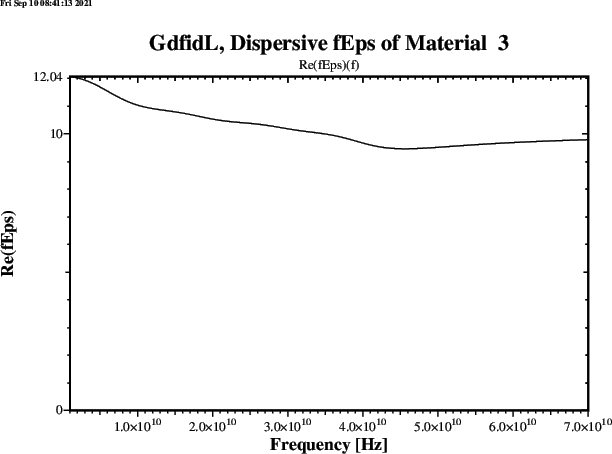
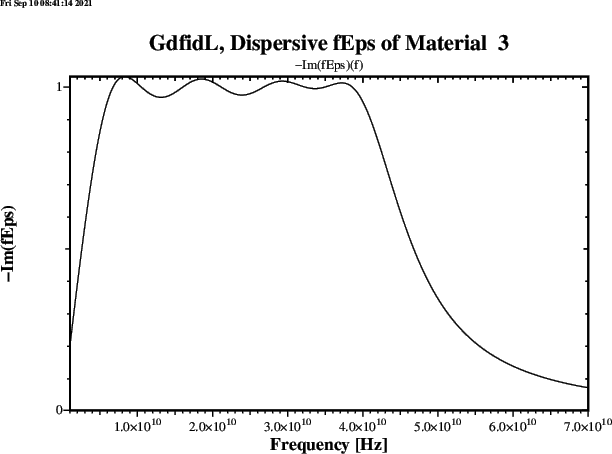
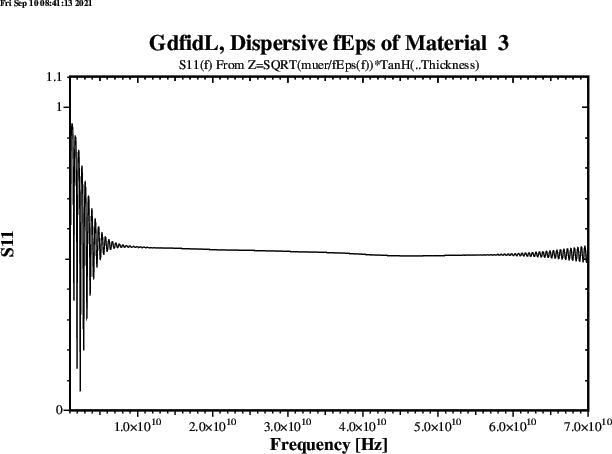
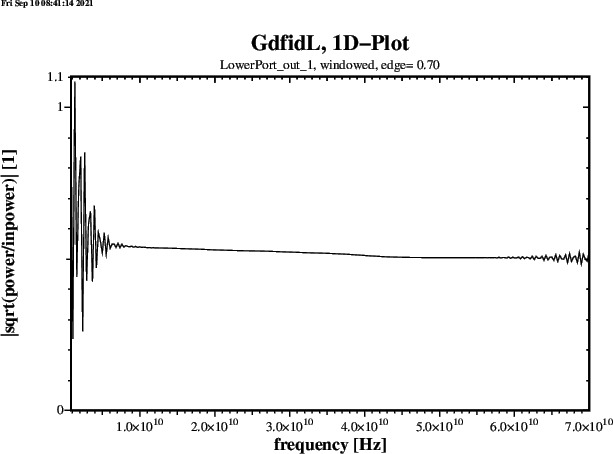
gd1 < /usr/local/gd1/examples-from-the-manual/dispersiveEps-TEM.gdf | tee logfileWe get three Plots. Figure 1.5 shows the real Part, figure 1.6 shows the imaginary Part of the frequency dependent epsr(f). Figure 1.7 shows the Reflection that a 0.1 Metres thick Slab of such a Material would produce for a perpendicular incident TEM-wave. The numerically computed Reflection of a thick Slab of such a Material is given in Figure 1.8.
Example
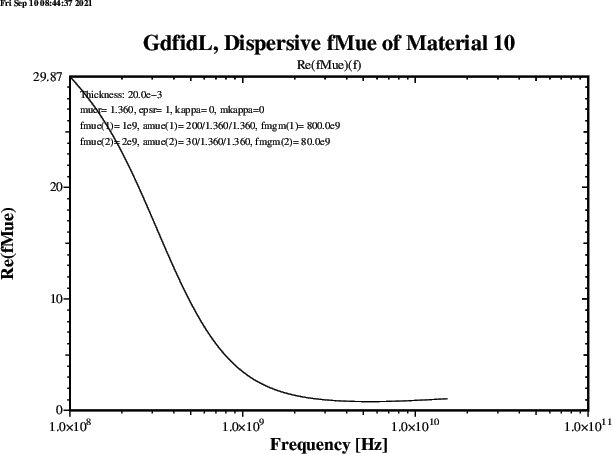
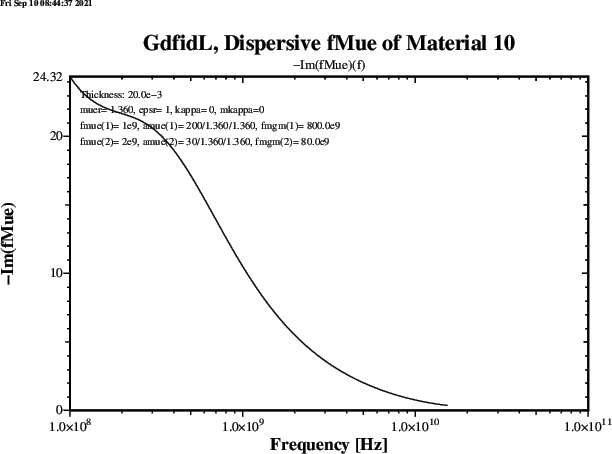
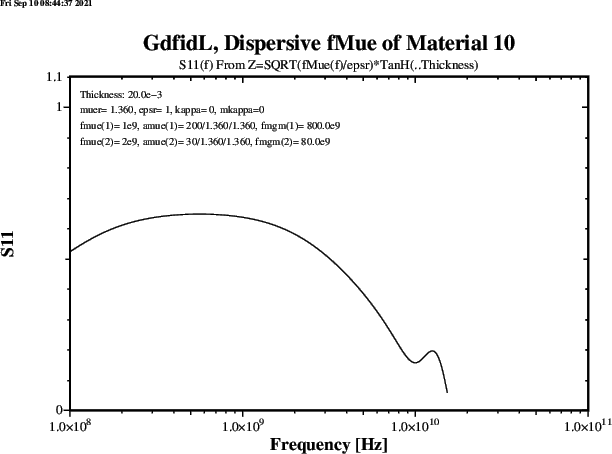
The following specifies that the Material with Index 10 shall be treated
as a dispersive Dielectric with two LORENTZ Resonances.
The frequency Dependence of the muer and the S11 of a 20 mm Slab of such a
Material shall be plotted.
 -material
# Dispersive Materials and Losses.
   material= 10, type= normal
  define(MUR, 1.36)
   muer= MUR, epsr= 1, kappa= 0, mkappa=0

   fmue(1)= 1e9, amue(1)= 200/MUR/MUR, fmgm(1)= 800.0e9
   fmue(2)= 2e9, amue(2)= 30/MUR/MUR, fmgm(2)= 80.0e9
    flow= 1e6, fhigh= 1400e6, xlog= yes, showfeps # Show the resulting fEps, fMue
To compute the Time Domain Field with dispersive Materials:
gd1 < /usr/local/gd1/examples-from-the-manual/dispersiveMue2-TEM.gdf | tee logfileWe get three Plots. Figure 1.9 shows the real Part, figure 1.10 shows the imaginary Part of the frequency dependent Muer(f). Figure 1.11 shows the Reflection that a Slab of such a Material would produce for a perpendicular incident TEM-wave. The numerically computed Reflection of a 20 mm Slab of such a Material is given in Figure 1.12.
 ##############################################################################
 # Flags: nomenu, noprompt, nomessage,                                        #
 ##############################################################################
 # Section: -lgeometry                                                        #
 ##############################################################################
 # infile = -none-                                                            #
 # xmirror= none              -- [none,low,high]                              #
 # ymirror= none              -- [none,low,high]                              #
 #                                                                            #
 #                                                                            #
 ##############################################################################
 # ?, doit, return, end, help                                                 #
 ##############################################################################
infile= NAME_OF_A_RESULTFILE:
outfile of a previous Computation.
xmirror= [none, low, high]:
xmirror= low , the Grid and the geometric Items
are mirrored on the lower x-Plane.
If xmirror= high , the Grid and the geometric Items
are mirrored on the higher x-Plane.
This allows the loading of a magnetostatic or resonant Field computed
with using Planes of Symmetry to be loaded for a Particle in Cell
Computation where, for most Cases, no Planes of Symmetry can be used.
ymirror= [none, low, high]:
doit:
-lgeometry, all previous defined Geometric
items are lost.
You should only redefine Material Parameters after loading a Grid via
-lgeometry.
Brick is a rectangular Box, with its Edges parallel
to the cartesian Coordinate Axes.
If you need to model a Brick with Edges in other Directions, you can
use the -rotate Section to rotate the Brick in any Direction.
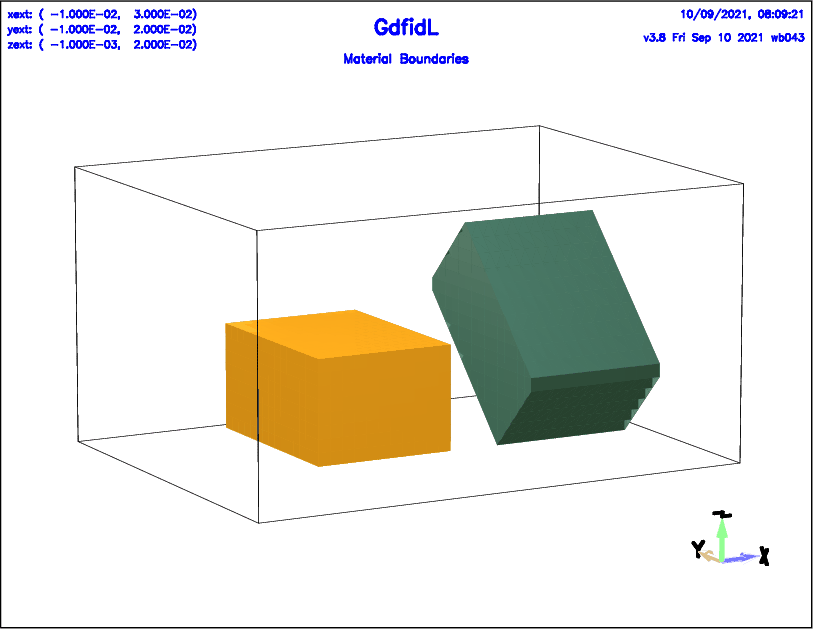
 ##############################################################################
 # Flags: nomenu, noprompt, nomessage,                                        #
 ##############################################################################
 # section -brick                                                             #
 ##############################################################################
 # material=  1, sloppy= no                                                   #
 # whichcells= all, taboo= none                                               #
 #     show= off    -- [off|now|later|all]                                    #
 #     name= brick-000000000                                                  #
 # xlow = undefined     , ylow = undefined     , zlow = undefined             #
 # xhigh= undefined     , yhigh= undefined     , zhigh= undefined             #
 # # # # #                                                                    #
 # volume= (undefined, undefined, undefined, undefined, undefined, undefined) #
 ##############################################################################
 # doit, return, help                                                         #
 ##############################################################################
yes, no. If no, Meshplanes are enforced
at the Borderplanes of the Brick.
For a Brick which is rotated, sloppy=no might give unexpected Results.
all, or a Material-Index.
If whichcells= all, all Volume inside the Brick is assigned
the Material-Index, provided the former Material is not
taboo.
If whichcells is a Material-Index, only the Parts of the
Brick that are currently filled with the given Index are assigned
the new Material-Index.
none, or a Material-Index.
If taboo= all, all Volume inside the brick is assigned
the Material-Index.
If taboo is a Material-Index, only the parts of the
brick that are currently filled with another Index than the given
Index are assigned the new Material-Index.
show=off, no Outline will be displayed.
show=later,
the Outline of the Brick will be shown later, together
with Outlines of other specified Items.
If show=all is present,
the Outlines of all other specified Items bricks
gccylinders, ggcylinders and gbors
found in the Inputstream so far where show
was not off will be displayed.
 # /usr/local/gd1/examples-from-the-manual/brick-example.gdf
 -general
     outfile= /tmp/UserName/example
     scratch= /tmp/UserName/scratch

 -mesh
     pxlow= -1e-2, pxhigh= 3e-2
     pylow= -1e-2, pyhigh= 2e-2
     pzlow= -0.1e-2, pzhigh= 2e-2

     cxlow= ele, cxhigh= mag
     cylow= ele, cyhigh= mag
     czlow= ele, czhigh= mag

     spacing= 1e-3

 -brick
     material= 1, sloppy= no
        xlow= 0, xhigh= 1.1e-2
        ylow= 0, yhigh= 1.5e-2
        zlow= 0, zhigh= 0.8e-2
     doit

 -transform,
      -translate, offset= ( 1.5e-2, 0, 0 ), doit
      -rotate, axis= ( 1, 0, 0 ), angle= -45, doit
 -brick, material= 3, sloppy= yes, doit

 -volumeplot
     scale= 3
     doit
gccylinder is a circular Cylinder, with its Axis in
some arbitrary Direction.
 ##############################################################################
 # Flags: nomenu, noprompt, nomessage,                                        #
 ##############################################################################
 # section -gccylinder                                                        #
 ##############################################################################
 # material  =  1                                                             #
 # whichcells= all, taboo= none                                               #
 #     show= off    -- [off|now|later|all]                                    #
 #     name= gccyl-000000000                                                  #
 # radius    = undefined                                                      #
 # length    = undefined                                                      #
 # origin    = ( undefined, undefined, undefined )                            #
 # direction = ( undefined, undefined, undefined )                            #
 ##############################################################################
 # doit, return, help                                                         #
 ##############################################################################
gccylinder.
all, or a Material-Index.
If whichcells=all, all Volume inside the cylinder is assigned
the Material-Index, provided the former Material is not
taboo.
If whichcells is a Material-Index, only the Parts of the
Cylinder that are currently filled with the given Index are assigned
the new Material-Index.
none, or a Material-Index.
If taboo=none, all Volume inside the Cylinder is assigned
the Material-Index.
If taboo is a Material-Index, only the Parts of the
cylinder that are currently filled with another Index than the given
taboo-Index are assigned the new Material-Index.
show=off, no Outline will be displayed.
show=later,
the Outline of the gccylinder will be shown later, together
with Outlines of other specified Items.
If show=all is present,
the Outlines of all other specified Items bricks
gccylinders, ggcylinders and gbors
found in the Inputstream so far where show
was not off will be displayed.
-gbor, see Pages
 # /usr/local/gd1/examples-from-the-manual/gccylinder-example.gdf

 -general
     outfile= /tmp/UserName/example
     scratch= /tmp/UserName/scratch-

 -mesh
     pxlow= 0, pxhigh= 1e-2
     pylow= 0, pyhigh= 2e-2
     pzlow= 0, pzhigh= 1.5e-2

     cxlow= ele, cxhigh= mag
     cylow= ele, cyhigh= mag
     czlow= ele, czhigh= mag

     spacing= 0.2e-3

 -gccylinder
     material= 5, radius= 3e-3, length= 7e-3
     origin= ( 0.5e-2, 0.3e-2, 0.6e-2 )
     direction= ( -0.4, 1.5, 0.4 )
     doit

 -volumeplot
     scale= 3
     doit
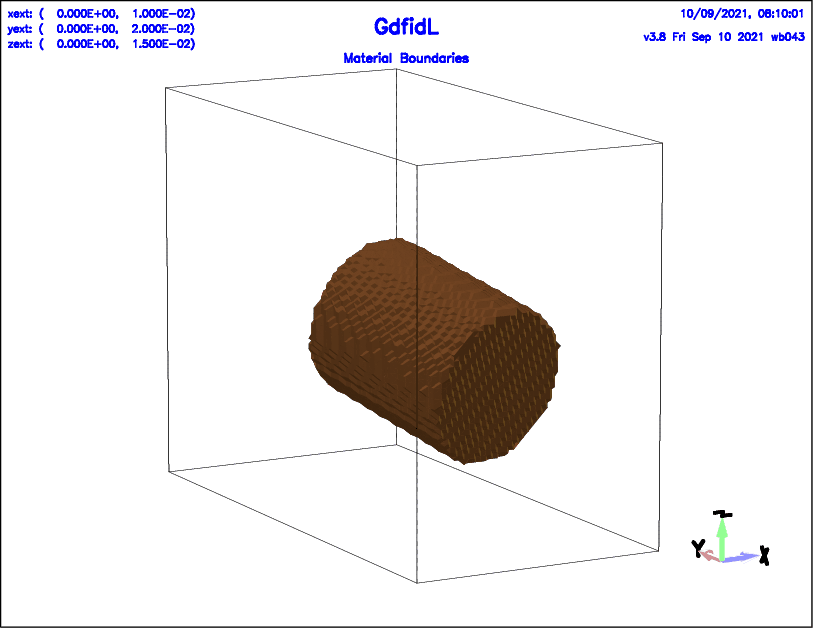
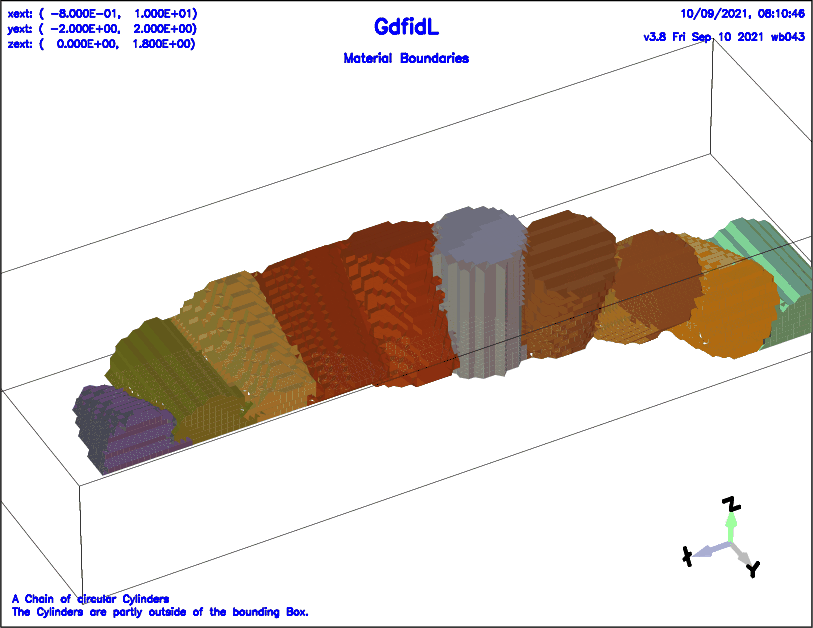
Example
 # /usr/local/gd1/examples-from-the-manual/gccylinder-example2.gdf

 define(VeryLarge, 10000)

 -general
    outfile= /tmp/UserName/example
    scratch= /tmp/UserName/scratch

    text()= A Chain of circular Cylinders
    text()= The Cylinders are partly outside of the bounding Box.

 -mesh
    pxlow= -0.8, pxhigh= 10
    pylow= -2, pyhigh= 2
    pzlow= -0, pzhigh= 1.8

    spacing= 8e-2

 -brick
    material= 0
    volume= ( -VeryLarge, VeryLarge, \
              -VeryLarge, VeryLarge, \
              -VeryLarge, VeryLarge )
    doit

 define(RADIUS, 0.6)
 -gccylinder
    length= 1.7
    radius= RADIUS
    do jj= 0, 9, 1
       material= jj+3
       origin= ( jj*1.5*RADIUS, 0, 0 )
 define(PHI, jj*22.5*@pi/180 )
       direction= ( 0, cos(PHI), sin(PHI) )
       doit
    end do

 -volumeplot
    eyeposition= ( 1.0, 2.30, 2 )
    scale= 5
    doit
 |
ggcylinder is a general Cylinder with a Footprint (Cross-Section)
described as a general Polygon.
This Footprint is swept along an Axis in a general Direction,
additionally, this Footprint can shrink or expand along this Axis,
additionally, this Footprint can be rotated along the Axis,
additionally, only Parts of the ggcylinder that fulfill
some additional Condition will be filled.
 ##############################################################################
 # Flags: nomenu, noprompt, nomessage,                                        #
 ##############################################################################
 # section -ggcylinder                                                        #
 ##############################################################################
 # material   =  1                                                            #
 # whichcells = all, taboo= none                                              #
 #     show   = off                     -- (off | all | later | now)          #
 #     name   = ggcyl-000000000                                               #
 #   fixpoints= no                      -- (yes|no)                           #
 #     inside = yes                     -- (yes|no)                           #
 # originprime    = ( 0.0, 0.0, 0.0 )                                         #
 # xprimedirection= ( 1.0, 0.0, 0.0 )                                         #
 # yprimedirection= ( 0.0, 1.0, 0.0 )                                         #
 #   zprimedirection= ( 0.0, 0.0, 1.0 )                                       #
 #   usezprimedirection= no             -- (yes|no)                           #
 # range      = ( undefined, undefined )                                      #
 # pitch      = 0.0                     -- [Degs/m]                           #
 # xexpgrowth = 0.0                                                           #
 # yexpgrowth = 0.0                                                           #
 # xslope     = 0.0                     -- (x2/x1-1)/len [1/m]                #
 # yslope     = 0.0                     -- (y2/y1-1)/len [1/m]                #
 # xscaleprime= 1.0                                                           #
 # yscaleprime= 1.0                                                           #
 # zxscaletablefile= -none-
 # zyscaletablefile= -none-
 #    deltaphi= 4.0                     -- Arc and Ellipse Resolution [Degs]  #
 ##############################################################################
 ## Syntax:                                                                   #
 #  point= (Xi, Yi)                                                           #
 #  arc, radius= RADIUS, type= [clockwise | counterclockwise]                 #
 #       size= [small | large ]                                               #
 #       deltaphi= 5                                                          #
 #  ellipse, center= (X0, Y0), size= [small | large ]                         #
 #       deltaphi= 5                                                          #
 ##############################################################################
 # doit, return, help, list, reset, clear                                     #
 ##############################################################################
material=MAT:
whichcells
all, or a Material-Index.
whichcells=all, all Volume inside the
ggcylinder is assigned the Material-Index,
provided the former Material is not taboo.
If whichcells is a Material-Index, only the Parts of the
ggcylinder that are currently filled with the given Index
are assigned the new Material-Index.
taboo
none, or a Material-Index.
taboo=none, all Volume inside the
ggcylinder is assigned the Material-Index.
If taboo is a Material-Index, only the Parts of the
ggcylinder that are currently filled with another Index
than the given Index are assigned the new Material-Index.
originprime:
ggcylinder.
xprimedirection:
yprimedirection:
usezprimedirection= [yes|no]:
usezprimedirection= yes, the Axis of the Cylinder is not
computed from the Cross Product of xprimedirection and yprimedirection,
but is taken to be the Direction given by
zprimedirection= ( XZ, YZ, ZZ ).
zprimedirection= ( XZ, YZ, ZZ ):
usezprimedirection= yes, the Axis of the Cylinder has the
Direction given by
zprimedirection= ( XZ, YZ, ZZ ).
If usezprimedirection= no, the given Values are not used
and the Direction is given by the Cross Product of
xprimedirection and yprimedirection.
range:
xprimedirection,yprimedirection,(xprime
yprime), relative to
originprime.
pitch:
xexpgrowth, yexpgrowth
xslope, yslope:
xscaleprime, yscaleprime:
zxscaletablefile, zyscaletablefile:
inside:
ggcylinder
shall be assigned Material Index MAT, or
whether the Volume outside of it shall be changed.
show:
show=off, no Outline will be displayed.
show=later,
the Outline of the ggcylinder will be shown later, together
with Outlines of other specified Items.
If show=all is present,
the Outlines of all other specified Items bricks
gccylinders, ggcylinders and gbors
found in the Inputstream so far where show
was not off will be displayed.
fixpoints
point= (XI, YI):
XI, YI are the Coordinates of the i.th Point in the Polygon
that describes the Footprint of the ggcylinder.
There have to be minimum 3 Points,
or 2 Points and an Arc
or 2 Points and an Ellipse.
arc:
radius= RADIUS:
RADIUS
size= [small | large] (optional):
type= [clockwise | counterclockwise]:
deltaphi:
clear:
doit:
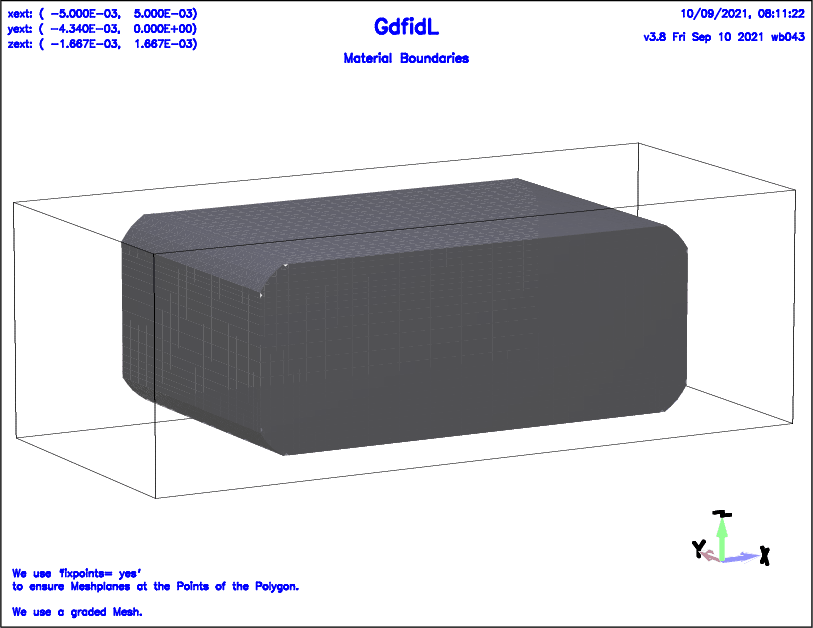
Example
The following decribes a Cavity with rounded Corners.
 # /usr/local/gd1/examples-from-the-manual/ggcylinder-example.gdf

 -general
    outfile= /tmp/UserName/example
    scratch= /tmp/UserName/scratch

    text()= We use 'fixpoints= yes'
    text()= to ensure Meshplanes at the Points of the Polygon.
    text()=
    text()= We use a graded Mesh.

 -mesh
    spacing= 100e-6
    graded= yes, dmaxgraded= 263.3e-6
    pxlow= -5e-3, pxhigh= 5e-3
    pylow= -4.34e-3, pyhigh= 0
    pzlow= -1.6665e-3, pzhigh= 1.6665e-3

    cxlow= ele, cxhigh= mag
    cylow= ele, cyhigh= mag
    czlow= ele, czhigh= ele

 -ggcylinder

    material= 7
    originprime= ( 0, 0, 0 )
    xprimedirection= ( 1, 0, 0 )
    yprimedirection= ( 0, 0, 1 )
    range= ( -4.2e-3, 4.2e-3 )

    clear  # Clear the Polygon-List, if any
    point= ( -3.3405e-3, -816.5e-6 )
       arc, radius= 500.0e-6, type= counterclockwise, size= small
    point= ( -2.8405e-3, -1.3165e-3 )
    point= (  2.8405e-3, -1.3165e-3 )
       arc
    point= (  3.3405e-3, -816.5e-6 )
    point= (  3.3405e-3,  816.5e-6 )
       arc
    point= (  2.8405e-3, 1.3165e-3 )
    point= ( -2.8405e-3, 1.3165e-3 )
       arc
    point= ( -3.3405e-3,  816.5e-6 )

    fixpoints= yes # Ensure Mesh-Planes at the Points of the Polygon.
    doit

 -volumeplot
    scale= 4
    doit
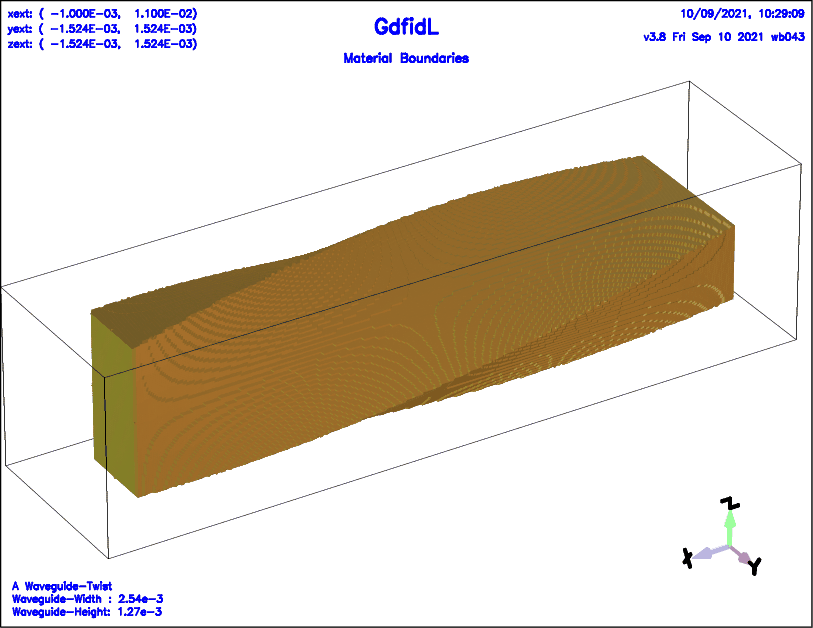
Example
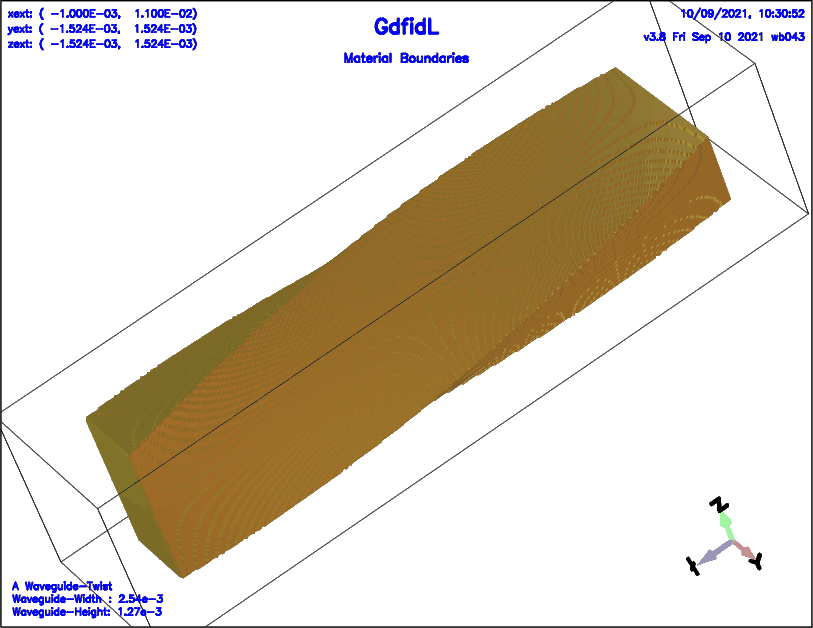
The following decribes a twisted rectangular Waveguide.
 # /usr/local/gd1/examples-from-the-manual/ggcylinder-twisted.gdf

 define(LargeNumber, 10000)

 define(LENGTH, 10e-3)
 define(WGW, 2.54e-3 )
 define(WGH, WGW/2 )

 -general
    outfile= /tmp/UserName/example
    scratch= /tmp/UserName/scratch

    text()= A Waveguide-Twist
    text()= Waveguide-Width : WGW
    text()= Waveguide-Height: WGH

 -mesh
    spacing= WGW/80
    pxlow= -1e-3, pxhigh= LENGTH+1e-3
    pylow= -WGW*0.6, pyhigh= 0.6*WGW
    pzlow= -WGW*0.6, pzhigh= 0.6*WGW


 define(EL, 10)
 -material, material= EL, type= electric
 -brick
    #
    # Fill the Universe with Metal:
    #
    material= EL
       volume= ( -LargeNumber, LargeNumber, \
                 -LargeNumber, LargeNumber, \
                 -LargeNumber, LargeNumber )
    doit

 -ggcylinder
    #
    # The twisted Waveguide.
    # We use a rectangular Footprint,
    # and specify a Pitch.
    # The Footprint shall rotate by -90 Degrees, over a length of LENGTH.
    #


    material= 0
    originprime= ( 0, 0, 0 )
    xprimedirection= ( 0, 1, 0 )
    yprimedirection= ( 0, 0, 1 )
    range= ( 0, LENGTH )
    pitch= -90/LENGTH

    clear  # Clear the previous Polygon-List, if any.
    point= ( -WGW/2, -WGH/2 )
    point= (  WGW/2, -WGH/2 )
    point= (  WGW/2,  WGH/2 )
    point= ( -WGW/2,  WGH/2 )
    doit

 -volumeplot
    eyeposition= ( 1, 2, 1.3 )
    scale= 4.5
    doit
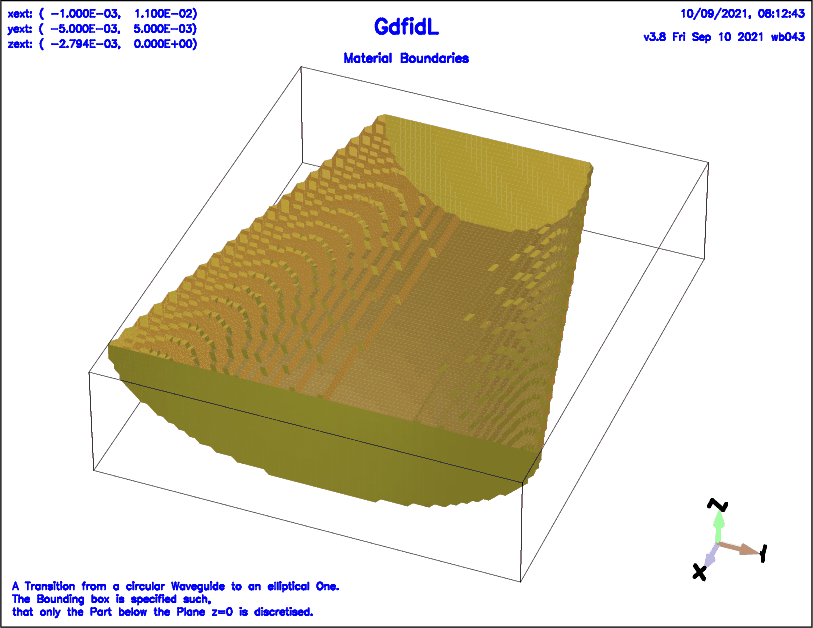
Example
The following decribes a Transition from a circular Waveguide to
an elliptical Waveguide.
 # /usr/local/gd1/examples-from-the-manual/ggcylinder-circular-to-elliptic.gdf

 define(LargeNumber, 10000)

 define(LENGTH, 10e-3)
 define(RADIUS1, 2.54e-3 ) define(RADIUS2, 5.0e-3  )
 -general
    outfile= /tmp/UserName/example
    scratch= /tmp/UserName/scratch

    text()= A Transition from a circular Waveguide to an elliptical One.
    text()= The Bounding box is specified such,
    text()= that only the Part below the Plane z=0 is discretised.

 -mesh
    spacing= RADIUS1/20
    pxlow= -1e-3, pxhigh= LENGTH+1e-3
    pylow= -RADIUS2*1.0, pyhigh= RADIUS2*1.0
    pzlow= -RADIUS1*1.1, pzhigh= 0


 define(EL, 10)
 -material, material= EL, type= electric
 -brick
    #
    # Fill the Universe with Metal:
    #
    material= EL
       volume= ( -LargeNumber, LargeNumber, \
                 -LargeNumber, LargeNumber, \
                 -LargeNumber, LargeNumber )
    doit

 -ggcylinder
    #
    # The Waveguide.
    # We use a circular Footprint,
    # and specify a Slope, different in x- and y
    #
    material= 0
    originprime= ( 0, 0, 0 )
    xprimedirection= ( 0, 1, 0 )
    yprimedirection= ( 0, 0, 1 )
    range= ( 0, LENGTH )
# xlingro 1+(RADIUS2/RADIUS1-1)/LENGTH
    xslope= (RADIUS2/RADIUS1-1)/LENGTH
    yslope= 0

    clear  # Clear the previous Polygon-List, if any.
    point= ( -RADIUS1, 0 )
      arc, radius= RADIUS1, size= large, type= counterclockwise
    point= (  RADIUS1, 0 )
      arc
    point= ( -RADIUS1, 0 )
    doit

 -volumeplot
    eyeposition= ( 2, 1, 1.8 )
    scale= 3
    doit
Example
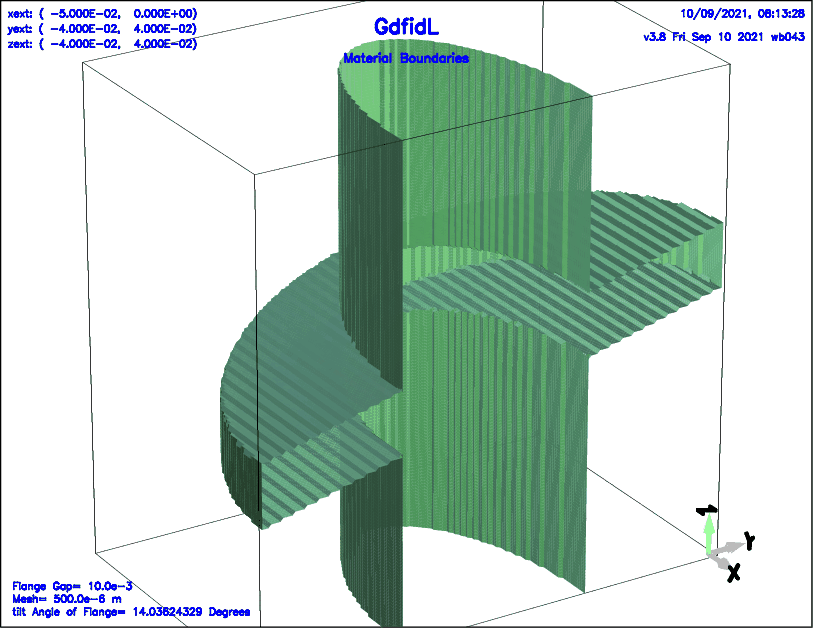
The following decribes a elliptical Wedge where the Axis of the ggcylinder
is in the z-Direction, while the Plane Normal of the Wedge is tilted.
 # /usr/local/gd1/examples-from-the-manual/ggcylinder-usezprimedirection.gdf

 define(INF, 1000)
 define(STPSZE, 0.5e-3)       # Define the Mesh Step Size, 0.5 mm

 #
 # Description of the Flange Geometry.
 #
 define(FlangeGap, 10e-3 )      # Gap of the Flange Joint.
 define(FlangeD0, 80e-3)        # Diameter of Gasket Seal.
 define(Width, FlangeGap/2 )    # 1/2 Width of Flange Gap in z-Axis.
 define(FlangeRadius, FlangeD0/2 )
 define(AxisA  , 70e-3/2 )      # 1/2 *major Diameter of interior Ellipse.
 define(AxisB  , 32e-3/2 )      # 1/2 *minor Diameter of interior Ellipse.

  #--- Parameters related to a tilted Flange Joint ---
 define(ZW, 10e-3)                      # z-Deviation from the y-Axis.
 define(Theta, atan(ZW/FlangeRadius) )  # Angle between y-Axis and y'-Axis.
 define(RR, FlangeRadius/cos(Theta) )   # Radius of the tilted Cylinder.
 define(LL, Width/cos(Theta) )          # Half Length of tilted Cylinder.


 ###
 ### We enter the Section "-general"
 ### Here we define the Name of the Database where the
 ### Results of the Computation shall be written to.
 ###    (outfile= )
 ### We also define what Names shall be used for Scratchfiles.
 ###    (scratchbase= )
 ###
 -general
    outfile= /tmp/UserName/bla
    scratch= /tmp/UserName/scratch-

    text()= Flange Gap= FlangeGap
    text()= Mesh= STPSZE m
    text()= tilt Angle of Flange= eval(Theta*180/@pi) [Degrees]

 ###
 ### We define the default Mesh-Spacing,
 ### we define the Borders of the computational Volume.
 ###
 define(Zmin, -4e-2)
 define(Zmax,  4e-2)
 -mesh
   spacing= STPSZE
   pxlow= -5e-2, pxhigh= 0
   pylow= -4e-2, pyhigh= 4e-2
   pzlow= Zmin, pzhigh= Zmax

 #####
 # Specify that the Material Index '3' describes a perfect conducting Material.
 -material, material= 3, type= electric

 ##
 ## Fill the Universe with Metal.
 ##
 -brick, material= 3, volume= ( -INF,INF, -INF,INF, -INF,INF ), doit

 ##
 ## Step 1: Carve out a tilted circular Box.
 ##
  -ggcylinder         # A Parallelogram Gap with a tilt Angle.
     material= 0
     origin= ( 0, 0, 0 )
     xprimedirection= ( 1, 0, 0 )
     yprimedirection= (0, cos(Theta), sin(Theta) )
 zprimedirection= ( 0, 0, 1 ), usezprimedirection= yes
     range= ( -LL, LL )

     clear
     point= ( -RR, 0 )
       arc, radius= RR,type= counterclockwise, size= small
     point= (  RR, 0 )
       arc, radius= RR,type= counterclockwise, size= smal
     point= ( -RR, 0 )
     show= later
     doit
 usezprimedirection= no # Switch back to the Default, 'no'.

##
## Step 2: Creating the interior Footprint of elliptic Beampipe(hollow)
##
-ggcylinder
   material= 0
   origin= ( 0, 0, 0 )
   xprimedirection= ( 1, 0, 0 )
   yprimedirection= ( 0, 1, 0 )
   range= (Zmin-2*STPSZE, Zmax+STPSZE)
   xslope= 0, yslope= 0

   clear  # Clear any old Polygon-Description of the Footprint.
    # point= (x', y')
   point= ( 0, -AxisB),
     ellipse, center= ( 0, 0 ),
   point= ( AxisA, 0 ),
     ellipse,
   point= ( 0, AxisB ),
     ellipse,
   point= ( -AxisA, 0 ),
     ellipse,
   point= ( 0, -AxisB ),
# show= all
   doit

 ############

 -volumeplot
    eyeposition= ( 1, -0.5, 0.5 )
    scale= 3
    doit
Example
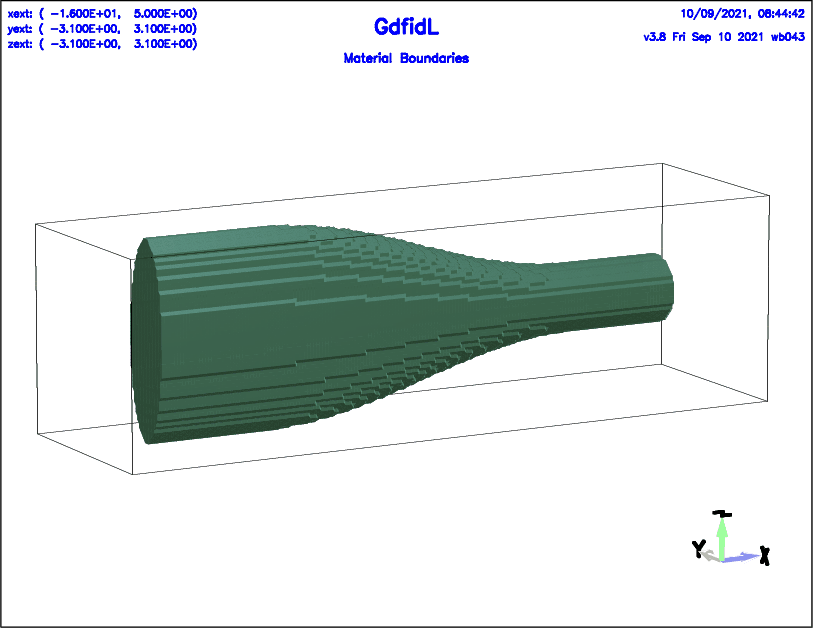
The following decribes a Cosine-Taper. The Cross-Section is specified as a
ggcylinder, the Cross Section is circular.
The xscale and yscale are specified via tables.
 # /usr/local/gd1/examples-from-the-manual/zxscale-example.gdf

 define(R1, 1 )
 define(R3, 3 )

 define(DR, 0.1*R1)

 -general
    outfile= /tmp/UserName/bla
    scratch= /tmp/UserName/scratch-

 -mesh
    spacing= R1 / 10
    pxlow=  -16, pxhigh= 5
    pylow = -(R3+DR), pyhigh= R3+DR
    pzlow = -(R3+DR), pzhigh= R3+DR

 # Compile the program which creates the Table.
 system( $FC Two-Cosine-Table.f90 )
 # Run the program which creates the table.
 system( ./a.out >  Two+Cosine-Table )

# The source Code looks like:
#    Pi= 4*ATAN(1.0)
#    z0= 0
#    zN= 10
#    N= 100
#    DO i= 1, N
#       z= z0 + (i-1)*(zN-z0) / (N-1)
#       WRITE (*,*) z, 2 - COS((z-z0) * Pi/(zN-z0))
#    END DO
#    END
#

##
## Create the tapered Beampipe.
##
 -ggcylinder
    material= 3
    origin= ( 0, 0, 0 )
    xprime= ( 0, 0, 1 )  # The x'-Direction.
    yprime= ( 0, 1, 0 )  # The y'-Direction.
                         # The z'-Direction is then implicitely the
                         # ( -1, 0, 0 ) Direction.
                         #    z' = x' cross y'
    range= ( -3, 14 )  # The Range of the z'-Values.

    # Filenames of the Tables.
    zxscale= Two+Cosine-Table
  ##  zyscale= -none-

    clear  # Clear any old Polygon-Description of the Footprint.
    #
    # This decribes a circular Footprint.
    #
     # point= (x', y')
    point= ( 0, -R1 )
      arc, radius= R1, type= clockwise, size= small
    point= ( 0,  R1 )
      arc
    point= ( 0, -R1 )
 # show= now
    doit

 -volumeplot, scale= 4, doit
gbor is a Body of Revolution with a Cross Section described
as a general Polygon.
This Cross Section is swept around some Axis in a general Direction.
Moreover, only Volume that fulfills some additional Condition
will be filled.
 ##############################################################################
 # Flags: nomenu, noprompt, nomessage,                                        #
 ##############################################################################
 # section -gbor                                                              #
 ##############################################################################
 # material       =  1                                                        #
 # whichcells     = all, taboo= none                                          #
 #     show       = off                 -- (off | all | later | now)          #
 #     name       = gbor-000000000                                            #
 # inside         = yes                 -- (yes|no)                           #
 # originprime    = ( 0.0, 0.0, 0.0 )                                         #
 # zprimedirection= ( 0.0, 0.0, 1.0 )                                         #
 # rprimedirection= ( 1.0, 0.0, 0.0 )                                         #
 # range          = ( 0.0, 360.0 )                                            #
 # xscaleprime    = 1.0                 -- Elliptic Coordinates.              #
 # yscaleprime    = 1.0                 -- Elliptic Coordinates.              #
 ##############################################################################
 ## Syntax:                                                                   #
 #  point= (Zi, Ri)                                                           #
 #  arc, radius= RADIUS, type= [clockwise | counterclockwise]                 #
 #       size= [small | large ]                                               #
 #       deltaphi= 5                                                          #
 #  ellipse, center= (Z0, R0), size= [small | large ]                         #
 #       deltaphi= 5                                                          #
 ##############################################################################
 # doit, return, help, list, reset, clear                                     #
 ##############################################################################
material= MAT:
whichcells
all, or a Material-index.
whichcells=all, all Volume inside the
gbor is assigned the Material-index,
provided the former Material is not taboo.
If whichcells is a Material-index, only the Parts of the
gbor that are currently filled with the given Index
are assigned the new Material-Index.
taboo
none, or a Material-index.
taboo=none, all Volume inside the
gbor is assigned the Material-index.
If taboo is a Material-index, only the Parts of the
gbor that are currently filled with another Index
than the given Index are assigned the new Material-Index.
originprime:
gbor.
zprimedirection:
gbor.
rprimedirection:
range:
xscaleprime, yscaleprime:
inside:
gbor
shall be assigned the Material Index MAT, or
whether the Volume outside of it shall be set to the
Material Index MAT.
show:
show=off, no Outline will be displayed.
show=later,
the Outline of the gbor will be shown later, together
with Outlines of other specified Items.
If show=all is present,
the Outlines of all other specified Items bricks
gccylinders, ggcylinders and gbors
found in the Inputstream so far where show
was not off will be displayed.
point= (XI, YI):
XI, YI are the Coordinates of the i.th Point in the Polygon
that describes the Polygon of the gbor.
There have to be minimum 3 Points,
or 2 Points and an Arc
or 2 Points and an Ellipse.
arc:
radius= RADIUS:
RADIUS
size= [small | large] (optional):
type= [clockwise | counterclockwise]:
deltaphi:
clear:
doit:
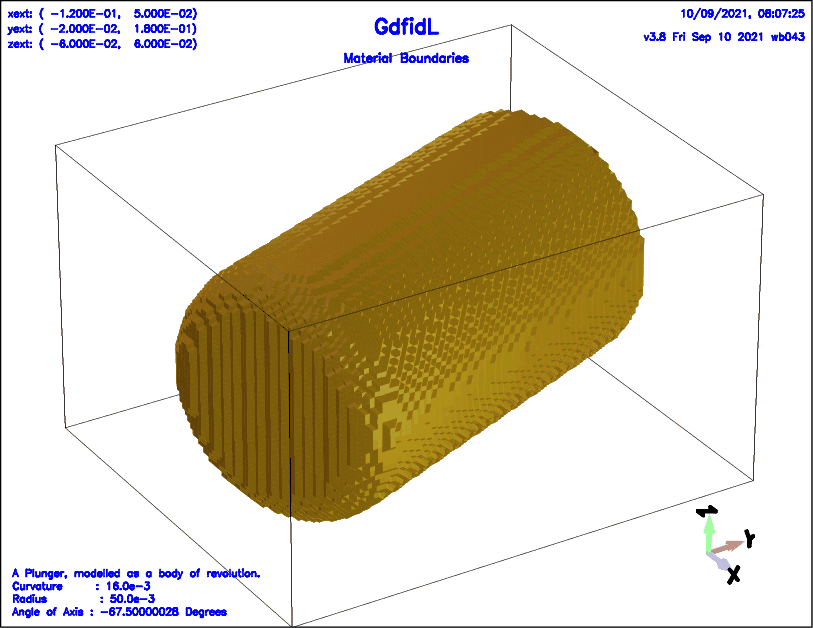
 # /usr/local/gd1/examples-from-the-manual/plunger0.gdf

 define(PlungerInnerRadius, 100e-3/2 )
 define(PlungerCurvature, 16e-3 )
 define(PlungerAngle, -67.5*@pi/180 )

 -general
    outfile= /tmp/UserName/example
    scratch= /tmp/UserName/scratch-

    text()= A Plunger, modelled as a body of revolution.
    text()= Curvature     : PlungerCurvature
    text()= Radius        : PlungerInnerRadius
    text()= Angle of Axis : eval(PlungerAngle * 180 / @pi) Degrees

 -mesh
    spacing= 0.2e-2
    pxlow= -0.12, pxhigh= 0.05
    pylow= -0.02, pyhigh= 0.18
    pzlow= -6e-2, pzhigh= 6e-2

 -gbor
     material= 4
     originprime= ( 0, 0, 0 )
     zprimedirection= ( cos(PlungerAngle), sin(PlungerAngle), 0 )
     rprimedirection= ( 0, 0, 1 )
     range= ( 0, 360 )

     clear
        # point= ( z, r )
     point= ( 0, 0 )
     point= ( 0, PlungerInnerRadius-PlungerCurvature )
        arc, radius= PlungerCurvature, size= small, type= counterclockwise
     point= ( -PlungerCurvature, PlungerInnerRadius )
     point= ( -170e-3, PlungerInnerRadius )
     point= ( -170e-3, 0 )
# show= now
     doit

 -volumeplot, eyeposition= ( 1, -0.5, 0.6 )
     scale= 3
     doit
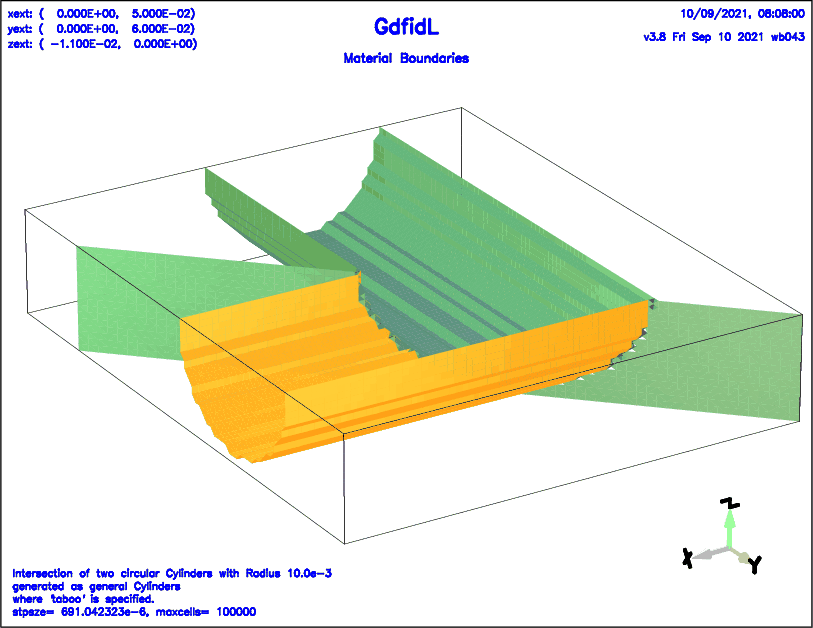
 # /usr/local/gd1/examples-from-the-manual/gbor-example1.gdf
define(LargeNumber, 10000)       # some big number

define(MAXCELLS, 1e+5)

define(XLOW, 0) define(XHIGH, 5e-2)
define(YLOW, 0) define(YHIGH, 6e-2)
define(ZLOW, -1.1e-2) define(ZHIGH, 0)

define(STPSZE, ((XHIGH-XLOW)*(YHIGH-YLOW)*(ZHIGH-ZLOW)/MAXCELLS)**(1/3) )

 -mesh
    volume= ( XLOW, XHIGH, \
              YLOW, YHIGH, \
              ZLOW, ZHIGH )

    spacing= STPSZE

 -general
    outfile= /tmp/UserName/example
    scratch= /tmp/UserName/scratch
 define(R, 1.0e-2)
    text()= Intersection of two circular Cylinders with Radius R
    text()= generated as general Cylinders
    text()= where 'taboo' is specified.
    text()= stpsze= STPSZE, maxcells= MAXCELLS

#
# Fill the Universe with Metal.
#
 -brick
    material= 1
    volume= ( -LargeNumber, LargeNumber, \
              -LargeNumber, LargeNumber, \
              -LargeNumber, LargeNumber )
    doit

#
# First Step,
# fill Cells above the Diagonal with Material 3.
# these Cells will not be filled by the first circular Cylinder,
# since we will specify 'taboo= 3'.
#
#
 -ggcylinder
    material= 3,
    origin= ( 0, 0, 0 ), xprime= ( 1, 0, 0 ), yprime= ( 0, 1, 0 ),
    range= ( ZLOW, ZHIGH ),

    clear
    point= ( XLOW, YLOW ), point= ( XLOW, YHIGH ),
    point= ( XLOW+(YHIGH-YLOW), YLOW )

    doit

#
# Second Step:
# Fill a circular Cylinder in x-Direction,
# but NOT Cells with Material Index 3 (taboo=3).
#
 -ggcylinder
    material= 0, taboo= 3,
    xprime= ( 0, 1, 0 ), yprime= ( 0, 0, 1 ),  # So the Axis will be in +x.
    origin= ( 0, 4e-2, 0 ),                    # Shift of Origin.
    range= ( XLOW, XHIGH ),

    clear
       point= ( -R, 0 ),
         arc, radius= R, type= counterclockwise,
       point= ( 0, -R ),
         arc, radius= R,
       point= ( R, 0 ),
    doit

#
# Third Step:
# Fill a circular Cylinder in y-Direction,
# but ONLY Cells with Material Index 3 (whichcells=3).
#
 -ggcylinder
    material= 0, whichcells= 3, taboo= none
    xprime= ( 1, 0, 0 ), yprime= ( 0, 0, -1 ),  # So the Axis will be in +y.
    origin= ( 2.e-2, 0, 0 ),                    # Shift of Origin.
    range= ( YLOW, YHIGH ),

    clear
       point= ( -R, 0 ),
          arc, radius= R, type= clockwise,
       point= ( 0, R ),
          arc, radius= R,
       point= ( R, 0 ),
    doit

 -volumeplot
    eyeposition= ( 1, 2, 1 )
    scale= 3.5
    doit
# /usr/local/gd1/examples-from-the-manual/gbor-example.gdf
define(MaxCells, 2e+6)
#
# define the geometry parameters
#
define(RBeamTube, 4.7625e-2)
define(RCurve, 1.0e-2)
define(ZGapNose, 10.9e-2)
define(RLarge, 25.0e-2) define(RSmall, 15.0e-2) define(RCenter, 10.0e-2)
define(INF, 10000) define(EL, 1) define(MAG, 2)
define(XLOW, -0.250) define(XHIGH, 0.250)
define(YLOW, -0.250) define(YHIGH, 0.250)
define(ZLOW, -0.200) define(ZHIGH, 0.200)
define(STPSZE, ((XHIGH-XLOW)*(YHIGH-YLOW)*(ZHIGH-ZLOW)/MaxCells)**(1/3) )
#
# gdfidl can evaluate sin(), cos(), atan() and X**Y
# definition of functions degsin() and degcos()
#
sdefine(degsin, [sin((@arg1)*@pi/180)])
sdefine(degcos, [cos((@arg1)*@pi/180)])
sdefine(degtan, [sin((@arg1)*@pi/180)/cos((@arg1)*@pi/180)])
-general
outfile= /tmp/UserName/example
scratch= /tmp/UserName/scratch-
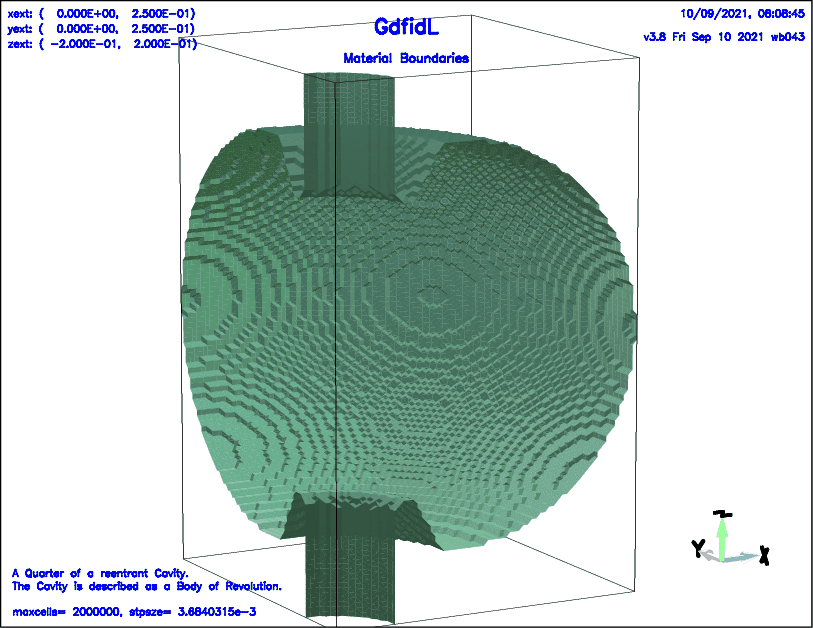
text(3)= A Quarter of a reentrant Cavity.
text()= The Cavity is described as a Body of Revolution.
text()=
text()= maxcells= MaxCells, stpsze= STPSZE
-mesh
pxlow= 0*XLOW, pxhigh= 1*XHIGH
pylow= 0*YLOW, pyhigh= 1*YHIGH
pzlow= 1*ZLOW, pzhigh= 1*ZHIGH
cxlow= mag, cxhigh= mag
cylow= mag, cyhigh= mag
czlow= ele, czhigh= ele
spacing= STPSZE
-material
material= 3, type= electric
-brick
#
# We fill the Universe with Metal.
#
material= 3
volume= ( -INF,INF, -INF,INF, -INF,INF )
doit
#
# We carve out the Cavity.
#
-gbor
material= 0, range= ( 0, 360 )
origin= ( 0, 0, 0 )
show= later, # Do not show now, but show later.
clear # Clear a previous Polygon List.
point= ( 0 , 0 ),
point= ( ZHIGH+2*STPSZE , 0 ),
point= ( ZHIGH+2*STPSZE , RBeamTube ),
point= ( ZGapNose+RCurve, RBeamTube ),
arc, radius= RCurve, size= small, type= clockwise,
deltaphi= 10
define(rdum, RBeamTube+(1+degcos(30))*RCurve)
define(zdum, ZGapNose +(1-degsin(30))*RCurve)
point= ( zdum, rdum )
define(deltaz, RSmall-zdum)
define(deltar, deltaz*degtan(30))
define(ffac, 0.85) ## adjust this for a smooth transition
define(zdum2, zdum+ffac*deltaz)
define(rdum2, rdum+ffac*deltar)
point= ( zdum2, rdum2 )
arc, radius= RCurve, size= small, type= counterclockwise,
deltaphi 10
point= ( RSmall, RCenter-0.8*RCurve ),
point= ( RSmall, RCenter ),
arc, radius= RSmall, size= small, type= counterclockwise,
delta= 3
point= ( -RSmall, RCenter ),
point= ( -RSmall, RCenter-0.8*RCurve ),
arc, radius= RCurve, size= small, type= counterclockwise,
deltaphi= 10
point= ( -zdum2, rdum2 )
point= ( -zdum, rdum )
arc, radius= RCurve, size= small, type= clockwise, delta 10
point= ( -(ZGapNose+RCurve), RBeamTube ),
point= ( ZLOW-2*STPSZE, RBeamTube ),
point= ( ZLOW-2*STPSZE, 0 )
list
doit
#
# Enforce some Meshplanes:
#
-mesh
zfixed( 2, -(ZGapNose+RCurve), -ZGapNose ) # At the Noses.
zfixed( 2, (ZGapNose+RCurve), ZGapNose ) # At the Noses.
zfixed( 2, -RSmall, RSmall) # At the z-Borders of the Cavity.
-volumeplot
scale= 3
doit
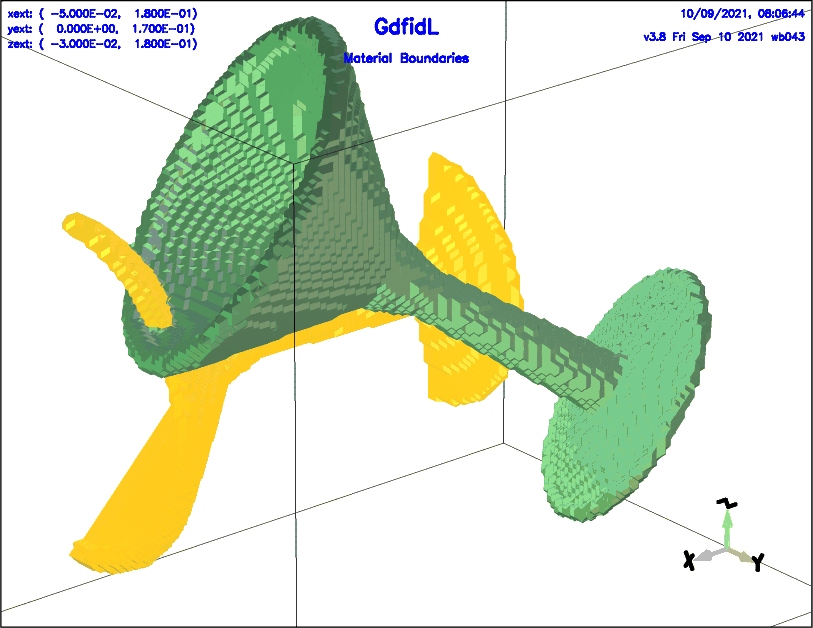
Example
The following describes two Bodies of Revolution that look similiar to Glasses.
The Shape is only specified once, but two different Glasses
are generated by varying 'zprime' and 'rprime'
 # /usr/local/gd1/examples-from-the-manual/gbor-glasses.gdf

define(MAXCELLS,1e+6)

define(XLOW,-5e-2) define(XHIGH,18e-2)
define(YLOW,-0e-2) define(YHIGH,17e-2)
define(ZLOW,-3e-2) define(ZHIGH,18e-2)
define(STPSZE, ((XHIGH-XLOW)*(YHIGH-YLOW)*(ZHIGH-ZLOW)/MAXCELLS)**(1/3) )

 -general
    outfile= /tmp/UserName/glasses
    scratch= /tmp/UserName/glasses-scratch-

 -mesh
    spacing= STPSZE
    volume= ( XLOW, XHIGH, \
              YLOW, YHIGH, \
              ZLOW, ZHIGH )

# Fill the Universe with Vacuum.
 define(LargeNumber,10000)
 -brick
     material= 0
        volume= ( -LargeNumber, LargeNumber, \
                  -LargeNumber, LargeNumber, \
                  -LargeNumber, LargeNumber )
     doit

 #
 # The Glasses:
 #
  -gbor

     #
     # Definition of the Cross-Section:
     #
     clear
     point= (  0.7e-2,      0 ),
     point= (       0, 4.0e-2 ),
       arc, radius=0.25e-2, size= large, type= clockwise
     point= (  0.3e-2, 4.0e-2 ),
     point= (  1.0e-2, 1.0e-2 ),
     point= (  8.0e-2, 0.8e-2 ),
     point= ( 10.0e-2, 1.4e-2 ),
     point= ( 15.0e-2, 6.0e-2 ),
       arc, radius= 0.4e-2, type= clockwise
     point= ( 15.2e-2, 5.4e-2 ),
     point= ( 10.0e-2,      0 )

     #
     # That Cross-Section is used twice,
     # with different Parameters for origin, zprime etc..
     #

     material= 1,
     origin= ( -2e-2, 0, 4e-2 ),
     zprimedir= ( 1, 0, 0 ),
     rprimedir= ( 0, 1, 0 ),
     range= ( -90, 90 ),
 ##    show= now
     doit                 # This 'doit' generates the first 'glass'.


     material= 3
     origin= ( 0, 12e-2, 4e-2 ),
     zprimedir= ( 1, -0.5, 0.7 ),
     rprimedir= ( 0, 1, 0 ),
     range= ( 0, 360 ),
 ##    show= all
     doit                 # This 'doit' generates the second 'glass'

 -volumeplot
     eyeposition= ( 0.7, 1, 0.5 )
     scale= 4
    doit
The so described Body can be rotated, shrunk or expanded and shifted.
 ##############################################################################
 # Flags: nomenu, noprompt, nomessage,                                        #
 ##############################################################################
 # section -stlfile                                                           #
 ##############################################################################
 # file= /usr/local/gd1/examples/woman.stl                                    #
 # material  =  1                                                             #
 # whichcells= all, taboo= none, nboundaries=  1                              #
 # originprime    = ( 0.0, 0.0, 0.0 )                                         #
 # xprimedirection= ( 1.0, 0.0, 0.0 )                                         #
 # yprimedirection= ( 0.0, 1.0, 0.0 )                                         #
 # xscale= 1.0                                                                #
 # yscale= 1.0                                                                #
 # zscale= 1.0                                                                #
 # debend = no                          -- debend Description around uAxis    #
 #    uaxis= z                          -- [xyz] : Direction of debend-Axis   #
 #    radius= 0.0                                                             #
 #    v0    = 0.0                       -- v0, w0: Coordinates of the Axis.   #
 #    w0    = 0.0                                                             #
 # show   = no                          -- ( yes | no )                       #
 #    plotbbox= ( -1.0e+30, 1.0e+30,  \                                       #
 #                -1.0e+30, 1.0e+30,  \                                       #
 #                -1.0e+30, 1.0e+30 )                                         #
 # ----- Fixed Planes from Analysis of Patches Normals:                       #
 # xfixed= no                           -- ( yes | no )                       #
 #     dx= auto                         -- Treshold                           #
 #    xda= auto                         -- Treshold                           #
 # yfixed= no                           -- ( yes | no )                       #
 #     dy= auto                         -- Treshold                           #
 #    yda= auto                         -- Treshold                           #
 # zfixed= no                           -- ( yes | no )                       #
 #     dz= auto                         -- Treshold                           #
 #    zda= auto                         -- Treshold                           #
 ##############################################################################
 # doit, return, help                                                         #
 ##############################################################################
file= NAME_OF_STLFILE:
material= MAT:
whichcells
all, or a Material-Index.
whichcells=all, all Volume inside the
STL-Body is assigned the Material-Index,
provided the former Material is not taboo.
If whichcells is a Material-Index, only the Parts of the
STL-Body that are currently filled with the given Index
are assigned the new Material-Index.
taboo
none, or a Material-Index.
taboo=none, all Volume inside the
STL-Body is assigned the Material-Index.
If taboo is a Material-Index, only the Parts of the
STL-Body that are currently filled with another Index
than the given Index are assigned the new Material-Index.
nboundaries= [1,2]
debend= [yes|no]
uaxis= [x|y|z]
debend=yes. The Axis around which the Body is bended.
radius= NUMBER
debend=yes. The bending Radius.
v0= NUMBER, w0= NUMBER
debend=yes. The Coordinates of the bending Axis.
originprime= (X0, Y0, Z0): xprimedirection= (XXN, XYN, XZN): yprimedirection= (YXN, YYN, YZN): xscale= XS, yscale= YS, zscale= ZS:
The Coordinates of a Point P of the STL-set are now transformed via
            P <= (A) * P
            P_x <= P_x * xscale + X0
            P_y <= P_y * yscale + Y0
            P_z <= P_z * zscale + Z0
show= [yes|no] :
plotbbox= (X0,X1, Y0,Y1, Z0,Z1) :
show=yes, ie. when a Plot of the read Triangles is done,
only the Triangles within these Borders are shown.
xfixed= [yes|no], yfixed= [yes|no], zfixed= [yes|no] :
xfixed=yes, the Triangles are analysed and fixed Meshplanes
are inserted where a significant Fraction of Triangles with Plane-Normal
in x-Direction are.
yfixed=yes: The Corresponding for y-directed Plane-Normals.
zfixed=yes: The Corresponding for z-directed Plane-Normals.
doit:
Example
 # /usr/local/gd1/examples-from-the-manual/stl-example2.gdf

 -mesh
     spacing= 1
     volume= ( 0,200, 0,130, -200,0 )

 -stlfile
     file= /usr/local/gd1/examples/wagner60kASTL.stl
     xprime= ( 1, 0, 0 )
     yprime= ( 0, 0, -1 )
     material= 1, taboo= none
##     show= yes,
     doit

 -volumeplot, scale= 2.5, eyepos= ( 1, 2, 0.5), doit
 # /usr/local/gd1/examples-from-the-manual/stl-example-debend.gdf

 define(FILE, dipchamSTL00)
 define(INF, 10000)

 define(SIGMA, 10e-3)
 define(STPSZE, SIGMA/5 )
 define(TRAILER, 68*SIGMA)
 define(OFFSET,20e-3)

 define(A,    300.0e-3)
 define(B,    400.0e-3)

 define(ZYL1, 120e-3)

###############################################################

 -general
   outfile= /tmp/UserName/bla
   scratch= /tmp/UserName/scratch-
   text()= stpsze= STPSZE
   text()= sigma= SIGMA, sigma/stpsze= eval(SIGMA/STPSZE)
   text()= charge= CHARGE, RDV
   text()= offset= OFFSET

###############################################################
 -mesh
   pxlow= -ZYL1+40e-3, pxhigh= ZYL1+100e-3
   pylow= -ZYL1,     pyhigh= ZYL1
   pzlow= 2e-3,     pzhigh= 398e-3
   pzhigh= 1.59

   spacing= STPSZE

#########################################################################
-material
  material= 3, type= electric

-brick
  #
  # Fill the universe with metal.
  #
  material= 1, name= Background
     volume= (-INF,INF, -INF,INF, -INF,INF)
  doit
################################################################

-stlfile
   file= /usr/local/gd1/examples-from-the-manual/DP_VAC_Xapa.stl
   material= 0, whichcells= all, taboo= none
    #
    # The stl-file does not describe the volume filled with vacuum,
    # but the metal body.
    # To model the vacuum part, we use a trick:
    # We say that the number of triangles that are to be crossed
    # when going from inside the body to outside of the body
    # (to infinity) has to be a multiple of two.
    #
   nboundaries= 2

# define(UA, 1)
 define(UA, 2)
# define(UA, 3)
   if (UA == 2) then
      originprime = ( 0, 0, -6093e-3 )
      xprimedirection= ( 0, 0, 1 )
      yprimedirection= ( 1, 0, 0 ) # axis= +y
   elseif (UA == 1) then
      originprime = ( 0, -6093e-3, 0 )
      xprimedirection= ( 0, 1, 0 )
      yprimedirection= ( 1, 0, 0 ) # axis= -z
   else
      originprime=  ( 0, -6093e-3, 0 )
      xprimedirection= ( 0, 1, 0 )
      yprimedirection= ( 0, 0, 1 ) # axix= +x
   end if
   xscale= 1e-3
   yscale= 1e-3
   zscale= 1e-3
   if (1) then
      #
      # The geometry is a dipole chamber.
      # The charge in reality travels over a circular path.
      # As GdfidL can only compute wakepotentials when the
      # exciting charge and the witness charges are traveling
      # in + z-direction, we de-bend the geometry such that the
      # originaly arc-like beampipe is straight.
      #
      debend= yes
      if (UA == 2) then
         uaxis= y # (u,v,w) = (y,z,x)
         radius= 8.25
         v0= 0
         w0= -8.25
      elseif (UA == 1) then
         uaxis= z # (u,v,w) = (z,x,y)
         radius= 8.25
         v0= -8.25
         w0= 0
      else
         uaxis= x # (u,v,w)= (x,y,z)
         radius= 8.25
         v0= 0
         w0= -8.25
      end if
   end if

##   show= yes
   doit

#########################################################################
-volumeplot
      scale= 4
  roty= 90
  bbylow= 0.
      doit
# end

##########################################################################

#
# Wake-Parameters.
#
 -fdtd
  -ports
    name= lower_end, plane= zlow,   modes= 0, npml= 20, doit
    name= upper_end, plane= zhigh,  modes= 0, npml= 20, doit

 -lcharge
    xpos    = OFFSET
    ypos    = 0
    charge  = 1e-12
    sigma   = SIGMA
    shigh   = 12*SIGMA +TRAILER
##    showdata= yes

# -fdtd, doit
 |
 ##############################################################################
 # Flags: nomenu, noprompt, nomessage,                                        #
 ##############################################################################
 # section -geofunction                                                       #
 ##############################################################################
 # material  =  1                                                             #
 # whichcells= all, taboo= none                                               #
 # fdescriptionsubroutine=-none-
 # a1= 0.0,                             b1= 0.0                               #
 # a2= 0.0,                             b2= 0.0                               #
 # a3= 0.0,                             b3= 0.0                               #
 # a4= 0.0,                             b4= 0.0                               #
 # a5= 0.0,                             b5= 0.0                               #
 # a6= 0.0,                             b6= 0.0                               #
 # a7= 0.0,                             b7= 0.0                               #
 # a8= 0.0,                             b8= 0.0                               #
 # a9= 0.0,                             b9= 0.0                               #
 ##############################################################################
 # doit, return, help                                                         #
 ##############################################################################
material:
whichcells:
taboo= [none|0..50]:
fdescriptionsubroutine= NAME-OF-A-SHARED-OBJECT:
 SUBROUTINE fgeosub( Point, AArray, IsIn )
 DOUBLE PRECISION, INTENT(IN), DIMENSION(1:3)  :: Point
 DOUBLE PRECISION, INTENT(IN), DIMENSION(1:20) :: AArray
 INTEGER,          INTENT(INOUT) :: In
The Point Parameter are the cartesian Components of the Point, the AArray Parameter are the numbers a1..a9, b1..b9, and the IsIn Parameter is to be computed. It shall be Zero, if the Point is NOT in the Body.
doit:
 # /usr/local/gd1/examples-from-the-manual/geofunction-example.gdf
 -general
    outfile= /tmp/UserName/geofunction
    scratch= /tmp/UserName/scratch

 -mesh
    spacing= 0.02e-3
    pxlow= -3e-3, pxhigh= 3e-3
    pylow= -3e-3, pyhigh= 3e-3
    pzlow= 0, pzhigh= 5e-3
  czlow= magnetic, czhigh= magnetic
  pylow= 0, cylow= magnetic

 -brick
    material= 0, whichcells= all, taboo= none
    volume= ( -INF,INF, -INF,INF, -INF,INF )
    doit

    # Fill Parts of the Universe which shall later be described
    # by the 'geofunction'.
 -brick
    material= 10
    xlow= -1e-3, xhigh= 1e-3
    ylow= -INF, yhigh= INF
    zlow= -INF, zhigh= INF
  sloppy= yes
    doit
    xlow= -INF, xhigh= INF
    ylow= -1e-3, yhigh= 1e-3
    doit
  sloppy= no

 system( ifort -O3 -fPIC -auto -c \
            ./PointInsideFunction.f90 )
 system( gcc -fPIC -shared -Wl,-soname,PointInsideFunction.so \
           -o /tmp/PointInsideFunction.so PointInsideFunction.o )

 define(VAL, 1)
 -geofunction
    #
    # If this Inputfile is to be used with PVM/MPI,
    # each Task will try to load the Shared Object.
    # We assume here, /tmp/ is accessible by each Task.
    #
    fdescriptionsubroutine= /tmp/PointInsideFunction.so
    material= 3, whichcells= 10, taboo= none
## whichcells= all
    a1= 1              # Key
    a2= 1825283, a3= 692618, a4= 0.7 * 3.28e-3, a5= 0,
    a8= 1              # Key: Pot gt val
    a9= VAL            # Aequipotential-Value
   doit

    material= 4
    a8= -1              # Key Pot lt val
    a9= -VAL            # Aequipotential-Value
   doit

 -brick, material= 0, whichcells= 10
         volume= ( -INF,INF, -INF,INF, -INF,INF ), doit

 -material
    material= 3, type= electric
    material= 4, type= electric
    material= 10, type= electric

 -volumeplot, scale= 4, eyepos ( -1, -2, 3 ), doit

 -eigenvalues
    estimation= 100e9
#    doit
The Sourcecode PointInsideFunction.f90:
 SUBROUTINE fgeosub( Point, A, In )

 DOUBLE PRECISION, INTENT(IN), DIMENSION(1:3)  :: Point
 DOUBLE PRECISION, INTENT(IN), DIMENSION(1:20) :: A
 INTEGER,          INTENT(INOUT) :: In

 DOUBLE PRECISION :: Pi, Phi, P
 DOUBLE PRECISION :: x, y, z, z0, z1, zz, az, rmz, oodL, a01, a10

    Pi= 4*ATAN(1.0d0)

    IF (NINT(A(1)) == 1) THEN
       x= Point(1)
       y= Point(2)
       z= Point(3)
       P = A(4)+A(5)*z
       Phi= A(2)*(x**2-y**2) &
          + A(3)*(x**2+y**2+(P/Pi)**2)*wbCos(2*Pi*z/P)

       IF (A(8) > 0) THEN
          IF (Phi > A(9)) THEN
             In= 1
          ELSE
             In= 0
          END IF
       ELSE
          IF (Phi < A(9)) THEN
             In= 1
          ELSE
             In= 0
          END IF
       END IF
    ELSE IF (NINT(A(1)) == 2) THEN

! a1,a2,a3,a4,a5,a6,a7,a8,a9 => A( 1: 9)
! b1,b2,b3,b4,b5,b6,b7,b8,b9 => A(11:19)

!      Period described as a Polinomial
!      Amplitude described as a Polinomial

       x= Point(1)
       y= Point(2)
       z= Point(3)
       z0= A(2)
       z1= A(3)
!c      write (*,*) ' a(1:9):', a(1:9)
!c      write (*,*) ' a(11:19):', a(11:19)
       IF ((z < z0) .OR. (z > z1)) THEN
          In= 0
          RETURN
       END IF
       zz= z-z0
       oodL= 1 / (z1-z0)
       P = A(4) +zz*(A(5)-A(4))*oodL
       az= A(6) +zz*(A(7)-A(6))*oodL
       rmz= A(8)+zz*(A(9)-A(8))*oodL
       a10= (rmz**2-1) &
          / (2*(rmz*az)**2+(rmz**2+1)*(P/Pi)**2)
       a01= ((rmz**2+1)*az**2+2*(P/Pi)**2) &
          / (2*(rmz*az)**2+(rmz**2+1)*(P/Pi)**2) &
          / az**2
       Phi= a01*(x**2-y**2) &
          + a10*(x**2+y**2+(P/Pi)**2)*wbCos(2*Pi*zz/P)

       IF (A(11) > 0) THEN
          IF (Phi > A(12)) THEN
             In= 1
          ELSE
             In= 0
          END IF
       ELSE
          IF (Phi < A(12)) THEN
             In= 1
          ELSE
             In= 0
          END IF
       END IF

    ELSE
       In= 0
    END IF

 CONTAINS

    DOUBLE PRECISION FUNCTION wbCos( x )
    DOUBLE PRECISION, INTENT(IN) :: x

    DOUBLE PRECISION :: xx
    INTEGER :: iSign

       xx= ABS(x)
       DO WHILE (xx > 2*Pi)
          xx= xx - 2*Pi
       END DO

       IF (xx > Pi) THEN
          iSign= -1
          xx= xx - Pi
       ELSE
          iSign= 1
       END IF

       IF (xx > Pi/2) THEN
          iSign= -iSign
          xx= Pi - xx
       END IF


       wbCos= iSign* &
           (1 - xx**2/2 + xx**4/(2*3*4) - xx**6 / (2.*3.*4.*5.*6.) )
       !!       + xx**8 / (2.*3.*4.*5.*6.*7.*8.) &
       !!       - xx**10 / (2.d0*3.d0*4.d0*5.d0*6.d0*7.d0*8.d0*9.d0*10.d0) )

    END FUNCTION wbCos

 END SUBROUTINE fgeosub
 ##############################################################################
 # Flags: nomenu, noprompt, nomessage,                                        #
 ##############################################################################
 # Section: -transform                                                        #
 ##############################################################################
 # -translate                                                                 #
 # -rotate                                                                    #
 #                                                                            #
 # Matrix:                                                                    #
 #     1.00000000    ,    0.00000000    ,    0.00000000    ,    0.00000000    #
 #     0.00000000    ,    1.00000000    ,    0.00000000    ,    0.00000000    #
 #     0.00000000    ,    0.00000000    ,    1.00000000    ,    0.00000000    #
 #     0.00000000    ,    0.00000000    ,    0.00000000    ,    1.00000000    #
 ##############################################################################
 # reset, ?, return, help                                                     #
 ##############################################################################
-translate:
-rotate:
reset:
 ##############################################################################
 # Flags: nomenu, noprompt, nomessage,                                        #
 ##############################################################################
 # Section: -translate                                                        #
 ##############################################################################
 # offset= ( 0.0, 0.0, 0.0 )                                                  #
 #                                                                            #
 ##############################################################################
 # doit, ?, return, help                                                      #
 ##############################################################################
offset:
doit:
 ##############################################################################
 # Flags: nomenu, noprompt, nomessage,                                        #
 ##############################################################################
 # Section: -rotate                                                           #
 ##############################################################################
 # axis= ( 0.0, 0.0, 1.0 )                                                    #
 # angle= 90.0                                                                #
 # Matrix:                                                                    #
 #     1.00000000    ,    0.00000000    ,    0.00000000    ,    0.00000000    #
 #     0.00000000    ,    1.00000000    ,    0.00000000    ,    0.00000000    #
 #     0.00000000    ,    0.00000000    ,    1.00000000    ,    0.00000000    #
 #     0.00000000    ,    0.00000000    ,    0.00000000    ,    1.00000000    #
 ##############################################################################
 # doit, ?, return, help                                                      #
 ##############################################################################
axis:
angle:
doit:
Example
 -general
     outfile= /tmp/UserName/bla
     scratch= /tmp/UserName/scratch

 -mesh
     spacing= 5e-3
     pxlow= -0.4, pxhigh= 0.3
     pylow= -0.3, pyhigh= 0.3
     pzlow= -0.1, pzhigh= 0.4

 -transform, reset

 -brick
     material= 0
     volume= ( -BIG,BIG, -BIG,BIG, -BIG,BIG )
     doit

 #
 # Translate all subsequent Items by (0.1, 0, 0).
 #
 -translate, offset= ( 1/10, 0, 0 ), doit

 -brick
    material= 1
    name= brick1
    xlow= 0, xhigh= 0.1
    ylow= 0, yhigh= 0.2
    zlow= 0, zhigh= 0.3
    doit

 #
 # Additionally to the initial Translation,
 # rotate by 90 Degrees around the (0,0,1)-Axis,
 # then rotate 20 Degrees around the (0,1,0)-Axis,
 #
 -rotate,
     axis= ( 0, 0, 1 ), angle= 90, doit
     axis= ( 0, 1, 1 ), angle= 20, doit

 #
 # Next Brick, most Parameters as the first One,
 # but additionally to the Translation now also rotated.
 #
 -brick, material= 2, name= brick2, doit

 #
 # Next Rotation, same Parameters.
 # Because the Rotations etc are all performed,
 # subsequent Items are translated once and rotated now four times.
 #
 -rotate,
     axis= ( 0, 0, 1 ), angle= 90, doit
     axis= ( 0, 1, 1 ), angle= 20, doit

 # Next Brick, except for 'material', the same Parameters as the previous Brick.
 -brick, material= 3, name= brick3, doit

 -volumeplot, scale= 3, doit
 ##############################################################################
 # Flags: nomenu, noprompt, nomessage,                                        #
 ##############################################################################
 # Section: -volumeplot                                                       #
 ##############################################################################
 # onlyplotfile  = no         -- Do not display Plot                          #
 # showlines = no                                                             #
 # text     = yes                                                             #
 # scale    = 1.80                                                            #
 # 2dplotopts = -geometry 690x560+10+10                                       #
 #   plotopts = -geometry 800x668+410+40 -noclip                              #
 # eyeposition  = ( -1.0, -2.30, 0.50 )                                       #
 # bbxlow =    -1.0000e+30, bbylow =    -1.0000e+30, bbzlow =    -1.0000e+30  #
 # bbxhigh=     1.0000e+30, bbyhigh=     1.0000e+30, bbzhigh=     1.0000e+30  #
 # rotx   =     0.0000    , roty   =     0.0000    , rotz   =     0.0000      #
 #                                                                            #
 ##############################################################################
 # doit, ?, return, help                                                      #
 ##############################################################################
showlines= [yes|no]:
text= [yes|no]:
text()= bla bla
in the Section -general
should be plotted together with the Material Boundaries.
scale= SCALE:
plotopts= ANY STRING CONTAING OPTIONS FOR gd1.3dplot:
dataplot.ps.
eyeposition= (XEYE, YEYE, ZEYE):
bbxlow=,bbxhigh=,bbylow=bbyhigh=,bbzlow=,bbzhigh=:
rotx= PhiX, roty= PhiY, rotz= PhiZ:
PhiX,
then the Result is rotated around the y-Axis by an angle of PhiY,
and finally the Result is rotated around the z-Axis by an angle of PhiZ.
doit:
bbyhigh is specified such, that
only the Material Boundaries behind the Plane y=0 are shown.
 include(/usr/local/gd1/examples-from-the-manual/ggcylinder-twisted.gdf)
 -volumeplot
    eyeposition= ( 1, 2, 1.3 )
    scale= 4.5
 bbyhigh= 0
    doit
Example
The following shows the Material Distribution of a Waveguide Twist again,
this time, the Parameter roty is specified nonzero.
 include(/usr/local/gd1/examples-from-the-manual/ggcylinder-twisted.gdf)
 -volumeplot
    eyeposition= ( 1, 2, 1.3 )
    scale= 4.5
 roty= 20
    doit
A similar Effect can be achieved with the Section -volumeplot
with the Aid of the Parameters bb?low, bb?high.
 ##############################################################################
 # Flags: nomenu, noprompt, nomessage,                                        #
 ##############################################################################
 # Section: -cutplot                                                          #
 ##############################################################################
 # onlyplotfile= no                     -- don't display Plot                 #
 # draw  = both                         -- both | approximated | input        #
 # grid  = yes                          -- yes|no                             #
 # normal= z                            -- Plane Normal of the Cut-Plane      #
 # cutat = undefined                    -- The Coordinate of the Cut-Plane    #
 #                                                                            #
 # plotopts= -geometry 800x668+410+40 -noclip                                 #
 # eyeposition= ( -1.0, -2.30, 0.50 )                                         #
 ##############################################################################
 # doit, ?, return, help                                                      #
 ##############################################################################
draw= [both|approximated|input]:
grid= [yes|no]:
normal= [x|y|z], cutat= :
cutat: The Coordinate Value of the Gridplane in Direction
normal where the Material Filling shall be plotted.
plotopts= ANY STRING CONTAINING OPTIONS FOR gd1.3dplot:
dataplot.ps .
eyeposition= (XEYE, YEYE, ZEYE):
doit:
 ##############################################################################
 # Flags: nomenu, noprompt, nomessage,                                        #
 ##############################################################################
 # section -eigenvalues                                                       #
 ##############################################################################
 # solutions    = 15                                                          #
 # estimation   = undefined                                                   #
 # storeallmodes= no                                                          #
 #    flowsave  = 0.0                                                         #
 #    fhighsave = 1.0e+30                                                     #
 # passes       =  2                                                          #
 # pfac2        = 1.0e-3                                                      #
 # lossy          = no                  -- Lossy or dispersive Computation    #
 #     flowsearch = undefined           -- Edges of the search Region...      #
 #     fhighsearch= undefined           -- ...when "lossy= yes"               #
 #   -ports                             -- ...when "lossy= yes"               #
 #   -linitialfields                    -- ...when "lossy= yes"               #
 #                                                                            #
 #                                                                            #
 # compressed   = no                    -- Minimal RAM, more CPU and IO Time  #
 ##############################################################################
 # return, doit, help, ?                                                      #
 ##############################################################################
solutions= NSOL:
compressed= yes is specified, the Memory Requirement is NOT
proportional to the Number of Basisvectors, as then the Basisvectors
are compressed and stored to Files and retrieved from Files.
The compressed Basisvectors are written to Files with Names built from
the scratchbase Parameter of Section -general.
estimation= FUP:
NSOL.st Mode.
storeallmodes= [yes | no]:
passes=1),
but does not store them.
If you do not believe that these static Modes are really static,
you can enforce the storing to File with this Option.
When the static Solutions are in the outfile, you can view these
'Solutions' with gd1.pp.
flowsave= FLOW, fhighsave= FHIGH:
-general, dice= yes, iodice= yes, which specifies that
the Resultfields shall be stored on the local Disks of the Compute Nodes.
BUT: -general, dice= yes, iodice= yes can only be used for the
PVM Version, not the MPI Version.
passes= NPASS:
NSOL Basisvectors
that are mutually Orthogonal and (hopefully) span
only the Subspace also spanned by the Eigenvectors
corresponding to the NSOL lowest Eigenvalues.
passesNSOL.
Also, the Accuracy of the Fields becomes somewhat better.
pfac2= PFAC2:
pfac2,
that controls the relative Cleaning of the Basisvectors from Eigenvectors
outside the Range 0 to FUP, in which the NSOL resonant
Fields are expected.
pfac2 leads to increased CPU-Time, but better Accuracy for
the lower Modes. A good Value is pfac2=1e-3.
lossy= [yes|no]:
lossy= yes, Eigenvalues are searched in a Model where the
lossy Parameters and dispersive Parameters of Materials with
type= normal are taken into Account.
This Algorithm needs four times as much Memory
as the lossfree Algorithm.
flowsearch= F1, fhighsearch= F2:
lossy=yes:
The Frequency Range where the Resonances of the lossy Device are searched in.
-ports:
lossy= yes, absorbing Boundary Conditions are applied
at Ports that are specified via -eigenvalues,-ports.
The Section -eigenvalues,-ports is the same as the Section
-fdtd,-ports.
-linitialfields:
lossy= yes,
Initial Fields can be loaded as starting Field.
-eigenvalues,-linitialfields is the same as the Section
-fdtd,-linitialfields.
compressed:
compressed=yes, the Basis Vectors will be compressed and stored
to Scratchfiles and re-read when needed.
This takes much less Memory during the Eigenvalue computation, but
increases substantially the Input-Output Time.
doit:
doit starts the Eigenvalue Computation.
 -eigenvalues
   solutions= 15
   passes= 2
   estimation= 1.3e9
   doit
 ##############################################################################
 # Flags: nomenu, noprompt, nomessage,                                        #
 ##############################################################################
 # Section: -fdtd                                                             #
 ##############################################################################
 # -ports                     -- Absorbing Boundary Conditions.               #
 # -pexcitation               -- Excited Port Modes.                          #
 # -lcharges                  -- One or more relativistic Line Charges.       #
 # -windowwake                -- Wakes in a moving Mesh Window.               #
 # -clouds          -- not yet finished.                                      #
 # -linitialfields            -- Loads initial Fields at t=0.                 #
 # -voltages                  -- Enforce Voltages between Points.             #
 # -decaytime                 -- z-dependent Damping.                         #
 # -time                      -- Timestep etc.                                #
 # -storefieldsat             -- When to store Fields.                        #
 # -fexport                   -- When to store Fields.                        #
 # -smonitor                  -- What Flux Quantities to store.               #
 # -fmonitor                  -- What Field Quantities to store.              #
 # -pmonitor                  -- What Power Quantities to store.              #
 #                                                                            #
 # hfdtd= no                  -- Use higher Order Curl-Operators.             #
 ##############################################################################
 # doit, ?, return, help                                                      #
 ##############################################################################
-ports:
-fdtd/-ports where you specify the
Location of "ports" and the Properties of these Ports.
-pexcitation:
-fdtd/-pexcitation, where you specify
the Center Frequency, the Bandwidth and the Amplitudes of selected
Modes of selected Ports.
-lcharges:
-fdtd/-lcharge, where you specify
the Properties of relativistic Line Charges.
-windowwake:
-fdtd/-windowwake, where you specify
the Properties of a moving Mesh Window to compute the Wakepotential
of relativistic Line Charges.
-clouds:
-fdtd/-clouds, where you specify
the Properties of non-relativistic Charge Clouds.
-linitialfields:
-fdtd/-linitialfields,
where you specify what Fields shall be the Initialfields of a Time
dependent Computation.
-voltages:
-fdtd/-voltages, where you specify
excited Voltages between arbitrary Points.
-decaytime:
-time:
-fdtd/-time, where you specify
the minimum and maximum allowed Simulation Time.
-storefieldsat:
-fdtd/-storefieldsat.
You can specify multiple Time-Ranges where the electric and/ or magnetic
Fields are stored to Files.
-fexport:
-smonitor:
-fdtd/-smonitor, where you specify
what Scalar Quantities shall be monitored during the Time Domain Computation.
-fmonitor:
-fdtd/-fmonitor, where you specify
what Field Quantities shall be monitored during the Time Domain Computation.
-pmonitor:
-fdtd/-pmonitor, where you specify
what Power Quantities shall be monitored during the Time Domain Computation.
doit:
-time,-ports is the same as -eigenvalues,-ports.
A "Port" is a Part of the Border of the computational Volume that shall be treated as an infinitely long Waveguide. In this Section you specify the Location of Ports. You also specify the Number of Modes whose time Amplitudes shall be written to File.
 ##############################################################################
 # Flags: nomenu, noprompt, nomessage,                                        #
 ##############################################################################
 # Section: -ports                                                            #
 ##############################################################################
 # name  = noname-001                                                         #
 # plane = xlow                                                               #
 # modes = 1                                                                  #
 #(pxlow=      -1.0e+30    , pxhigh=       1.0e+30    ) Ignored for plane=xlow
 # pylow=      -1.0e+30    , pyhigh=       1.0e+30                            #
 # pzlow=      -1.0e+30    , pzhigh=       1.0e+30                            #
 # epsmaximum= 2.0                                                            #
 # muemaximum= 1.0                                                            #
 # npml      = 40                  -- No of PML-Planes                        #
 # dampn     = 50.0e-3             -- Damping factor in last Plane            #
 # enforcemesh= yes                -- Enforce translational invariant Mesh    #
 ##############################################################################
 # doit, list, ?, return, help                                                #
 ##############################################################################
name = ANY-STRING-WHICH-COULD-SERVE-AS-FILENAME:
plane= [xlow|xhigh|ylow|yhigh|zlow|zhigh]:
modes= NMODES:
No port Amplitudes are monitored when performing a lossy Eigenvalue computation.
pxlow, pxhigh, pylow, pyhigh, pzlow, pzhigh:
[x|y|z][low|high].
epsmaximum, muemaximum:
npml:
dampn:
doit:
list:
xlow1, xlow2.
Two Ports are at the upper x-Boundary of the computational Volume,
the Names are xhigh1, xhigh2.
The Ports at the same Boundary are distinguished by their pzlow, pzhigh
Parameters.
-fdtd
  -ports
     name= xlow1,  plane= xlow , pzlow= 0,  modes= 10, doit
     name= xhigh1, plane= xhigh, pzlow= 0,  modes= 2, doit
     name= xlow2,  plane= xlow , pzhigh= 0, modes= 2, doit
     name= xhigh2, plane= xhigh, pzhigh= 0, modes= 2, doit
 ##############################################################################
 # Flags: nomenu, noprompt, nomessage,                                        #
 ##############################################################################
 # Section: -pexcitation                                                      #
 ##############################################################################
 # port  =  undefined                                                         #
 # mode  = 1                                                                  #
 # amplitude = 1.0                                                            #
 # phase     = 0.0                                                            #
 # frequency = undefined                                                      #
 # bandwidth = undefined                                                      #
 # risetime  = 0.0                                                            #
 # signalcommand= -none-                                                      #
 ##############################################################################
 # nextport, list, ?, return, help                                            #
 ##############################################################################
port= NAME-OF-AN-ALREADY-DEFINED-PORT:
mode:
amplitude:
phase:
frequency:
bandwidth:
risetime:
list:
signalcommand= NAME_OF_COMMAND:
-none-, the Excitation will be computed from
risetime, frequency, bandwidth and amplitude.
If specified as any other String, every XXX Timesteps the specified
Command is executed to compute the Signal at the next XXX Timesteps.
The Command is executed as:
NAME_OF_COMMAND < ./gdfidl-actual-time-interval > ./gdfidl-actual-signal
The File ./gdfidl-actual-time-interval contains the following Data:
iTime1, iTime2, TimeStep
iTime1: The Number of the first Timestep for which
the Signal shall be defined.
iTime2: The Number of the last Timestep for which
the Signal shall be defined.
TimeStep: The Width of a Timestep.
Beta, Alpha, DeltaZ.
Beta: The real Part of the propagation Constant of the
selected Mode at the selected
Frequency frequency.
Alpha: The imaginary Part of the propagation Constant.
DeltaZ: The Width of the Mesh at the selected Port.
NAME_OF_COMMAND has to write to stdout
simply the Values of the Signal at the Timesteps iTime1 to
iTime2, one line for each value.
nextport:
port, mode, amplitude and phase,
but the Parameters frequency, bandwidth and risetime
are the same for all excited Ports.
InputPort shall be excited.
Its Amplitude shall be '1', the Centerfrequency of the excited Pulse shall be
1.2 GHz, and the Bandwidth of the excited Pulse shall be 0.7 GHz.
 -fdtd,
    -pexcitation
        port= InputPort
        mode= 1
        amplitude= 1
        frequency= 1.2e+9
        bandwidth= 0.7e+9
InputPort1 shall be excited.
Its Amplitude shall be '1', the Frequency of the excited Signal shall be
1.2 GHz, and the Risetime until Steady State of the Excitation shall be
10 HF-Periods.
In Addition, the fundamental Mode of the Port with Name
InputPort2 shall be excited. Its Amplitude shall be '1'.
 -fdtd,
    -pexcitation
        port= InputPort1, mode= 1, amplitude= 1, phase= 0
        frequency= 1.2e9, risetime= 10 / 1.2e9
      nextport
        port= InputPort2, mode= 1, amplitude= 1, phase= 0
Example
The following specifies that the fundamental Mode of the Port with Name
InputPort shall be excited.
The Portmodes Pattern shall be computed for a Frequency of 10 GHz,
and the Signal of the Excitation shall be defined by an external
Signal-command.
 -fdtd,
    -pexcitation
        port= InputPort
        mode= 1
        amplitude= 1
        frequency= 10e9
 #
 # Compile the Signalcommand.
 #
 system($F90 signal-command.f -o signal-command)
        signalcommand= ./signal-command
This is the Sourcefile signal-command.f:
      PROGRAM SignalCommand
      IMPLICIT DOUBLE PRECISION (a-h,o-z)

      Pi= 4*ATAN(1.0d0)
      Frequency= 10e9
      TRise= 10/Frequency
      TDecay= 20/Frequency
      THold= 50/Frequency
      READ (*,*) iTime1, iTime2, TimeStep
      READ (*,*) Beta, Alpha, DeltaZ
      DO iTime= iTime1, iTime2, 1
         ActualTime= iTime*TimeStep
         IF (ActualTime .LE. TRise) THEN
            Phi= ActualTime * Pi / TRise
            Factor= (1-COS(Phi))/2
         ELSE IF (ActualTime .LE. TRise+THold) THEN
            Factor= 1
         ELSE IF (ActualTime .LE. TRise+THold+TDecay) THEN
            Phi= (ActualTime - (TRise+THold)) * Pi / TDecay
            Factor= (1+COS(Phi))/2
         ELSE
            Factor= 0
         ENDIF
         Factor= Factor * TimeStep / DeltaZ
         WRITE (*,*) Factor*SIN(2*Pi*Frequency*ActualTime)
      ENDDO
      END PROGRAM SignalCommand
In this Section one specifies the Properties of one or several relativistic Line-Charges. When computing with the conventional Scheme, i.e. not with the Windowwake Algorithm, one can specify up to 100 Linecharges, each with a different Charge, different Position, different Distribution and different Direction of Flight. When using the Windowwake Algorithm, all Charges must go in positive z-Direction, and they must have the same Shape. They may differ in their Positions and Charge. Once the Properties of a Linecharge are specified, one switches to the next Linecharge with the Command 'nextcharge'.
The standard Usage of this Section is to compute Wakepotentials. When a nonzero Charge is specified, and a Time Domain Computation is performed, the Wakepotentials are computed as the Potential that is seen by Witness Particles that are traveling in positive z-Direction. When the conventional Scheme is used, Fields and Port Amplitudes may be stored and monitored as well.
 ##############################################################################
 # Flags: nomenu, noprompt, nomessage,                                        #
 ##############################################################################
 # Section: -lcharge                                                          #
 ##############################################################################
 # ----- Parameters of a Line Charge: ------                                  #
 # charge    =        0.0               -- [As]                               #
 # shape     = gaussian                 -- gaussian | triangular | table      #
 #    tablefile=  -none-
 #    xtable =        1.0               -- [m]                                #
 # sigma     =  undefined               -- [m]                                #
 # isigma    =  6                       -- Number of Sigmas to use.           #
 # xposition =        0.0               -- [m]                                #
 # yposition =        0.0               -- [m]                                #
 # direction = +z                       -- +z, -z                             #
 # soffset   =        0.0               -- [m]                                #
 # beta  =        1.0                   -- [1], quite a Hack, if not 1.       #
 # ----- Other Parameters: ------                                             #
 # shigh     =       auto               -- [m]                                #
 # showdata  = no                       -- ( yes | no )                       #
 # napoly    = yes                      -- ( yes | no )                       #
 #   naccuracy=      10.0e-6     -- wanted acc for poisson-eq in Napoly alg.  #
 #   ignoretem= yes                     -- should be "yes" for Wx, Wy         #
 ##############################################################################
 # ?, nextcharge, return, help                                                #
 ##############################################################################
charge:
shape:
gaussian, triangular and table.
tablefile:
sigma is then ignored.
xtable:
sigma:
isigma:
-windowwake it might be useful to specify
isigma=3. Then, the Length of the computational Window extends from
-3*isigma before the Center of the Charge up to shigh behind
the Center of the Charge.
xposition, yposition:
direction:
soffset:
soffset has the Effect that the Charge travels
later through a given z-Plane.
shigh:
auto" or a positive Real.
If "shigh= auto", a Value of "20 * sigma" is taken.
showdata= [yes|no]:
napoly= [yes|no]:
napoly= yes, near the z-Borders of the computational Volume,
an Integration of the Wakefield similiar to the Napoly-Integration is
performed. This Option should be set to napoly= yes for scraper-like
structures.
One can keep the Option set even
if it is no needed, as GdfidL checks whether such an Integration is useful.
If it is not, it is not done.
ignoretem= [yes|no]:
ignoretem=yes, the Term proportional to the primary Field
of the exciting Charge is ignored.
nextcharge:
 -lcharge
    xpos= 0
    ypos= 0
    charge= 1e-12
    sigma= 1e-3

    shigh= 100e-3
Example
An Example for a Table File describing a Charges Shape is given below.
# -lcharge
#    shape= table, tablefile= Bunch1.txt
#    xtable= 1e-6, charge= 1e-12
#
# Everything behind a '#' is ignored.
# Lines in the Tablefile may be empty, or they may
# contain two (or more) Numbers.
# The first Number is a Position, the next Number is
# a relative Charge. What follows behind these two Numbers is ignored.
#
# bunch1 (linac entrance)
# s[microns]   Charge
# ________________________________________________


0,      0
1       -1.32067
2       -1.10711
3       -0.894051
4       -0.6815
5       -0.469454
6       -0.25791
7       -0.046869
8       0.16367
9       0.373709
10       0.583247
Example
An Example how to specify four Line-Charges
that excite mostly quadrupole-Wakepotentials:
 define(CHARGE, 1e-12) define(SIGMA, 1e-3)
 define(RADIUS, SomeValue)

 define(RADIUSoSQRT2, RADIUS * (2**0.5) ) # Radius * Cos( 45 Degrees )
 -lcharge
         xposition=  RADIUSoSQRT2, yposition=  RADIUSoSQRT2
         charge= CHARGE, sigma= SIGMA, soffset= 0
      nextcharge
         xposition= -RADIUSoSQRT2, yposition=  RADIUSoSQRT2
         charge= -CHARGE, sigma= SIGMA, soffset= 0
      nextcharge
         xposition= -RADIUSoSQRT2, yposition= -RADIUSoSQRT2
         charge=  CHARGE, sigma= SIGMA, soffset= 0
      nextcharge
         xposition=  RADIUSoSQRT2, yposition= -RADIUSoSQRT2
         charge= -CHARGE, sigma= SIGMA, soffset= 0
 # /usr/local/gd1/examples-from-the-manual/quadrupole.gdf
 #
 # This Device has two Planes of Symmetry.
 # These Planes of Symmetry are NOT used here.
 # Four Charges are specified such that
 # the excited Wakefields are mainly quadrupole Wakefields.

 -general,
     outfile= /tmp/UserName/bla
     scratch= /tmp/UserName/scratch

 define( A , 2*0.038 )
 define( A2, 2*0.016 ) # x-Width

 define( B , 2*0.010 ) # y-Width
 define( B2, 2*0.002 )

 define(RANGE, 0.01)

 define(STPSZE, B/100 )
 -mesh
     spacing= STPSZE
     pxlow= -(A/2+STPSZE), pxhigh= (A/2+STPSZE), cxlow= ele, cxhigh= ele
     pylow= -(B/2+STPSZE), pyhigh= (B/2+STPSZE), cylow= ele, cyhigh= ele
     pzlow= -0.02, pzhigh= 0.02

 ##########
 -material, material= 3, type= electric

 # Fill the Universe with Metal:
 -brick
     material= 3
         xlow= -INF, xhigh= INF
         ylow= -INF, yhigh= INF
         zlow= -INF, zhigh= INF
     doit

 do ii= 1, 2

    # The Device also has a Plane of Symmetry at z=0.
    # Half of the Device is modeled here, and that Half
    # is rotated and translated to the wanted Position
    # and Orientation.

    -transform, reset
    if (ii == 1) then
       -translate, offset= ( 0, 0, -(0.01+RANGE+0.005/2) ), doit
    else
       -rotate, axis= ( 0, 1, 0 ), angle= 180, doit
       -translate, offset= ( 0, 0,  0.01+RANGE+0.005/2 ), doit
    end if

    -ggcylinder
        material= 0
        xprime= ( 1, 0, 0 )
        yprime= ( 0, 1, 0 )
        xslope= 0, yslope= 0  # Re-Set to the Default Values
        xscale= 1, yscale= 1  # Re-Set to the Default Values

        clear
           point= (  0   , -B /2 )
           point= (  A2/2, -B /2 )
           point= (  A /2, -B2/2 )
           point= (  A /2,  B2/2 )
           point= (  A2/2,  B /2 )
           point= ( -A2/2,  B /2 )
           point= ( -A /2,  B2/2 )
           point= ( -A /2, -B2/2 )
           point= ( -A2/2, -B /2 )
     show= later

         origin= ( 0, 0, 0 )
         range= ( 0, 0.01 )
         doit   # The wide and straight Part.

 # Same Cross-section, linear slopes:
         xslope= (0.033/0.038-1)/RANGE
         yslope= (0.011/0.012-1)/RANGE
         origin= ( 0, 0, 0.01 )
         range= ( 0, RANGE )
    show= later
         doit  # The tapered Part.

 # Same Cross-section, scaled
         xslope= 0, yslope= 0
         xscale= 0.033/0.038, yscale= 0.011/0.012
         origin= ( 0, 0, 0.01+RANGE )
         range= ( 0, 0.005 )
    if (ii == 1) then
       show= later
    else
       show= all
    end if
         doit  # The narrow and straight Part.
 end do

 -volumeplot, doit
 -mesh, perfectmesh= no
 ##########
 -ports
      name= Lower, plane= zlow, modes= 0, doit
      name= Upper, plane= zhigh, modes= 0, doit
 ##########
 define(CHARGE, 1e-12) define(SIGMA, 1e-3)
 define(RADIUS, B/10)
 define(RADIUSoSQRT2, RADIUS * (2**0.5) ) # Radius * Cos( 45 Degrees )
 -lcharge
         xposition=  RADIUSoSQRT2, yposition=  RADIUSoSQRT2
         charge= CHARGE, sigma= SIGMA, soffset= 0
      nextcharge
         xposition= -RADIUSoSQRT2, yposition=  RADIUSoSQRT2
         charge= -CHARGE, sigma= SIGMA, soffset= 0
      nextcharge
         xposition= -RADIUSoSQRT2, yposition= -RADIUSoSQRT2
         charge=  CHARGE, sigma= SIGMA, soffset= 0
      nextcharge
         xposition=  RADIUSoSQRT2, yposition= -RADIUSoSQRT2
         charge= -CHARGE, sigma= SIGMA, soffset= 0

    shigh= 10 * SIGMA

 -fdtd, doit
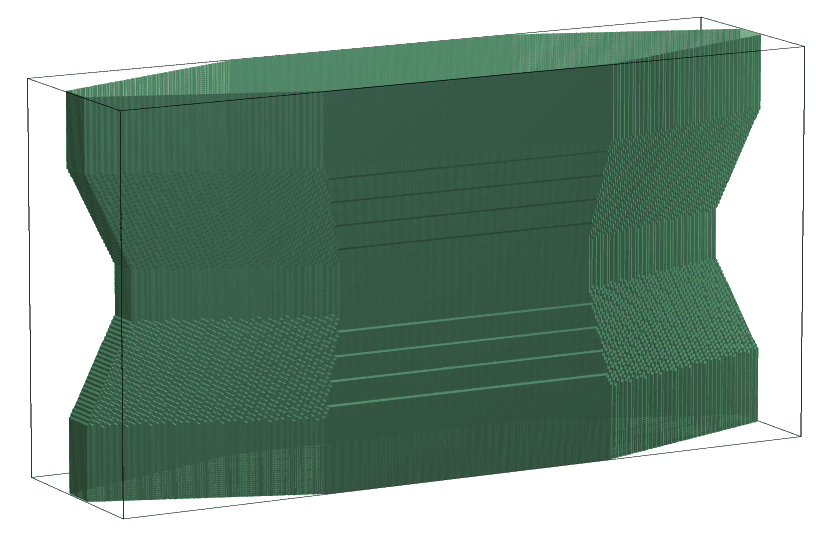 |
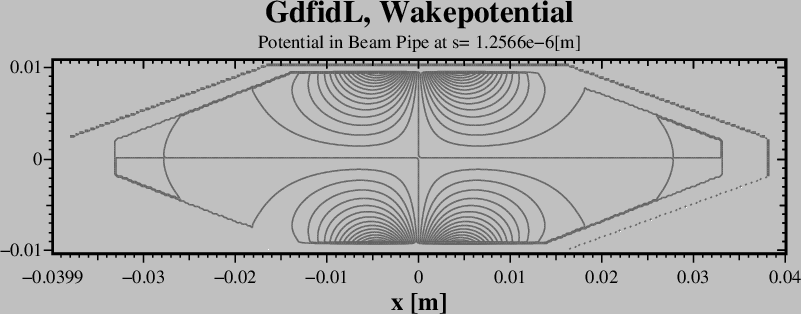 |
 ##############################################################################
 # Flags: nomenu, noprompt, nomessage,                                        #
 ##############################################################################
 # Section: -windowwake                                                       #
 ##############################################################################
 # strangsplitting= yes                                                       #
 # fdtdorder= 31              -- What Order of FDTD Algorithm to take [1,31]  #
 # periodic  = no             -- Assume periodic Device.                      #
 #    nperiods=   100         -- Maximum Number of Periods to consider.       #
 #    modstore=    10         -- Store Wakepotentials after simulating        #
 #                            --   Multiples of modstore*(pzhigh-pzlow).      #
 ##############################################################################
 # doit, ?, return, help                                                      #
 ##############################################################################
strangsplitting:
yes, no".
strangsplitting=yes, a Scheme with splitted Updates for the
z-transverse Components and z-longitudinal Components is used.
This Scheme has negligible Dispersion Error for TEM-waves propagating
in z-Direction. The Dispersion Error for other Kind of Waves is comparable
to a first order FDTD Scheme.
fdtdorder:
strangsplitting=no, and fdtdorder=1, the normal FDTD
Algorithm is used to advance the electromagnetic Fields.
If strangsplitting=no, and fdtdorder=31, a modified FDTD
Algorithm is used to advance the electromagnetic Fields.
That Scheme has zero Dispersion for Waves going in x- or y- or z-Direction
and less Dispersion-Error than strang-Splitting for all Kind of Waves.
periodic:
yes, no".
periodic= no, the Length of the Geometry as specified
via
-mesh, pzlow= ZLOW, pzhigh= ZHIGH is used for computing the
Wakepotential.
periodic= yes, the Length of the Geometry as specified
via
-mesh, pzlow= ZLOW, pzhigh= ZHIGH is assumed to be one Period
of a finite periodic Structure with Number of Periods given by
nperiods= NP. After computing the Fields in a Multiple of
modstore= MP periods, the Wakepotentials so far are recorded
to the Database.
nperiods= NP:
periodic=yes.
modstore= MP:
-lcharge. The moving computational Window has a Length of
isigma*sigma + shigh.
The used Grid-Spacing in z is the Minimum of all the x-Spacings and y-Spacings
and, if the specified "zspacing" in Section "-mesh" is smaller, then that
zspacing is used.
Napoly-like Integration is performed, and cannot be switched off.
The Memory Requirement is proportional to the Length of the moving computational Window, i.e. proportional to isigma*sigma + shigh. One should not specify a large Value for shigh, in particular not longer than the structure Length, otherwise a conventional Wakepotential Computation is more economic.
The CPU Requirement is proportional to the Length of the moving Window times the Length over which the moving Window must travel. That Length is the z-Extension of the Structure plus the Length of the Window. The CPU Requirement is proportional to (isigma*sigma + shigh) * (pzhigh-pzlow + isigma*sigma + shigh). Any specified Port is ignored. The x- and y-Extension of the computational Volume must be specified large enough that Reflections from the x- and y-Borders cannot change the Wakepotentials. E.g. Waveguides going in x- or y-Direction should be modeled with a Length of "shigh".
The Losses of Materials with type=impedance
and of Materials with type=coating are taken into Account.
The Losses of dielectric Materials are ignored.
Only Fields specified via fexport will be exported.
The only other Result is the Wakepotential.
Example
The following specifies that we want to compute the Wakepotential
of a Linecharge travelling with the Speed of Light along the axis (x,y)=(0,0).
The total charge of the Linecharge shall be 1 pC, and its Gaussian Width
Sigma shall be 1 mm.
We are interested in s-Values up to 20 mm.
 -lcharge
    xpos= 0, ypos= 0
    charge= 1e-12
    sigma= 1e-3
    shigh= 20e-3
 -windowwake
    doit
If a 'Particle in Cell' Computation is badly needed, contact Warner Bruns Field Computations. It might be that by the Date that you read this, what you need is already available.
 ##############################################################################
 # Flags: nomenu, noprompt, nomessage,                                        #
 ##############################################################################
 # Section: -clouds                                                           #
 ##############################################################################
 # box        = no                                                            #
 #   fraction = 0.990                                                         #
 #   bverbose = no                                                            #
 # ejectioncommand= -none-                                                    #
 # ejectionsubroutine= -none-                                                 #
 #                                                                            #
 #                                                                            #
 ##############################################################################
 # ?, return, help                                                            #
 ##############################################################################
The initial Field is the Sum of the specified Fields.
 ##############################################################################
 # Flags: nomenu, noprompt, nomessage,                                        #
 ##############################################################################
 # Section: -linitialfields                                                   #
 ##############################################################################
 # infile   = ./previous_outfile                                              #
 #    symbol   = e_1                                                          #
 #    quantity = e                                                            #
 #    solution = 1                                                            #
 #    factor   = 1.0                                                          #
 #    torealpart= yes                                                         #
 #    static   = no                                                           #
 #    brz      = no                                                           #
 #      xmirror= none                                                         #
 #      ymirror= none                                                         #
 # abstatic = 0.0                                                             #
 # nbstatic = ( 0.0, 0.0, 1.0 )                                               #
 ##############################################################################
 # doit, ?, return, end, help                                                 #
 ##############################################################################
infile= NAME_OF_A_PREVIOUSLY_USED_OUTFILE:
infile via the Section
-lgeometry.
symbol= QUAN_ISOL:
quantity= QUAN:
solution= ISOL:
factor:
torealpart:
static:
static= yes, the loaded Field will only be used to accelerate
or deflect free moving Charges in the PIC-algorithm.
If static= no, the loaded Field will be used as Part of the
initial Condition for the electromagnetic Field.
brz:
abstatic:
nbstatic:
doit:
 #
 # As the Filename in two Places better be the same,
 # We define the Files Name as a Variable.
 #
 sdefine( INFILE, /tmp/UserName/resonant-computation )
  -lgeometry
     infile= INFILE
  -linitialfields
     infile= INFILE
     symbol= e_1, factor=  1, doit
     symbol= h_1, factor= -1, doit
-voltages section.
 ##############################################################################
 # Flags: nomenu, noprompt, nomessage,                                        #
 ##############################################################################
 # Section: -voltages                                                         #
 ##############################################################################
 # startpoint  = ( 0.0, 0.0, 0.0 )                                            #
 # endpoint    = ( 0.0, 0.0, 0.0 )                                            #
 # resistance  = 0.10                   -- [Ohm]                              #
 # inductance  = 0.0                    -- [Henry]                            #
 # amplitude   = undefined              -- [V]                                #
 # phase       = 0.0                    -- [Degs]                             #
 # frequency   = undefined              -- [1/s]                              #
 # bandwidth   = undefined              -- [1/s]                              #
 # risetime    = undefined              -- [s]                                #
 # logcurrent  = yes                                                          #
 # name        = noname-001                                                   #
 ##############################################################################
 # doit, ?, list, return, help                                                #
 ##############################################################################
startpoint, endpoint:
resistance:
inductance:
amplitude, phase, frequency, bandwidth:
risetime:
risetime, the Voltage is switched on according to the Formula:
 |
(1.6) |
logcurrent:
name:
doit:
If Voltage Sources are specified, the electric Field Strength between the Startpoint
and Endpoint is measured while the Time Domain Computation is running.
The Difference between the specified Voltage and the so measured Voltage
is multplied by the Resistance of the Voltage Source.
That Value is used as Current which is enforced to flow between the starting
Point and Endpoint. The Current is low pass filtered with a time Constant given by ![]() .
.
The Values of the wanted Voltage, the measured Voltage and the Current can be inspected in the Postprocessor.
No Example yet.
 ##############################################################################
 # Flags: nomenu, noprompt, nomessage,                                        #
 ##############################################################################
 # section -decaytime                                                         #
 ##############################################################################
 ## syntax:                                                                   #
 #  point= (Z_i, Tau_i)                                                       #
 ##############################################################################
 # clear, show, doit, ?, return, help                                         #
 ##############################################################################
point:
clear:
show:
Example
 -fdtd
    define(FREQ, 12e9)
    -decaytime
       clear
       point= ( -INF, 6000 / (@pi*FREQ) )
       point= ( Zmin, 6880 / (@pi*FREQ) )
       point= ( Zmax, 6580 / (@pi*FREQ) )
       point= (  INF, 6000 / (@pi*FREQ) )
      # show
       doit
 ##############################################################################
 # Flags: nomenu, noprompt, nomessage,                                        #
 ##############################################################################
 # section -time                                                              #
 ##############################################################################
 # firstsaved    = undefined                                                  #
 # lastsaved     = undefined                                                  #
 # distancesaved = undefined                                                  #
 # tminimum      = undefined                                                  #
 # tmaximum      = undefined                                                  #
 # decaytime =       1.0e+30                                                  #
 ##############################################################################
 # amptresh =       3.0e-3                                                    #
 # dtsafety =       0.90                                                      #
 # ndt      = auto                                                            #
 # ___stopafter=       1.0e+30          -- Force Stop after that Time.        #
 # ___evmax    = undefined              -- Dangerous.                         #
 # ___dt       = undefined              -- Dangerous.                         #
 ##############################################################################
 # return, help, ?                                                            #
 ##############################################################################
firstsaved:
lastsaved:
distancesaved:
tminimum= TMIN, tmaximum= TMAX:
TMIN and a maximum one of TMAX.
TMIN no Power is flowing through any Port,
the Simulation is stopped.
TMIN the Power flowing through all Ports is
stationary, the Simulation is stopped.
TMAX, the Simulation will be stopped.
decaytime= OOALPHA:
OOALPHA:
The Reason for this Parameter is as follows:
single.gd1 calculates mostly in single Precision,
with a relative Accuray of its internal Values of ![]() for most
Machines.
With this Machine Accuracy, it is not possible to calculate
the Decay of high Q-Structures.
If you would fill your Volume not with Vacuum but with a Dielectric with
a very low Conductivity
for most
Machines.
With this Machine Accuracy, it is not possible to calculate
the Decay of high Q-Structures.
If you would fill your Volume not with Vacuum but with a Dielectric with
a very low Conductivity ![]() ,
the Program would attempt to scale in every Timestep the electric Field
with a Factor of
,
the Program would attempt to scale in every Timestep the electric Field
with a Factor of
 . For low Values of
 ![]() this Factor is so near to One that
it cannot be represented in single Precision as distinct from One.
this Factor is so near to One that
it cannot be represented in single Precision as distinct from One.
With the specification of decaytime,
the Fields (both E and B) in the entire Volume are scaled
by such a Factor, that after a simulation Time of OOALPHA
the Fields have decayed by a Factor of 1/e.
If you have to calculate the Scattering Parameters of
a Resonator with a known (not too low) internal Q-value,
e.g. greater than 1000, you can specify artificial Losses with this
Keyword and gd1 or single.gd1 together with gd1.pp
will calculate the proper scattering Parameters.
amptresh= TRESH:
dtsafety:
dtsafety.
The used Timestep is
ndt:
___stopafter:
___evmax:
___evmax.
NOT USEFUL. This is avaiable to test that the Results of parallel and serial
Computations are bitwise identical.
___dt:
  define(FREQ, 1e9)
  tmin=  100/FREQ, tmax= 1000/FREQ
  firstsaved= 10/FREQ, lastsaved=  20/FREQ
  distance=   1/2/FREQ
-fmonitor or -smonitor.
 ##############################################################################
 # Flags: nomenu, noprompt, nomessage,                                        #
 ##############################################################################
 # Section: -storefieldsat                                                    #
 ##############################################################################
 # name  = noname-0001                                                        #
 # whattosave= both                     -- e-fields, h-fields, both, clouds,  #
 #                                      --     jimpedance                     #
 # firstsaved   = undefined                                                   #
 # lastsaved    = undefined                                                   #
 # distancesaved= undefined                                                   #
 ##############################################################################
 # doit, list, ?, return, help                                                #
 ##############################################################################
name:
"name= a", the saved e-Fields are
accessible later in the Post-Processor under the Name "a_e_1" for the first
stored Field. The first stored h-Field of the Set is accessible as
"a_h_1".
whattosave:
e-fields, h-fields, both, clouds, jimpedance.
The clouds Value is for PIC-Computations, it specifies that only the
Data of free moving Charges shall be stored at the selected Times.
If you have a PIC-Computation running, and you have selected
one of e-fields, h-fields, both, the Data of free moving Charges
are stored as well.
firstsaved:
lastsaved:
distancesaved:
doit:
list:
 define(FREQ, 1e9)

 -fdtd
    -storefieldsat
      name= a, what= both
         firstsaved= 10/FREQ
         lastsaved=  12/FREQ
         distance=   0.1/FREQ
      doit

      name= b, what= e-fields
         firstsaved= 20/FREQ
         lastsaved=  30/FREQ
         distance=   0.25/FREQ
      doit
 define(FREQ, 1e9)

 -fdtd
    -storefieldsat
      do ii= 100, 1000, 100
         #
         # This 'name= a-ii' is expanded to eg. 'name= a-100'
         #
         name= a-ii, what= e-fields
            firstsaved=  ii       /FREQ
            lastsaved=  (ii+1+1/8)/FREQ
            distance=   1/8/FREQ
         doit
      enddo
 ##############################################################################
 # Flags: nomenu, noprompt, nomessage,                                        #
 ##############################################################################
 # Section: -fexport                                                          #
 ##############################################################################
 # outfile= noname-0001
 # whattosave= e                        -- e-fields, h-fields, honmat         #
 # firstsaved   = undefined                                                   #
 # lastsaved    = undefined                                                   #
 # distancesaved= undefined                                                   #
 # bbxlow  =    -1.0000e+30, bbylow =    -1.0000e+30, bbzlow =    -1.0000e+30 #
 # bbxhigh =     1.0000e+30, bbyhigh=     1.0000e+30, bbzhigh=     1.0000e+30 #
 ##############################################################################
 # doit, ?, return, end, help                                                 #
 ##############################################################################
outfile:
whattosave:
whattosave=honmat, the Values of H on electric conducting
Surfaces are written in a complicated special compressed Format,
which (probably) can only be read by gd1.pp's section -3dmanygifs.
The File-Format is so complicated to keep the Filesizes small.
firstsaved, lastsaved, distancesaved:
bbxlow=,bbxhigh=,bbylow=bbyhigh=,bbzlow=,bbzhigh=:
doit:
 define(STPF, 0.5) define(NP, 4) define(RADIUS, 1+1) define(GAP, 0.5)
 define(PERIODE, 0.6) define(BEAMR, RADIUS/2) define(STPSZE, SIGMA/10/STPF)

 define(DRADIUS, 2*STPSZE )
 define( ZLOW, -(NP*PERIODE+BEAMR)/2 )
 define( ZHIGH, (NP*PERIODE+BEAMR)/2 )
 -general
    outfile= /tmp/UserName/resultfile
    scratch= /tmp/UserName/scratch

 -mesh
    pxlow= -(RADIUS+DRADIUS), pxhigh= (RADIUS+DRADIUS)
    pylow= -(RADIUS+DRADIUS), pyhigh= (RADIUS+DRADIUS)
    pzlow= ZLOW, pzhigh= ZHIGH
 define(PZLOW, ZLOW)
 define(PZHIGH, ZHIGH)

   pxlow= 0, cxlow= mag
   pylow= 0, cylow= mag
   spacing= STPSZE

 ############
 -brick, material 1, volume (-INF, INF, -INF, INF, -INF, INF), doit

 do ip= -(NP-1)/2, (NP-1)/2, 1
    -gccylinder
       material= 0, radius= RADIUS, length= GAP
       origin= (0,0,ip*PERIODE-GAP/2)
       direction= (0,0,1)
 show= later
       doit
 enddo

 -gccylinder
    material= 0, radius= BEAMR, length= INF
    origin= ( 0, 0, -INF/2 ), direction= ( 0, 0, 1 )
# show= all
    doit

 #####
 -volumeplot, scale 1.8, plotopts -geometry 600x550+10+10, doit

 ####
  -lcharge
    sigma= 0.1, charge= 1e-12, xposition= 0, yposition= 0
    #
    # The following large Value for shigh is chosen for getting a Movie
    # of the full Structure.
    #
    shigh= ZHIGH-ZLOW

   define(NDT, 0.5 * SIGMA / @clight)
 -fexport
    outfile= /tmp/UserName/H-onmat-
    what= honmat
    firstsaved= 1e-20, lastsaved= 1e20
    distancesaved= NDT
    bbxlow= 0, bbxhigh= INF
    bbylow= 0, bbyhigh= INF
    bbzlow= PZLOW+2*STPSZE, bbzhigh= PZHIGH-2*STPSZE
    doit

 -windowwake,
     doit
 end
#####################
The following is Input for gd1.pp to read the Files and create many gifs from them. From the gifs, a mpeg File is created and displayed.
# Input for gd1.pp:

 -3dmanygifs
   1stinfile= /tmp/UserName/H-onmat--000000001.gz
   outfiles= /tmp/UserName/absh-
## uptonfiles= 10
#   what= abs
   what= logabs
   uptonfiles= 1e9
   xrot= -30, yrot= 40
   doit

 system( mpeg_encode ./gdfidl.3dmanygifs-mpeg_encode-params )
 system( mpeg_play -dither color fexported.mpg )
 ##############################################################################
 # Flags: nomenu, noprompt, nomessage,                                        #
 ##############################################################################
 # Section: -smonitor                                                         #
 ##############################################################################
 # name  = noname-001                                                         #
 # whattosave= convectioncurrent                                              #
 #                       -- convectioncurrent, displacementcurrent            #
 #                       -- magneticflux                                      #
 #                       -- poyntingflux, ppclouds, pnclouds                  #
 #    normal= z, cutat= undefined                                             #
 #    xlow=      -1.0e+30    , xhigh=       1.0e+30                           #
 #    ylow=      -1.0e+30    , yhigh=       1.0e+30                           #
 #    zlow=      -1.0e+30    , zhigh=       1.0e+30                           #
 ##############################################################################
 # doit, list, ?, return, help                                                #
 ##############################################################################
name:
whattosave:
normal:
cutat:
bbxlow=,bbxhigh=,bbylow=bbyhigh=,bbzlow=,bbzhigh=:
doit:
 ##############################################################################
 # Flags: nomenu, noprompt, nomessage,                                        #
 ##############################################################################
 # Section: -fmonitor                                                         #
 ##############################################################################
 # name  = noname-001                                                         #
 # whattosave= ecomponents                                                    #
 #                       -- ecomponents, hcomponents                          #
 #    position= ( 0.0, 0.0, 0.0 )                                             #
 ##############################################################################
 # doit, list, ?, return, help                                                #
 ##############################################################################
name:
whattosave:
position:
doit:
 ##############################################################################
 # Flags: nomenu, noprompt, nomessage,                                        #
 ##############################################################################
 # Section: -PMonitor                                                         #
 ##############################################################################
 # name = noname-001                                                          #
 # whattosave= pdielectrics                                                   #
 #                       -- ( pdielectrics | energy )                         #
 #    xlow=      -1.0e+30    , xhigh=       1.0e+30                           #
 #    ylow=      -1.0e+30    , yhigh=       1.0e+30                           #
 #    zlow=      -1.0e+30    , zhigh=       1.0e+30                           #
 #    stride= 10                                                              #
 ##############################################################################
 # doit, list, ?, return, help                                                #
 ##############################################################################
name:
whattosave:
xlow=, xhigh=, ylow=, yhigh=, zlow=, zhigh= :
doit:
-sparameter)
computes Scattering Parameters from the Amplitudes of Port-Modes
that were computed and stored by
gd1.
-wakes.
-totouchstone.
Before you can do anything useful, you have to specify from what Database
gd1.pp shall take the Fields from. Therefore the first Thing you do is:
enter the Section -general.
 ##############################################################################
 # Flags: nomenu, noprompt, nomessage,                                        #
 ##############################################################################
 # Section: -base                                                             #
 #  VshzpnIb 210909                                                           #
 ##############################################################################
 # -general         -- Define Database                                        #
 # -3darrowplot     -- Field Plots, Material Plot                             #
 # -lineplot        -- Lineplot of Field Components,                          #
 # -glineplot       -- Lineplot of Field Comp along gline,                    #
 # -2dplot          -- Aquivalue Plot of a Component on a Plane.              #
 # -energy          -- Compute stored Energy                                  #
 # -lintegral       -- Compute Voltages                                       #
 # -wlosses         -- Compute Wall Losses                                    #
 # -dlosses         -- Compute dielectric Losses                              #
 # -flux            -- Compute Fluxes through rectangular Areas               #
 # -clouds          -- Properties of free moving Clouds                       #
 # -sparameters     -- Analyses Time History of Port Mode Amplitudes          #
 # -material        -- Specify Conductivities for Loss Computations           #
 # -wakes           -- Wakepotentials, Impedances                             #
 # ***** Miscellanea ******                                                   #
 #  -totouchstone   -- Convert fri-data to touchstone Form                    #
 #  -combine        -- Combines Scattering Parameters                         #
 #  -pcombine       -- Combines E & H to Poynting Field.                      #
 #  -smonitor       -- Display and fft smonitor Data                          #
 #  -fmonitor       -- Display and fft fmonitor Data                          #
 #  -pmonitor       -- Display pmonitor Data                                  #
 #  -voltages       -- Display and fft Voltages Data                          #
 #  -fexport        -- Export 3D Field Data                                   #
 #  -2dmanygifs     --                                                        #
 #  -3dmanygifs     --                                                        #
 #  -debug          -- Specify Debug Levels                                   #
 #                                                                            #
 ##############################################################################
 # ?, help, end, ls                                                           #
 ##############################################################################
-general:
-3darrowplot:
-lineplot:
-glineplot:
-2dplot:
-energy:
-lintegral:
-wlosses:
-dlosses:
-flux:
-clouds:
-sparameters:
-material:
-wakes:
-totouchstone:
-combine:
-smonitor:
-fmonitor:
-pmonitor:
-fexport:
-2dmanygifs, -3dmanygifs:
-fexport.
-debug:
 ##############################################################################
 # Flags: nomenu, noprompt, nomessage,                                        #
 ##############################################################################
 # Section: -general                                                          #
 ##############################################################################
 # infile= ./results                                                          #
 # scratchbase= /scratch/wb//gdfidl-scratch-pid=000014263-                    #
 # text( 1)=                                                                  #
 ##############################################################################
 # 2dplotopts= -geometry 690x560+10+10                                        #
 #  linecolor= 0              -- 0: foreground, 3: yellow                     #
 #  foreground= black         -- black, white                                 #
 #  background= white         -- blue, white, black                           #
 # showtext     = yes         -- (yes | no)                                   #
 # onlyplotfiles= no          -- (yes | no)                                   #
 # nrofthreads= 20            -- SMP: Nr of Threads.                          #
 ##############################################################################
 # ?, return, end, help, ls                                                   #
 ##############################################################################
infile:
scratchbase:
TMPDIR set,
gd1.pp will take as default Value set scratchbase to the String
$TMPDIR/gdfidl-scratch-pid=XXXXX-
Here $TMPDIR is the Value of the Environment Variable TMPDIR,
and XXXXX
is the Number of the Process-ID of gd1.pp.
text()= ANY STRING, NOT NECESSARILY QUOTED
text(NUMBER)= ANY STRING, NOT NECESSARILY QUOTED ANY STRING, NOT NECESSARILY QUOTED:
NUMBER:
NUMBER, the String following text()=
is placed in the next free Line.
In the Case with NUMBER, it is guaranteed, that the String
is placed in the NUMBER.st Line.
You can specify up to 20 Annotation-Strings,
the maximum Length of each Annotation-String is 80 Characters.
When a new Database is specified, the Values of text are
overwritten by the Values that are found in the Database.
2dplotopts= ANY STRING CONTAING OPTIONS FOR mymtv2:
plotopts= ANY STRING CONTAING OPTIONS FOR gd1-3dplot:
showtext= [yes|no]:
onlyplotfiles= [yes|no]:
 -general
    infile= @last
    scratchbase= /tmp/garbage/delete-me-
    2dplotopts= -geometry 800x600
    plotopts= -geometry 1024x768
 ##############################################################################
 # Flags: nomenu, noprompt, nomessage,                                        #
 ##############################################################################
 # Section: -3darrowplot                                                      #
 ##############################################################################
 # symbol      = e_1                                                          #
 # quantity    = e                                                            #
 # solution    = 1                                                            #
 #    phase    = 45.0                   -- Only for Portmodes                 #
 # arrows      = 10000                                                        #
 # lenarrows   = 2.0                                                          #
 # maxlenarrows= 2.0                                                          #
 #   fcolour   = 4                                                            #
 # materials   = yes                    -- (yes | no)                         #
 # dielectrics = yes                    -- (yes | no)                         #
 # fonmaterials= yes                    -- (yes | no)                         #
 #    logfonmat= no                     -- (yes | no)                         #
 #    fmaxonmat= auto                                                         #
 # jonmaterials= no                     -- (yes | no)                         #
 # scale       = 2.80                                                         #
 # fscale      = auto                                                         #
 # nlscale     = no, nlexp= 0.30                                              #
 # eyeposition = ( -1.0, -2.30, 0.50 )                                        #
 # bbxlow = -1.0000e+30,    bbylow = -1.0000e+30,    bbzlow = -1.0000e+30     #
 # bbxhigh= 1.0000e+30,     bbyhigh= 1.0000e+30,     bbzhigh= 1.0000e+30      #
 # rotx   = 0.0000,         roty   = 0.0000,         rotz   = 0.0000          #
 # clouds = yes     -- Show Clouds                                            #
 ##############################################################################
 # plotopts= -geometry 800x668+410+40 -noclip                                 #
 # showtext     = yes                   -- (yes | no)                         #
 # showlines    = no                    -- (yes | no)                         #
 # onlyplotfiles= no                    -- (yes | no)                         #
 ##############################################################################
 # @absfmax:  undefined       -- of fonmat or jonmat.                         #
 # @farrowmax:  undefined     -- Value of largest Arrow.                      #
 ##############################################################################
 # doit, ?, return, end, help, ls                                             #
 ##############################################################################
symbol= QUAN_ISOL:
quantity= QUAN:
solution= ISOL:
component:
x,y,z,all.
Only the selected Component will be plotted.
phase:
arrows:
lenarrows:
lenarrows= 1, the Arrows are scaled such, that for an homogeneous
Field the Tip of one shown Arrow is just behind the Bottom of the next Arrow.
maxlenarrows:
fcolour= :
materials= :
yes, the Material Boundaries are plotted together with the
Fields.
dielectrics= :
dielectrics= no, Material Boundaries between dielectrics
will not be shown.
jonmaterials= : (Joules on Materials)
type= impedance.
fonmaterials= : (Fields on Materials)
logfonmat= :
maxfonmat= :
scale= SCALE:
fscale:
auto is specified, the Vectorfield is scaled by
this Value.
No further Scaling happens.
This is useful for generating Movies, where every frame of the Movie should
be scaled by the same Factor.
nlscale, nlexp:
nlscale= yes, the Size of Field Arrows are proportional to
the Amplitude of the Field to the Power of nlexp.
eyeposition= (XEYE, YEYE, ZEYE):
bbxlow=,bbxhigh=,bbylow=bbyhigh=,bbzlow=,bbzhigh=:
rotx= PhiX, roty= PhiY, rotz= PhiZ:
PhiX,
then the Result is rotated around the y-Axis by an angle of PhiY,
and finally the Result is rotated around the z-Axis by an angle of PhiZ.
clouds= :
plotopts= ANY STRING CONTAING OPTIONS FOR gd1-3dplot:
showtext= [yes|no]:
showlines= :
yes, thin Lines are plotted around the material Patches,
indicating the used Discretisation.
onlyplotfiles= [yes|no]:
doit:
   symbol= e_1
   doit
   symbol= ere_4
   fonmat= yes
   doit

 # only the Material Plot, without the Field-Arrows:
 lena 1e-6
   doit
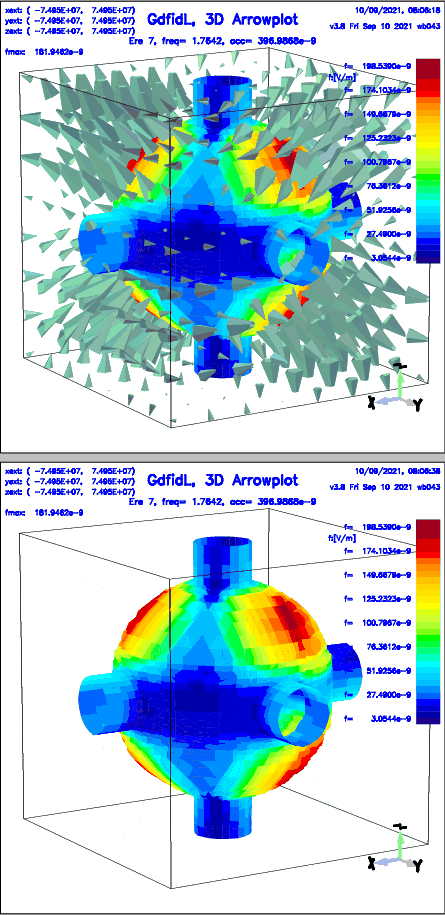 |
type=impedance:
In the first Step, we compute the Time Domain Fields with gd1:
gd1 < DDBA_simple_button_racetrack_no_cavity_no_recess.gdfThat Inputfile specifies all metallic Materials as of
type=impedance.
 -material
   material= 3, type= impedance, kappa= 1.3514e6 # button
   material= 5, type= impedance, kappa= 1.82e7   # pin
   material= 6, type= impedance, kappa= 1.3889e6 # anulus
   material= 7, type= impedance, kappa= 4.561e7  # coax pin
   material= 8, type= impedance, kappa= 1.35e6   # block
   material= 9, type= impedance, kappa= 1.59e7   # coax outer
Fields at selected Times are stored.
    # Store the e-Fields at selected Times.
    #     This will then also store the deposited Energy in
    #     'type= impedance'.
    #  gd1.pp: -3darrow, jonmat= yes, symbol= Bla_e_1, doit
    #
    -storefieldsat
        name= Bla, what= e
           firstsaved= 0.1 / @clight
           lastsaved= INF
           distance= 0.1 / @clight
        doit
After the Time Domain Computation has finished, we start gd1.pp with the Input:
    -general, infile= @last
    -3da
        jonmat= yes
        arrows= 1, lena= 1e-7  # No Arrows shown
        symbol= Bla_e_3, doit
The resulting Plot of the absorbed Energy is shown in
Figure 2.2.
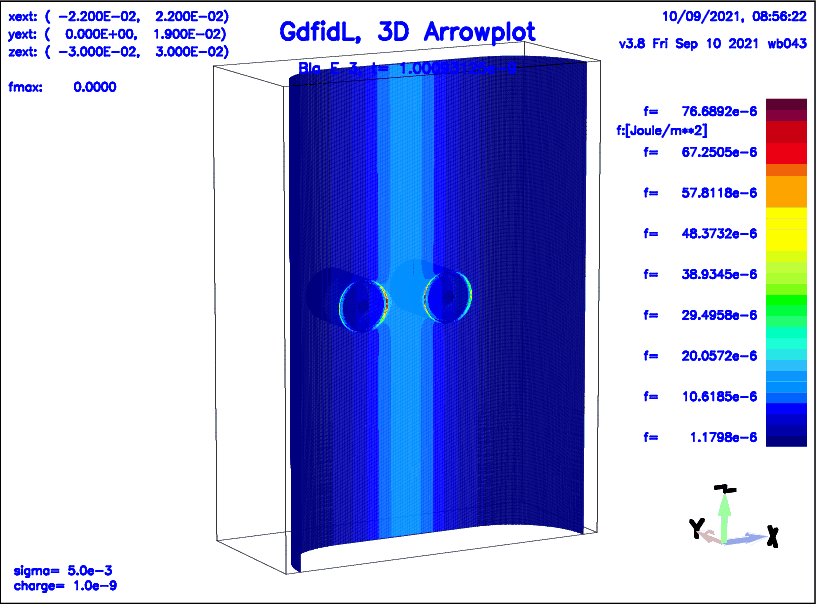 |
 ##############################################################################
 # Flags: nomenu, noprompt, nomessage,                                        #
 ##############################################################################
 # Section: -lineplot                                                         #
 ##############################################################################
 # symbol    = e_1                                                            #
 # quantity  = e                                                              #
 # solution  = 1                                                              #
 # component = z                                                              #
 #    phase  =       45.0               -- Only for Portmodes                 #
 #                                                                            #
 # direction = z                                                              #
 # startpoint= ( 0.0, 0.0, -1.0e+30 )                                         #
 ##############################################################################
 # 2dplotopts= -geometry 690x560+10+10                                        #
 #  linecolor= 0              -- 0: foreground, 3: yellow                     #
 #  foreground= black         -- black, white                                 #
 #  background= white         -- blue, white, black                           #
 # showtext     = yes         -- (yes | no)                                   #
 # onlyplotfiles= no          -- (yes | no)                                   #
 ##############################################################################
 # doit, ?, return, end, help, ls                                             #
 ##############################################################################
symbol= QUAN_ISOL:
quantity= QUAN:
solution= ISOL:
component= [x|y|z|]:
direction= [x|y|z]:
startpoint= (X0, Y0, Z0):
2dplotopts= ANY STRING CONTAING OPTIONS FOR mymtv2:
showtext= [yes|no]:
onlyplotfiles= [yes|no]:
doit:
 -gen, i @last
 -linepl, sym e_3, comp x, dir z, sta (0,0,@zmin), do
In full Glory, without Abbreviations, this is:
 -general
    infile= @last
 -lineplot
    symbol= e_3
    component= x
    direction= z
    startpoint= ( 0, 0, @zmin )
  doit
 ##############################################################################
 # Flags: nomenu, noprompt, nomessage,                                        #
 ##############################################################################
 # Section: -glineplot                                                        #
 ##############################################################################
 # symbol    = e_1                                                            #
 # quantity  = e                                                              #
 # solution  = 1                                                              #
 #                                                                            #
 # startpoint= ( 0.0, 0.0, -1.0e+30 )                                         #
 # direction = ( undefined, undefined, undefined )                            #
 ##############################################################################
 # 2dplotopts= -geometry 690x560+10+10                                        #
 #  linecolor= 0              -- 0: foreground, 3: yellow                     #
 #  foreground= black         -- black, white                                 #
 #  background= white         -- blue, white, black                           #
 # showtext     = yes         -- (yes | no)                                   #
 # onlyplotfiles= no          -- (yes | no)                                   #
 ##############################################################################
 ##############################################################################
 # @gvreal= undefined       @gvimag= undefined      @gvabs= undefined         #
 ##############################################################################
 # doit, ?, return, end, help, ls                                             #
 ##############################################################################
symbol= QUAN_ISOL:
quantity= QUAN:
solution= ISOL:
startpoint= (X0, Y0, Z0):
direction= ( Xn, Yn, Zn ):
2dplotopts= ANY STRING CONTAING OPTIONS FOR mymtv2:
showtext= [yes|no]:
onlyplotfiles= [yes|no]:
doit:
direction will be plotted.
The Component is plotted as a Function of u.
The Lineplot is performed a Line

As a Sideeffect, the complex Voltage as seen by a Particle is integrated.
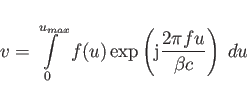
 ##############################################################################
 # Flags: nomenu, noprompt, nomessage,                                        #
 ##############################################################################
 # Section: -2dplot                                                           #
 ##############################################################################
 # symbol    = e_1                                                            #
 # quantity  = e                                                              #
 # solution  = 1                                                              #
 #                                                                            #
 # component = z                        -- What Component to be plotted.      #
 # normal    = z                        -- The Plane Normal of the Cut-Plane. #
 # cutat     = undefined                -- The Coordinate of the Cut-Plane.   #
 # ncontourlines= 30                    -- The Number of Contourlines.        #
 # fscale    = auto                                                           #
 #                                                                            #
 ##############################################################################
 # 2dplotopts= -geometry 690x560+10+10                                        #
 #  linecolor= 0              -- 0: foreground, 3: yellow                     #
 #  foreground= black         -- black, white                                 #
 #  background= white         -- blue, white, black                           #
 # showtext     = yes         -- (yes | no)                                   #
 # onlyplotfiles= no          -- (yes | no)                                   #
 ##############################################################################
 # doit, ?, return, end, help                                                 #
 ##############################################################################
symbol= QUAN_ISOL:
quantity= QUAN:
solution= ISOL:
component:
normal:
cutat:
ncontourlines:
fscale:
2dplotopts= ANY STRING CONTAING OPTIONS FOR mymtv2:
plotopts= ANY STRING CONTAING OPTIONS FOR gd1-3dplot:
showtext= [yes|no]:
onlyplotfiles= [yes|no]:
doit:
 ##############################################################################
 # Flags: nomenu, noprompt, nomessage,                                        #
 ##############################################################################
 # Section: -energy                                                           #
 ##############################################################################
 # symbol   = h_1                                                             #
 # quantity = h                                                               #
 # solution = 1                                                               #
 # bbxlow =    -1.0000e+30, bbylow =    -1.0000e+30, bbzlow =    -1.0000e+30  #
 # bbxhigh=     1.0000e+30, bbyhigh=     1.0000e+30, bbzhigh=     1.0000e+30  #
 #                                                                            #
 #                                                                            #
 # @henergy : undefined                 (symbol: undefined, m: 1)             #
 # @eenergy : undefined                 (symbol: undefined, m: 1)             #
 ##############################################################################
 # doit, ?, return, end, help, ls                                             #
 ##############################################################################
symbol= QUAN_ISOL:
quantity= QUAN:
solution= ISOL:
bbxlow=,bbxhigh=,bbylow=bbyhigh=,bbzlow=,bbzhigh=:
If the integrated Field was an electric Field, the Result of the Computation is stored in the symbolic Variable @eenergy. If the integrated Field was a magnetic Field, the Result of the Computation is stored in the symbolic Variable @henergy.
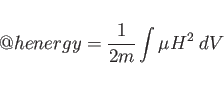 |
(2.1) |
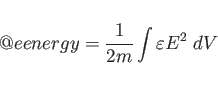 |
(2.2) |
m is 2 for resonant Fields,
and 1 for nonresonant Rields.
When you are computing resonant Fields without periodic Boundary Conditions,
the Fields that gd1.pp processes are the electric Fields at a Time t=0 and
the magnetic Fields at a Time t=T/4, where T=1/f. This means, you 'see' both,
the electric and magnetic Fields at a Time where they are at a Maximum.
To get the total stored Energy for resonant Fields, one has to integrate
![]() over the Volume at one instant
Time. But E and H are not at the same Time. They are offset by T/4.
The Factor of 1/m, with m=2 for resonant Fields, accounts for the Effect of
integrating both the electric and magnetic Fields at their (time) Peak Values.
over the Volume at one instant
Time. But E and H are not at the same Time. They are offset by T/4.
The Factor of 1/m, with m=2 for resonant Fields, accounts for the Effect of
integrating both the electric and magnetic Fields at their (time) Peak Values.
When you are computing time dependent Fields, the Fields that gd1.pp
(normally) processes are electric and magnetic Fields at (almost) the same
Time (almost, because there is a Time-Offset of half of the used Timestep, but
the used Timestep is very small). For time dependent Fields, the electric
and magnetic Fields are not at their Time-Peak Values, but more important,
the electric and magnetic Fields are at the same Time. The stored Energy
can therefore be expressed directly by integrating
![]() over the Volume.
No factor 'm' is needed.
over the Volume.
No factor 'm' is needed.
You cannot and do not need to specify that 'm'. gd1.pp does this for you.
Example
To compute the stored Energy in the first electric Field found
in the Database, we say:
-energy, symbol= e_1, doit
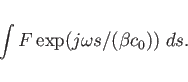
 ##############################################################################
 # Flags: nomenu, noprompt, nomessage,                                        #
 ##############################################################################
 # Section: -lintegral                                                        #
 ##############################################################################
 # symbol    = e_1                                                            #
 # quantity  = e                                                              #
 # solution  = 1                                                              #
 #                                                                            #
 # direction = z                                                              #
 # component = z                                                              #
 # startpoint= ( 0.0, 0.0, -1.0e+30 )                                         #
 #    (used) : ( @x0: undefined, @y0: undefined, @z0: undefined )             #
 # length    = auto                                                           #
 #    (@length) : undefined                                                   #
 # beta      = 1.0                                                            #
 # frequency = auto                     -- [auto | Real]                      #
 ##############################################################################
 # @vreal= undefined        @vimag= undefined       @vabs= undefined          #
 ##############################################################################
 # doit, ?, return, end, help, ls                                             #
 ##############################################################################
symbol= QUAN_ISOL:
quantity= QUAN:
solution= ISOL:
direction= [x|y|z]:
component= [x|y|z]:
startpoint= ( X0, Y0, Z0 ):
length:
auto, or a real Number.
length= auto, the Integration is performed from the Startpoint
to the End of the computational Domain (in direction-direction).
beta:
beta
as a very large Number, say 1e+10.
frequency:
"auto", the Frequency is taken from the Dataset.
If frequency is specified as a Number, that Value is taken for
the Integrand.
doit:
 ##############################################################################
 # Flags: nomenu, noprompt, nomessage,                                        #
 ##############################################################################
 # Section: -wlosses                                                          #
 ##############################################################################
 # symbol    = h_1                                                            #
 # quantity  = h                                                              #
 # solution  = 1                                                              #
 # frequency = auto                     -- [auto | Real]                      #
 # bbxlow =    -1.0000e+30, bbylow =    -1.0000e+30, bbzlow =    -1.0000e+30  #
 # bbxhigh=     1.0000e+30, bbyhigh=     1.0000e+30, bbzhigh=     1.0000e+30  #
 #                                                                            #
 #                                                                            #
 # @metalpower : undefined         [VA] (symbol: undefined)                   #
 ##############################################################################
 # doit, ?, return, end, help, ls                                             #
 ##############################################################################
The Conductivities that are used in the Perturbation Formula may be changed in the Section -material. The Result of the Computation is available as the symbolic Variable @metalpower. The Wall Losses are computed as:
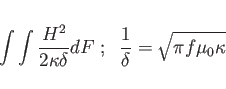
The Integration is performed over all metallic Surfaces that would appear in a Plot as produced by the Section -3darrowplot. This implies, that Wall Losses are NOT computed for electric Planes of Symmetry, since the Material on the Planes of Symmetry are not shown in -3darrowplot.
symbol= QUAN_ISOL:
quantity= QUAN:
solution= ISOL:
frequency:
"auto", the Frequency is taken from the Dataset.
If frequency is specified as a Number, that Value is taken for
the Integrand.
bbxlow=,bbxhigh=,bbylow=bbyhigh=,bbzlow=,bbzhigh=:
doit:
@metalpower for subsequent
Calculations.
For electric Fields:
![\begin{displaymath}
\frac{1}{m} \int \vec{E} \cdot \kappa_e \vec{E} \; dV = {\rm @epspower \; [VA]}
\end{displaymath}](img108.gif)
For magnetic Fields:
![\begin{displaymath}
\frac{1}{m} \int \vec{H} \cdot \kappa_m \vec{H} \; dV = {\rm @muepower \; [VA]}
\end{displaymath}](img109.gif)
The Integration is performed over the specified Volume.
The time-averaging Factor m is 2 for resonant Fields,
and 1 for nonresonant Fields.
 ##############################################################################
 # Flags: nomenu, noprompt, nomessage,                                        #
 ##############################################################################
 # Section: -dlosses                                                          #
 ##############################################################################
 # symbol    = h_1                                                            #
 # quantity  = h                                                              #
 # solution  = 1                                                              #
 # bbxlow =    -1.0000e+30, bbylow =    -1.0000e+30, bbzlow =    -1.0000e+30  #
 # bbxhigh=     1.0000e+30, bbyhigh=     1.0000e+30, bbzhigh=     1.0000e+30  #
 #                                                                            #
 #                                                                            #
 # @muepower : undefined               (symbol: undefined, m: 1)              #
 # @epspower : undefined               (symbol: undefined, m: 1)              #
 ##############################################################################
 # doit, ?, return, end, help, ls                                             #
 ##############################################################################
symbol= QUAN_ISOL:
quantity= QUAN:
solution= ISOL:
bbxlow=,bbxhigh=,bbylow=bbyhigh=,bbzlow=,bbzhigh=:
doit:
@epspower or @muepower
for subsequent Calculations.
 ##############################################################################
 # Flags: nomenu, noprompt, nomessage,                                        #
 ##############################################################################
 # Section: -flux                                                             #
 ##############################################################################
 # symbol  = h_1                                                              #
 # quantity= h                                                                #
 # solution= 1                                                                #
 #                                                                            #
 # normal  = z                     -- [x|y|z]                                 #
 # cutat   = undefined             -- Coordinate of the integration Plane     #
 # xlow= undefined            , xhigh= undefined                              #
 # ylow= undefined            , yhigh= undefined                              #
 # zlow= undefined            , zhigh= undefined                              #
 #    ( used: @cutat : undefined )                                            #
 #    ( used: @xlow  : undefined        , @xhigh  : undefined )               #
 #    ( used: @ylow  : undefined        , @yhigh  : undefined )               #
 #    ( used: @zlow  : undefined        , @zhigh  : undefined )               #
 # @flux : undefined [undefined]                                              #
 ##############################################################################
 # doit, ?, return, end, help, ls                                             #
 ##############################################################################
symbol= QUAN_ISOL:
quantity= QUAN:
solution= ISOL:
normal= [x|y|z]:
cutat= :
"normal" Coordinate of the Area through which the Integration
shall be performed.
xlow= ??, xhigh= ??, ylow= ??, yhigh= ??, zlow= ??, zhigh= ??:
normal= x, the Values xlow= ??, xhigh= ?? are ignored.
normal= y, the Values ylow= ??, yhigh= ?? are ignored.
normal= z, the Values zlow= ??, zhigh= ?? are ignored.
doit, the actually used Values will be accessible as the symbolic
Variables
@cutat, @xlow, @xhigh, @ylow, @yhigh, @zlow, @zhigh.
doit:
@flux for subsequent
Calculations.
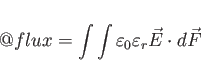
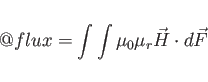
 ##############################################################################
 # Flags: nomenu, noprompt, nomessage,                                        #
 ##############################################################################
 # Section: -clouds                                                           #
 ##############################################################################
 # symbol  = h_1                                                              #
 # quantity= h                                                                #
 # solution= 1                                                                #
 #                                                                            #
 # position = no              -- 3D Plot of Particle Positions                #
 #   showbox= yes             -- Show computational Box with 3D Plot          #
 # gamma    = yes             -- 2D Plot of Gamma                             #
 # hgamma   = yes             -- 2D Plot of Gamma-density                     #
 #   ihgamma= 30              -- Number of hgamma Bins                        #
 # current  = yes             -- 2D Plot of Q*Velocity                        #
 #  binwidth=  5              -- Bin-Width of Current Average / ChargeSize    #
 #   normal = z               -- Direction of 2D Plots (gamma, current)       #
 # phase    = yes             -- Plots of Velocities vs Position              #
 #   xphase = yes               -- xVelocities vs xPosition                   #
 #   yphase = yes               -- yVelocities vs yPosition                   #
 #   zphase = yes               -- zVelocities vs zPosition                   #
 # export   = no              -- Export raw Cloud Data                        #
 #   outfile= ./gdfidl-exported-clouds                                        #
 ##############################################################################
 # 2dplotopts= -geometry 690x560+10+10                                        #
 #  linecolor= 0              -- 0: foreground, 3: yellow                     #
 #  foreground= black         -- black, white                                 #
 #  background= white         -- blue, white, black                           #
 # showtext     = yes         -- (yes | no)                                   #
 # onlyplotfiles= no          -- (yes | no)                                   #
 ##############################################################################
 # doit, ?, return, end, help, ls                                             #
 ##############################################################################
symbol= QUAN_ISOL:
quantity= QUAN:
solution= ISOL:
position= [yes|no]:
showbox= [yes|no]:
gamma= [yes|no]
hgamma= [yes|no]
ihgamma= NUMBER
hgamma= yes, specifies how many Bins of average Gamma shall be
used for the hgamma-Plot. The total normal-Extension of the
computational Volume will be divided in ihgamma=NUMBER equal
Sections.
The Average of the Gamma of all Clouds within the Bins will be plotted.
normal= [x|y|z]
hgamma Plot will be produced.
phase= [yes|no]
export= [yes|no]
outfile=WHATEVER.
2dplotopts= ANY STRING CONTAING OPTIONS FOR mymtv2:
showtext= [yes|no]:
onlyplotfiles= [yes|no]:
doit
 ##############################################################################
 # Flags: nomenu, noprompt, nomessage,                                        #
 ##############################################################################
 # Section -sparameter                                                        #
 ##############################################################################
 # ports      = all                                                           #
 #               -- (all | LIST )                                             #
 # modes      = ( 1 )                         -- (all | LIST )                #
 # timedata   = no                            -- ( yes | no )                 #
 #   tsumpower= no                            -- ( yes | no )                 #
 #   tintpower= no                            -- ( yes | no )                 #
 #   usample  = 5                             -- Undersample for t-Plots      #
 #   showeh   = yes                           -- show e*h t-Plots             #
 # freqdata   = yes                           -- ( yes | no )                 #
 #   wantdf   = auto                          -- ( auto | REAL )              #
 #   windowed = yes                           -- ( yes | no )                 #
 #     edgeofwindow= 0.70              -- At what Frac. start to apply Window #
 #   fsumpower= yes                           -- ( yes | no )                 #
 #   magnitude= yes                           -- ( yes | no )                 #
 #     slog   = no                            -- ( yes | no )                 #
 #     xlog   = no                            -- ( yes | no )                 #
 #   fintpower= no                            -- ( yes | no )                 #
 #   phase    = no                            -- ( yes | no )                 #
 #   smithplot= no                            -- ( yes | no )                 #
 #     markerat= undefined              -- Want a Marker at .. in Smith-Chart #
 #   groupvelocity= no                        -- ( yes | no )                 #
 #   fri      = no                            -- ( yes | no )                 #
 # excdata    = yes                     -- Show the Data of the Excitation    #
 # upto       = auto                    -- [s]   ( auto | REAL )              #
 # tfirst     = 0.0                     -- [s]                                #
 # flow       = auto                    -- [1/s] ( auto | REAL )              #
 # fhigh      = auto                    -- [1/s] ( auto | REAL )              #
 # ignoreexc  = no                            -- ( yes | no )                 #
 # details    = no                            -- ( yes | no )                 #
 ##############################################################################
 # 2dplotopts= -geometry 690x560+10+10                                        #
 #  linecolor= 0              -- 0: foreground, 3: yellow                     #
 #  foreground= black         -- black, white                                 #
 #  background= white         -- blue, white, black                           #
 # showtext     = yes         -- (yes | no)                                   #
 # onlyplotfiles= no          -- (yes | no)                                   #
 ##############################################################################
 # return, help, end, ls, clearmarkers, doit                                  #
 ##############################################################################
ports:
all, or a List of Names of Ports.
ports= all, the Time Domain Data of all Ports found in the
Database are processed.
ports is a List of Names, only the Time Domain Data of the Ports
whose Names are found in the List are processed.
modes:
all, or a List of Mode-Numbers.
modes= all, the Time Domain Data of all Modes of the selected
Ports found in the Database are processed.
modes is a List of Mode-Numbers, only the Time Domain Data of
the Modes with Numbers in the List are processed.
timedata:
timedata= yes, the Time Domain Amplitudes of the selected
Modes are plotted.
tsumpower:
tintpower:
usample= NN:
freqdata:
freqdata= no, no scattering Parameters are plotted.
wantdf= DF:
wantdf=auto, the computed scattering Parameters have a
frequency Resolution of just df = 1 / simulated Time.
wantdf=DF , the Time Domain Data are assumed to be Zero outside
of the FDTD-simulated time Range. These zero-padded time Signals within
a time Range of DT = 1 / DF are FFTed, giving an apparent frequency
Resolution
of DF.
windowed:
edgeofwindow= FRAC:
![\begin{displaymath}\frac{1}{2} \left[1+\cos(\pi\frac{t-FRAC*T}{(1-FRAC)*T})\right] \end{displaymath}](img112.gif)
fsumpower:
magnitude:
magnitude= yes, the absolute Value of the scattering Parameters
are plotted.
slog:
slog= yes, the Magnitude of the scattering Parameters are
initially plotted in a logarithmic Plot.
fintpower:
phase:
phase= yes, the Phase of the scattering Parameters are plotted.
smithplot:
smithplot= yes, the scattering Parameters are plotted in a
Smith-Plot.
markerat= Fi:
groupvelocity:
groupvelocity= yes, the Groupvelocity is computed from the
Phase. The Result is only sensible for Transmissions.
fri:
fri= yes, the scattering Parameters are written in fri-Format
to Files.
excdata:
upto:
auto or a Time-Value.
upto= auto, the Time Data up to the last found simulated Time
are considered for the Fourier-Transforms.
upto= TMAX, only the Time-Data upto the Time-Value TMAX
are considered for the Fourier-Transforms. This is useful,
for the Case that a late Time Instability of the Time
Domain Computation has occured, and you want to know the scattering
Parameters of a shorter Simulation.
THIS SHOULD NOT HAPPEN.
IF YOU ENCOUNTER A LATE TIME INSTABILITY, PLEASE SEND THE INPUTFILE
WHERE THIS INSTABILITY HAS OCCURED TO "bruns@gdfidl.de".
wantdf= DF.
tfirst= TFIRST:
TFIRST are discarded and replaced by Zero.
flow:
flow= auto, the lower Limit of the Frequency Range of the
Plots is derived from the Centerfrequency and the Bandwidth of the
Excitation as they were specified in the Input for
gd1.
If flow= FMIN, the lower Limit of the Frequency Range is
FMIN.
fhigh:
fhigh= auto, the upper Limit of the Frequency Range of the
Plots is derived from the Centerfrequency and the Bandwidth of the
Excitation as they were specified in the Input for
gd1.
If fhigh= FMAX, the upper Limit of the Frequency Range is
FMAX.
ignoreexc:
ignoreexc= yes, the Spectrum of the excited Mode is ignored.
Instead, a flat Spectrum is assumed.
This is useful e.g. to compute the Coupling from an relativistic Charge
to the Port-Modes.
details:
yes, a lot of intermediate Data are plotted.
2dplotopts= ANY STRING CONTAING OPTIONS FOR mymtv2:
plotopts= ANY STRING CONTAING OPTIONS FOR gd1-3dplot:
showtext= [yes|no]:
onlyplotfiles= [yes|no]:
doit:
clearmarkers:
clearmarkers, the List of Markers which were requested via
markerat is cleared.
Input, Output, we say:
 -sparameter
     modes= ( 1, 2 )
     ports= ( Input, Output )
  doit
gd1 < /usr/local/gd1/examples-from-the-manual/arndt.MTT90.p1854.fig5.gdf
 # /usr/local/gd1/examples-from-the-manual/arndt.MTT90.p1854.fig5.gdf

define(INF,10000.0)
define(MAG, 2) define(PEL, 1) define(CU, 3) define(PER,0)

define(FREQ,15e9)

define(WGH, 15.8e-3)
define(WGW0, 7.9e-3)
define(T0, 6.6e-3)

define(CSW1, 4.2e-3)
define(T1, 6.2e-3)

define(STPSZE, 0.5e-3 )
define(XHIGH, 30e-3) define(XLOW, -XHIGH )
define(ZHIGH, 12e-3) define(ZLOW, -ZHIGH )

########
########
########
 -general
   outfile= /tmp/UserName/arndt
   scratch= /tmp/UserName/arndt-scratch-

 -mesh
   spacing= STPSZE
#   graded= on, qfgraded= 1.2, dmaxgraded= 3e8/FREQ/20
   pxlow= XLOW, pxhigh= XHIGH
   pylow= -WGH/2-STPSZE, pyhigh= 0   # Weg damit
   pylow= 0, pyhigh= WGH/2+STPSZE
   pzlow= ZLOW, pzhigh= ZHIGH
   cxlow= el, cxhigh= el
   cylow= el, cyhigh= mag   # Weg damit
   cylow= mag, cyhigh= ele
   czlow= el, czhigh= mag

 -material
   material= PEL, type= electric
   material= CU,  type= electric

#
# Fill the Universe with Material CU.
#
-brick
   material= CU,
   volume= ( -INF, INF, \
             -INF, INF, \
             -INF, INF)
   doit
#
# The upper and lower Waveguide.
#
   material= 0,
   volume= ( -INF,INF, -WGH/2,WGH/2, T0/2,T0/2+WGW0 ), doit
   vol (-INF,INF, -WGH/2,WGH/2, -(T0/2+WGW0),-T0/2 ), doit

#
# The coupling Slits.
#
   vol ( -CSW1/2,CSW1/2, -WGH/2,WGH/2, -(T0/2+WGW0),T0/2+WGW0 ), doit
   vol ( -(4.2e-3/2+3.0e-3),\
          (4.2e-3/2+3.0e-3),\
          -WGH/2,WGH/2,\
          T0/2,T0/2+WGW0 ),
   doit

   vol ( -(4.2e-3/2+3.0e-3),4.2e-3/2+3.0e-3, -WGH/2,WGH/2, -(T0/2+WGW0),-T0/2 ), do
define(XDUM, 4.2e-3/2+3.0e-3 )
   vol ( -(XDUM+3.2e-3),-XDUM, -WGH/2,WGH/2, -(T0/2+WGW0),T0/2+WGW0 ), do
   vol ( XDUM,XDUM+3.2e-3, -WGH/2,WGH/2, -(T0/2+WGW0),T0/2+WGW0 ), do

define(XDUM, 4.2e-3/2+3.0e-3+3.2e-3+4.2e-3 )
   vol ( -(XDUM+1.6e-3),-XDUM, -WGH/2,WGH/2, -(T0/2+WGW0),T0/2+WGW0 ), do
   vol ( XDUM,XDUM+1.6e-3, -WGH/2,WGH/2, -(T0/2+WGW0),T0/2+WGW0 ), do

 -volumeplot,
#   eyeposition= ( 1.0, 2.0, 0.5)
   scale= 4.5
   doit

-fdtd
  -ports
     name= xlow1,  plane= xlow,  pzlow = 0, modes= 1, doit
     name= xlow2,  plane= xlow,  pzhigh= 0, modes= 1, doit
     name= xhigh1, plane= xhigh, pzlow = 0, modes= 1, doit
     name= xhigh2, plane= xhigh, pzhigh= 0, modes= 1, doit

  -pexcitation
     port= xlow1,
     mode= 1, amplitude= 1, frequency= 15e9, bandwidth= 10e9,

  -time
     tmin=    100/FREQ
     tmax=  10000/FREQ
     firsts= 10/FREQ
     lasts = 11/FREQ
     distancesave= 0.10/FREQ
     amptresh= 1e-3

  -fdtd
     doit
In the next Step, we start gd1.pp to compute the scattering Parameters
from the Time Domain Amplitudes, that were computed by gd1.
The Input we give to gd1.pp is:
 -gen, inf @last
 -3da, sy e_1, scal 4.5, arr 5000, fonmat yes, doit
 -spa, window yes, doit
       window no, doit
The resulting Plots are shown in the Figures
2.3 to 2.13.
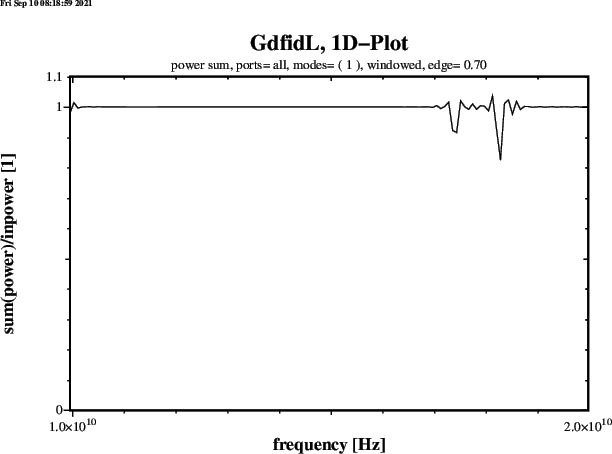 |
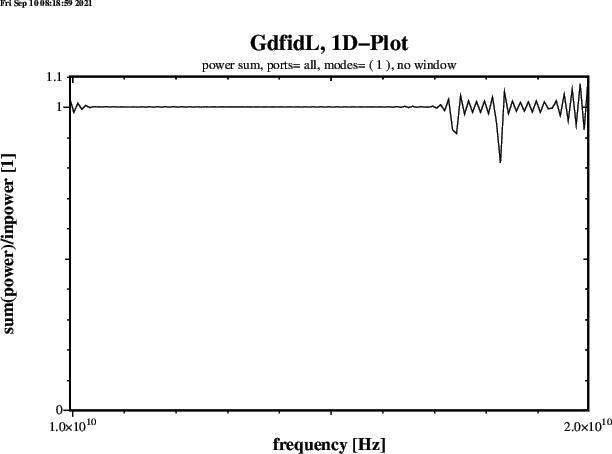 |
tfirst.
A Computation with a relativistic Line Charge is performed.
The Device is a Button-Beam-Position-Monitor. Only a Quarter of the Device is modeled.
There are three Ports where Energy can flow away from the Button.
The TEM-Line which is connected to the Button, and the lower and upper Beam-Pipe.
The Amplitudes at these Ports is recorded when modes at these Ports is specified
larger than Zero.
gd1 < /usr/local/gd1/examples-from-the-manual/Button-LineCharge.gdf
 # /usr/local/gd1/examples-from-the-manual/Button-LineCharge.gdf

define(INF, 10000)

define(SIGMA, 4.6e-3)
define(STPSZE, 0.15e-3 )

define(A,    40e-3)
define(B,    37e-3)

define(ZYL1, 100e-3)

define(RADO, 3.8e-3)
define(RADI, 3.5e-3)
define(FEED, 0.33e-3)

define(BUTTON,4.0e-3)
define(CERMA, 4.5e-3)
define(CERME, 6.5e-3)
define(BLOCK, 7.5e-3)

define(EXT, 85e-3)


###############################################################

 -general
    outfile= /tmp/UserName/Resultfiles
    scratch= /tmp/UserName/scratch-

 -mesh
    spacing= STPSZE, perfectmesh= no
    graded= yes, dmaxgraded= 4*STPSZE

 define(BUTTONX0, 9.065e-3)
 define(X1, BUTTONX0-RADO)
 define(X2, BUTTONX0+RADO)
 define(NX, 1+(X2-X1)/STPSZE)
    xfixed( NX, X1, X2 )
    zfixed( NX, -RADO, +RADO )

    pxlow= 0, pxhigh= EXT+5e-3
    pylow= 0, pyhigh= 25e-3
    pzlow = -0.01
    pzhigh= +0.01

    cxlow= mag, cxhigh= ele
    cylow= mag, cyhigh= ele
    czlow= el,  czhigh= ele

 #########################################################################
 -material
    material= 3, type= electric
    material= 4, type= electric
    material= 5, type= normal, epsr= 9, muer= 1

-brick
  # Fill the universe with metal..
  material=4
     volume= (-INF,INF, -INF,INF, -INF,INF)
  doit
 ################################################################
 #vacuum chamber

 -ggcylinder
     material= 0
     originprime= ( 0, 0, 0 )
     xprimedirection= ( 1, 0, 0 )
     yprimedirection= ( 0, 1, 0 )
     range= (-ZYL1/2, ZYL1/2)
 show= later
     clear
       point= ( -36e-3,      -5e-3)
       point= ( -36e-3,       5e-3)
       point= (-20.415e-3,   14e-3)
       point= ( 20.415e-3,   14e-3)
       point= (  36e-3,       5e-3)
       point= (  56e-3,       5e-3)
       point= (  56e-3,      14e-3)
       point= ( EXT,         14e-3)
       point= ( EXT,        -14e-3)
       point= (  56e-3,     -14e-3)
       point= (  56e-3,      -5e-3)
       point= (  36e-3,      -5e-3)
       point= ( 20.415e-3,  -14e-3)
       point= (-20.415e-3,  -14e-3)
       point= ( -36e-3,      -5e-3)
     doit


 #
 # All four Buttons are modelled, although
 # only one of them is inside the selected Quarter.
 #
 do i= -1, 1, 2
    do j= -1, 1, 2

       #The vacuum part containing the bpm's
       -gbor
           material= 0
           originprime= ( j * BUTTONX0, 14e-3*i, 0 )
           zprimedirection= ( 0, i, 0 )
           rprimedirection= ( 1, 0, 0 )
           range= (0, 360)
 show= later
           clear
              point= (0,       0.)
              point= (0,       4.25e-3)
              point= (27e-3,   4.25e-3)
              point= (27e-3,   0.)
           doit


       # the bpm's
       #the outside shell _1

        material= 3
           clear
              point= (0,        RADO)
              point= (0,        4.25e-3)
              point= (17.5e-3,  4.25e-3)
              point= (17.5e-3,  4.25e-3)
              point= (27e-3,    4.25e-3)
              point= (27e-3,    2.05e-3)
              point= (BLOCK,    2.05e-3)
              point= (BLOCK,    RADO)
              point= (0,        RADO)
            doit

       #inner part of the bpm's
            clear
               point= (0,       0.0)
               point= (0,       RADI)
               point= (BUTTON,  RADI)
               point= (BUTTON, 1.65e-3)
               point= (CERMA,  1.65e-3)
               point= (CERMA,  FEED)
               point= (CERME,  FEED)
               point= (CERME,  0.89e-3)
               point= (27e-3,  0.89e-3)
               point= (27e-3,  0.0e-3)
            doit

       #Al203 part_1
         material= 5
            clear
               point= (CERMA,  FEED)
               point= (CERMA,  RADO)
               point= (CERME,  RADO)
               point= (CERME,  FEED)
            doit
   end do
 end do
###############################################
-volumeplot
      scale=3
      doit
##########################################################################
#
# Wake-Parameters..
#
# For Ports where the Beam passes through, npml=40 or larger is recommended.
#
-fdtd
  -ports
    name= lower_end, plane= zlow,  modes= 10, npml= 40, doit
    name= upper_end, plane= zhigh, modes= 10, npml= 40, doit
    name= bpmho,     plane= yhigh, modes= 1, doit

 -lcharge
    xpos= 0, ypos= 0,
    charge= 1e-12, sigma= SIGMA
    shigh= 2

 #
 # The Storing of the Fields is just for the nice plot for the Manual.
 #
 -time
    firstsaved= SIGMA / @clight
    lastsaved= (ZYL1 + 20 * SIGMA) / @clight
    distance= SIGMA / @clight

 -fdtd
    doit
The time Data of the Modes at the lower and upper Beam-Pipes are contaminated by the Passing of
the Beam through these Ports at small time Values.
The Beam has significant Charge ie more than 1e-7 than the Maximum, for times less
than
 -general,
     infile= @last
     scratch= ./Resultfile-
 -3darrow, sy e_11, arr 1e4, lena 100, fonmat yes, scale 4, doit
 -spa,
       freqdata= no, timedata= yes, tintpower= yes, modes= all

    ports= ( lower_end )
       tfirst= 0, doit
       tfirst= 8 * SIGMA / 3e8, doit
    ports= ( upper_end )
       tfirst= 0, doit
       tfirst= ( @zmax - @zmin + 8 * SIGMA ) / 3e8, doit
    ports= ( bpmho )
       tfirst= 0, doit
 |
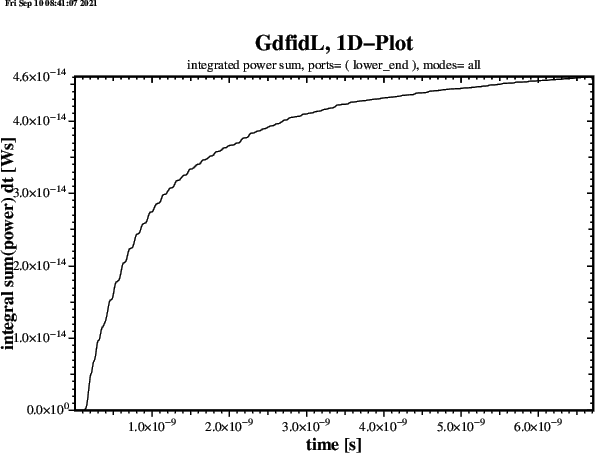 |
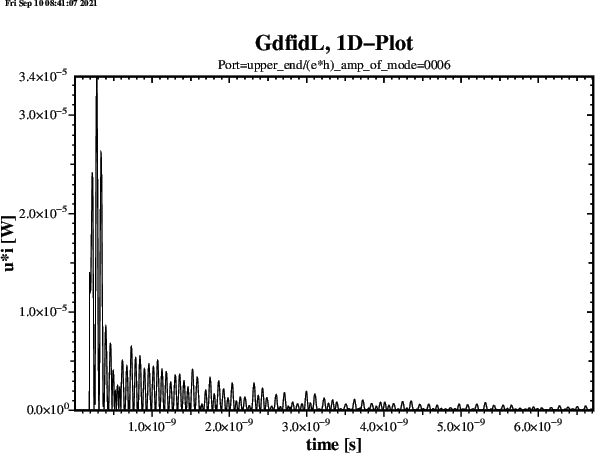 |
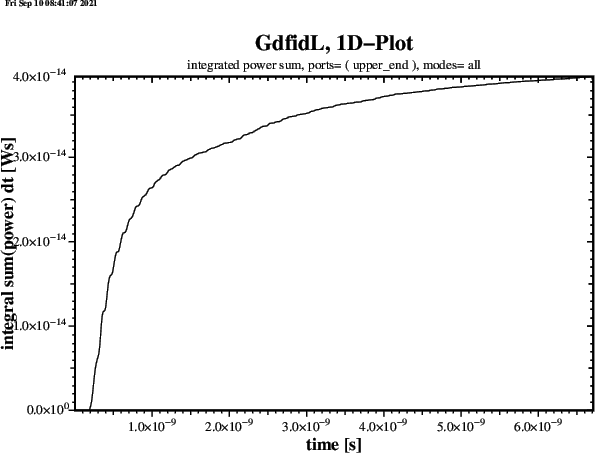 |
Re(S)= a1*Re(E)*Re(H) - b1*Im(E)*Im(H)
The imaginary-Part
Im(S)= a2*Re(E)*Im(H) + b2*Im(E)*Re(H)
 ##############################################################################
 # Flags: nomenu, noprompt, nomessage,                                        #
 ##############################################################################
 # Section: -pcombine                                                         #
 ##############################################################################
 # Re(S): a1*Re(E)*Re(H) - b1*Im(E)*Im(H)                                     #
 # Im(S): a2*Re(E)*Im(H) + b2*Im(E)*Re(H)                                     #
 #----------------------------------------------------------------------------#
 # a1=        0.50                                                            #
 # a2=        0.50                                                            #
 # b1=        0.50                                                            #
 # b2=        0.50                                                            #
 # eresymbol    = ere_1                                                       #
 #   erequantity= ere                                                         #
 #   eresolution= 1                                                           #
 # eimsymbol    = ere_1                                                       #
 #   eimquantity= ere                                                         #
 #   eimsolution= 1                                                           #
 # hresymbol    = hre_1                                                       #
 #   hrequantity= hre                                                         #
 #   hresolution= 1                                                           #
 # himsymbol    = hre_1                                                       #
 #   himquantity= hre                                                         #
 #   himsolution= 1                                                           #
 # sresymbol    = sre_1                                                       #
 #   srequantity= sre                                                         #
 #   sresolution= 1                                                           #
 # simsymbol    = sim_1                                                       #
 #   simquantity= sim                                                         #
 #   simsolution= 1                                                           #
 ##############################################################################
 # doit, ?, return, end, ls                                                   #
 ##############################################################################
When both a1 and a2 are specified as zero, eresymbol is not referenced and so does not need to be specified.
a1, b1, a2, b2
eresymbol, eimsymbol
hresymbol, himsymbol
erequantity, eimquantity, hrequantity, himquantity
eresolution, eimsolution, hresolution, himsolution
sresymbol, simsymbol:
srequantity, simquantity
sresolution, simsolution:
doit:
gd1 < /usr/local/gd1/examples-from-the-manual/arndt.MTT90.p1854.fig5.gdf
 # /usr/local/gd1/examples-from-the-manual/arndt.MTT90.p1854.fig5.gdf

define(INF,10000.0)
define(MAG, 2) define(PEL, 1) define(CU, 3) define(PER,0)

define(FREQ,15e9)

define(WGH, 15.8e-3)
define(WGW0, 7.9e-3)
define(T0, 6.6e-3)

define(CSW1, 4.2e-3)
define(T1, 6.2e-3)

define(STPSZE, 0.5e-3 )
define(XHIGH, 30e-3) define(XLOW, -XHIGH )
define(ZHIGH, 12e-3) define(ZLOW, -ZHIGH )

########
########
########
 -general
   outfile= /tmp/UserName/arndt
   scratch= /tmp/UserName/arndt-scratch-

 -mesh
   spacing= STPSZE
#   graded= on, qfgraded= 1.2, dmaxgraded= 3e8/FREQ/20
   pxlow= XLOW, pxhigh= XHIGH
   pylow= -WGH/2-STPSZE, pyhigh= 0   # Weg damit
   pylow= 0, pyhigh= WGH/2+STPSZE
   pzlow= ZLOW, pzhigh= ZHIGH
   cxlow= el, cxhigh= el
   cylow= el, cyhigh= mag   # Weg damit
   cylow= mag, cyhigh= ele
   czlow= el, czhigh= mag

 -material
   material= PEL, type= electric
   material= CU,  type= electric

#
# Fill the Universe with Material CU.
#
-brick
   material= CU,
   volume= ( -INF, INF, \
             -INF, INF, \
             -INF, INF)
   doit
#
# The upper and lower Waveguide.
#
   material= 0,
   volume= ( -INF,INF, -WGH/2,WGH/2, T0/2,T0/2+WGW0 ), doit
   vol (-INF,INF, -WGH/2,WGH/2, -(T0/2+WGW0),-T0/2 ), doit

#
# The coupling Slits.
#
   vol ( -CSW1/2,CSW1/2, -WGH/2,WGH/2, -(T0/2+WGW0),T0/2+WGW0 ), doit
   vol ( -(4.2e-3/2+3.0e-3),\
          (4.2e-3/2+3.0e-3),\
          -WGH/2,WGH/2,\
          T0/2,T0/2+WGW0 ),
   doit

   vol ( -(4.2e-3/2+3.0e-3),4.2e-3/2+3.0e-3, -WGH/2,WGH/2, -(T0/2+WGW0),-T0/2 ), do
define(XDUM, 4.2e-3/2+3.0e-3 )
   vol ( -(XDUM+3.2e-3),-XDUM, -WGH/2,WGH/2, -(T0/2+WGW0),T0/2+WGW0 ), do
   vol ( XDUM,XDUM+3.2e-3, -WGH/2,WGH/2, -(T0/2+WGW0),T0/2+WGW0 ), do

define(XDUM, 4.2e-3/2+3.0e-3+3.2e-3+4.2e-3 )
   vol ( -(XDUM+1.6e-3),-XDUM, -WGH/2,WGH/2, -(T0/2+WGW0),T0/2+WGW0 ), do
   vol ( XDUM,XDUM+1.6e-3, -WGH/2,WGH/2, -(T0/2+WGW0),T0/2+WGW0 ), do

 -volumeplot,
#   eyeposition= ( 1.0, 2.0, 0.5)
   scale= 4.5
   doit

-fdtd
  -ports
     name= xlow1,  plane= xlow,  pzlow = 0, modes= 1, doit
     name= xlow2,  plane= xlow,  pzhigh= 0, modes= 1, doit
     name= xhigh1, plane= xhigh, pzlow = 0, modes= 1, doit
     name= xhigh2, plane= xhigh, pzhigh= 0, modes= 1, doit

  -pexcitation
     port= xlow1,
     mode= 1, amplitude= 1, frequency= 15e9, bandwidth= 10e9,

  -time
     tmin=    100/FREQ
     tmax=  10000/FREQ
     firsts= 10/FREQ
     lasts = 11/FREQ
     distancesave= 0.10/FREQ
     amptresh= 1e-3

  -fdtd
     doit
In the next Step, we start gd1.pp to combine the first stored E-Field and
the first stored H-Field to get the Poynting-Field. We display the resulting Field.
The Input we give to gd1.pp is:
 -gen, inf @last
 -pcombine
  # Re(s)= a1 * Re(E) * Re(H) - a2 * Im(E) * Im(H)
    a1= 0.5, b1= 0, a2= 0, b2= 0
    eresymbol= e_1
    hresymbol= h_1
    sresymbol= s_1, doit
 -3da, sy= s_1, doit
The resulting Plot is shown in the Figure
2.24.
 ##############################################################################
 # Flags: nomenu, noprompt, nomessage,                                        #
 ##############################################################################
 # section -material                                                          #
 ##############################################################################
 # material=  1        epsr....: infinity      kappa    =      58.0e+6        #
 # type: electric         xepsr: infinity        xkappa =      58.0e+6        #
 #                        yepsr: infinity        ykappa =      58.0e+6        #
 #                        zepsr: infinity        zkappa =      58.0e+6        #
 #                     muer....:       0.0     mkappa   :       0.0           #
 #                        xmuer:       0.0       xmkappa:       0.0           #
 #                        ymuer:       0.0       ymkappa:       0.0           #
 #                        zmuer:       0.0       zmkappa:       0.0           #
 ##############################################################################
 # return, help, ls                                                           #
 ##############################################################################
type, epsr, muer, mkappa cannot be changed.
-wlosses
shall use a Conductivity of
 -material
    material= 10
    kappa= 30e6
gd1 computes the Integral of the ![]() component along the outermost
Paths where a Witness-Particle can travel and stores the Result in the Database.
Since from these Data the longitudinal and transverse Wakepotentials everywhere
in the Beam Pipe can be computed, you can specify an unlimited Number of
Positions (x,y) where you are interested in the Wakepotentials.
The (x,y) Position of the exciting Charge cannot be changed afterwards,
though.
component along the outermost
Paths where a Witness-Particle can travel and stores the Result in the Database.
Since from these Data the longitudinal and transverse Wakepotentials everywhere
in the Beam Pipe can be computed, you can specify an unlimited Number of
Positions (x,y) where you are interested in the Wakepotentials.
The (x,y) Position of the exciting Charge cannot be changed afterwards,
though.
 ##############################################################################
 # Flags: nomenu, noprompt, nomessage,                                        #
 ##############################################################################
 # section -wakes                                                             #
 ##############################################################################
 # set =     0      -- What Dataset (windowwake only)                         #
 # watq      = yes  -- Process all Wakes at Positions of Line-Charges         #
 # awtatq    = yes  -- Use the Average of the two nearest transverse Wakes    #
 #                  -- as the transverse Wakes at the Positions of Charges    #
 # impedances= no   -- Compute Impedances.                                    #
 #    wantdf = auto           -- Wanted freq Resolution => SIN(f)/f Interpol. #
 #    window = yes            -- Apply Hann-Window when computing Impedances. #
 #     fhigh =  undefined          -- fhigh of Impedances.                    #
 #    excitation= charge           -- {charge|port}.                          #
 # uselu= yes            -- Use Sparse LU-Factorisation (not MG).             #
 #   niter =   2         -- nIter for MG                                      #
 #   omega =    1.10     -- Omega for MG                                      #
 #   Omega2=    1.10     -- Omega2 for MG                                     #
 #   mgdetails= no       -- Show Number of its etc                            #
 # uselowpass= no        -- Use lowpass Filtering.                            #
 # usehighpass= no       -- Use highpass Filtering.                           #
 # showchargemax= no     -- Show Value of Charge Maximum.                     #
 # sbunchspectrum= no    -- Show Spectrum of the Current(, when imp=yes).     #
 # centerbunch= yes      -- Shift Data. Bunch Center will be at s=0.          #
 # peroffset= no         -- Scale Wx by x, Wy by y.                           #
 # xyref   = ( 0.0, 0.0)                        -- refpoint for ??atxy-Data   #
 # usexyref= no                                 -- Use refpoint?              #
 # clear            -- Clears all the "w*at*" Values.                         #
 # watxy = ( undefined, undefined)                  -- want wz(xi,yi,s), i= 1 #
 # wxatxy= ( undefined, undefined)                  -- want wx(xi,yi,s), i= 1 #
 # wyatxy= ( undefined, undefined)                  -- want wy(xi,yi,s), i= 1 #
 # watsi = undefined                  -- want w(x,y,si), i= 1                 #
 # watxi = undefined                  -- want w(xi,y,s), i= 1                 #
 #   liny= 20                         -- Number of Lines in y-Direction.      #
 # watyi = undefined                  -- want w(x,yi,s), i= 1                 #
 #   linx= 20                         -- Number of Lines in x-Direction.      #
 # wxatxi= undefined                  -- want wx(xi,y,s), i= 1                #
 # wxatyi= undefined                  -- want wx(x,yi,s), i= 1                #
 # wyatxi= undefined                  -- want wy(xi,y,s), i= 1                #
 # wyatyi= undefined                  -- want wy(x,yi,s), i= 1                #
 # istrides= 3                        -- Distance of s-Points of the Plots    #
 #                                    --                 in Units of "ds".    #
 # slow =        0.0                  -- Lowest s-Value to consider.          #
 # shigh=  undefined                  -- Highest s-Value to consider.         #
 # watsfiles = -none-
 #   xlowwats =       -1.0e+30                                                #
 #   xhighwats=        1.0e+30                                                #
 #   ylowwats =       -1.0e+30                                                #
 #   yhighwats=        1.0e+30                                                #
 # frequency=  undefined ( @ufrequency :  undefined )                         #
 #   ( @zxesrf:  undefined )                                                  #
 #   ( @zxesrf:  undefined )                                                  #
 #   ( @zxesrf:  undefined )                                                  #
 #  ( @xloss :  undefined ) [VAs]                                             #
 #  ( @yloss :  undefined ) [VAs]                                             #
 #  ( @zloss :  undefined ) [VAs]                                             #
 #  ( @charge:  undefined ) [As]                                              #
 ##############################################################################
 # 2dplotopts= -geometry 690x560+10+10                                        #
 #  linecolor= 0              -- 0: foreground, 3: yellow                     #
 #  foreground= black         -- black, white                                 #
 #  background= white         -- blue, white, black                           #
 # showtext     = yes         -- (yes | no)                                   #
 # onlyplotfiles= no          -- (yes | no)                                   #
 ##############################################################################
 # return, help, end, clear, doit                                             #
 ##############################################################################
-windowwake, one can compute
in a single Run the Wakepotentials of different Numbers of periodic Sections
of a periodic Geometry. The different Results are call Sets. The Number of
the Set to analyse is specified.
If awtatq= yes, gd1.pp computes the transverse Wakepotentials at the two Positions between the Grid Planes that are nearest to the Position of the exciting Charge. The Average of the two Potentials are then assumed to be the transverse Wakepotential at the Position of the Charge.
uselu=no, the linear Equations are solved with
an iterative Scheme, which requires less memory, but much more time.
yes, the s-Coordinate is shifted such that the maximum of the exciting
Charge is at s=0.
yes, the transverse Wakepotentials and Impedances are
plotted after scaling by their x- and y-Positions.
usexyref=yes, the transverse Wakepotentials at (XREF,YREF)
are computed, and the other transverse Wakepotentials are
plotted as eg.
You can specify an unlimited Number of (x,y)-Positions where you want to know the longitudinal or transverse Wakepotentials.
You can specify an unlimited Number of s-Positions where you want to have such Plot.
You can specify an unlimited Number of y- or y-Positions where you want to know the longitudinal Wakepotentials.
If you specify wxatxi= Xi, the transverse Wakepotential in x-Direction will be plotted in the y-s Plane at the x-Coordinate between Meshplanes nearest to Xi.
If you specify wxatyi= Yi, the transverse Wakepotential in x-Direction will be plotted in the x-s Plane at the y-Coordinate between Meshplanes nearest to Yi.
If you specify wyatxi= Xi, the transverse Wakepotential in y-Direction will be plotted in the y-s Plane at the x-Coordinate between Meshplanes nearest to Xi.
If you specify wyatyi= Yi, the transverse Wakepotential in y-Direction will be plotted in the x-s Plane at the y-Coordinate between Meshplanes nearest to Yi.
You can specify an unlimited Number of y- or y-Positions where you want to know the transverse Wakepotentials.
xlowwats etc the limiting Planes of the Region where w(x,y,s) shall
be written to wats-Files.
2dplotopts= ANY STRING CONTAING OPTIONS FOR mymtv2:
plotopts= ANY STRING CONTAING OPTIONS FOR gd1-3dplot:
showtext= [yes|no]:
onlyplotfiles= [yes|no]:
@zloss, @xloss, @yloss after a
Wakepotential Computation.
 -wake
    watxi= 1e-3
    watxi= 2e-3
-sparameter may be used to generate the fri-Files.
 ##############################################################################
 # Flags: nomenu, noprompt, nomessage,                                        #
 ##############################################################################
 # section: -totouchstone                                                     #
 ##############################################################################
 # outfile= ./s-matrix.sXp                                                    #
 # ports= 2                                                                   #
 # normalise= no                                                              #
 #                                                                            #
 # ij= (1,1)                  -- Index of S-Parameter.                        #
 # file=  -none-
 #                            -- Filename of S-Parameter.                     #
 # factor= 1.0                -- Factor to apply.                             #
 # iport=  1, fcutoff= 0.0                                                    #
 # ###                                                                        #
 # Already specified Files:                                                   #
 # ij: (1,1), factor: 1.0, fcutoff: 0.0                                       #
 #   file:  -none-
 # ij: (1,2), factor: 1.0, fcutoff: 0.0                                       #
 #   file:  -none-
 # ij: (2,1), factor: 1.0, fcutoff: 0.0                                       #
 #   file:  -none-
 # ij: (2,2), factor: 1.0, fcutoff: 0.0                                       #
 #   file:  -none-
 ##############################################################################
 # clear, doit, ?, return, end, help, ls                                      #
 ##############################################################################
outfile= VALID-FILENAME:
ports= NN:
normalise:
ij= (I, J):
file= NAME-OF-A-FRI-FILE:
factor= NUMBER:
wantdf= DF),
and must have the same frequency Range.
#!/bin/sh

#
# First Step:
# Computation of the four rows of the scattering matrix.
# The results of each computation are stored in a different file.
#
#    In the inputfile "arndt.00.x.gdf", the outfile is defined as
#       outfile= /tmp/bruw1931/garbage/arndt-excitation-at-PEXC
#
#
# At each computation, a different port is excited.
#
#    In the inputfile, the excitation is defined via:
#  -pexcitation
#     port= PEXC,
#     mode= 1, amplitude= 1, frequency= 17e9, bandwidth= 20e9,
#

 for PEXC in xlow1 xhigh1 xlow2 xhigh2
 do
    gd1 -DPEXC=$PEXC < arndt.00.x.gdf | tee out-excitation=$PEXC
 done

#
# Fouriertransform, and generating fri-files.
# The names of the fri-files are defined via
#
#  -general, scratch= /tmp/bruw1931/garbage/exc-at-$PEXC-
#
# Frequency resolution is 10 MHz  (wantdf= 10e6)
#
 for PEXC in xlow1 xhigh1 xlow2 xhigh2
 do
    gd1.pp << EOF
      -general
         infile= /tmp/bruw1931/garbage/arndt-excitation-at-$PEXC
         scratch= /tmp/bruw1931/garbage/exc-at-$PEXC-
      -sparameter
         window= yes, edgeofwindow= 0.7
         wantdf= 10e6
         flow= 5e9, fhigh= 25e9
         timedata= no, fsumpower= no, magnitude= no, phase= no, smithplot= no
         fri= yes
         onlyplotfiles= yes
         doit
EOF
 done

#
# Second step.
# Combining the rows of the scattering matrix to one TouchStone-file.
#

 gd1.pp << EOF
 -totouchstone
    clear     # file= - undefined -
    ports= 4

 sdefine(BASE, /tmp/bruw1931/garbage/exc-at)
    sdefine(P1, xlow1) sdefine(P2, xhigh1)
    sdefine(P3, xlow2) sdefine(P4, xhigh2)
      ij= (1,1), file= [BASE]-[P1]-[P1]_out_1.fri
      ij= (1,2), file= [BASE]-[P1]-[P2]_out_1.fri
      ij= (1,3), file= [BASE]-[P1]-[P3]_out_1.fri
      ij= (1,4), file= [BASE]-[P1]-[P4]_out_1.fri

      ij= (2,1), file= [BASE]-[P2]-[P1]_out_1.fri
      ij= (2,2), file= [BASE]-[P2]-[P2]_out_1.fri
      ij= (2,3), file= [BASE]-[P2]-[P3]_out_1.fri
      ij= (2,4), file= [BASE]-[P2]-[P4]_out_1.fri

      ij= (3,1), file= [BASE]-[P3]-[P1]_out_1.fri
      ij= (3,2), file= [BASE]-[P3]-[P2]_out_1.fri
      ij= (3,3), file= [BASE]-[P3]-[P3]_out_1.fri
      ij= (3,4), file= [BASE]-[P3]-[P4]_out_1.fri

      ij= (4,1), file= [BASE]-[P4]-[P1]_out_1.fri
      ij= (4,2), file= [BASE]-[P4]-[P2]_out_1.fri
      ij= (4,3), file= [BASE]-[P4]-[P3]_out_1.fri
      ij= (4,4), file= [BASE]-[P4]-[P4]_out_1.fri

     outfile= /tmp/bruw1931/garbage/touchstone.s4p

    doit
EOF

##############
 ##############################################################################
 # Flags: nomenu, noprompt, nomessage,                                        #
 ##############################################################################
 # section: -combine                                                          #
 ##############################################################################
 # outfile= ./s-matrix.sXp
 # show= yes                            -- Give a Plot of the resulting       #
 #                                      -- Scattering Parameters.             #
 # kdevice= 1, smatrix=  -none-
 # kdevice= 2, smatrix=  -none-
 # kdevice= 3, smatrix=  -none-
 # p1ik= ( 1, 1 ), p2ik= ( 1, 2 ), factor= 1.0                                #
 #  fcutoff= 0.0, epsmue= 1.0, linelength= 0.0                                #
 # rpi= 1, pik= ( 1, 1 )                                                      #
 # ####                                                                       #
 # Specified Port Connections:                                                #
 #     -- none so far --                                                      #
 # ####                                                                       #
 # Specified outer Ports:                                                     #
 #     -- none so far --                                                      #
 ##############################################################################
 # connect, assign, clear, doit, ?, return, end, help                         #
 ##############################################################################
outfile=
kdevice= NUMBER, smatrix= FILENAME
p1ik= ( I1, K1 ), p2ik= ( I2, K2 ), factor= FACTOR,
fcutoff= FC, epsmue= EPSMUE, linelength= LL, connect
rpi= IRPI, pik= (I,K), assign
show= [yes|no]:
doit:
 -combine
  outfile= ./filter.s2p
    kdevice= 1, smatrix= /tmp/UserName/ipart=1.s2p
    kdevice= 2, smatrix= /tmp/UserName/ipart=2.s2p
    kdevice= 3, smatrix= /tmp/UserName/ipart=1.s2p


   # Connect the Ports at the Cutplanes.
   # i: Port, k: Device
    p1ik = (2,1), p2ik = (1,2), fcutoff= 3.2e9,
         epsmue= 1, linelength= -5e-3, factor= 1, connect
    p1ik = (2,2), p2ik = (2,3), fcutoff= 3.2e9,
         epsmue= 1, linelength= -5e-3, factor= 1, connect

   # rpi : Resulting Port I
   # pik : Port I of device K
   rpi= 1, pik= (1,1), assign
      # The port '1' of the resulting device shall be the port '1' of device '1'.
   rpi= 2, pik= (1,3), assign
      # The port '2' of the resulting device shall be the port '1' of device '3'.
 doit
-smonitor,
ie. scalar Flux Quantities.
 ##############################################################################
 # Flags: nomenu, noprompt, nomessage,                                        #
 ##############################################################################
 # section: -smonitor                                                         #
 ##############################################################################
 # symbol  = - none -                                                         #
 # timedata   = yes                    -- ( yes | no )                        #
 # upto       = auto                   -- [s]   ( auto | REAL )               #
 # freqdata   = yes                    -- ( yes | no )                        #
 #   wantdf   = auto                   -- ( auto | REAL )                     #
 #   windowed = yes                    -- ( yes | no )                        #
 #     edgeofwindow= 0.70              -- At what Frac. start to apply Window #
 #   flow     = auto                   -- [1/s] ( auto | REAL )               #
 #   fhigh    = auto                   -- [1/s] ( auto | REAL )               #
 ##############################################################################
 # 2dplotopts= -geometry 690x560+10+10                                        #
 #  linecolor= 0              -- 0: foreground, 3: yellow                     #
 #  foreground= black         -- black, white                                 #
 #  background= white         -- blue, white, black                           #
 # showtext     = yes         -- (yes | no)                                   #
 # onlyplotfiles= no          -- (yes | no)                                   #
 ##############################################################################
 # doit, ?, return, end, help, ls                                             #
 ##############################################################################
symbol= BLA_BLA_BLUB:
timedata= [yes|no]:
upto= [auto|REAL]:
freqdata= [yes|no]:
wantdf= REAL:
windowed= [yes|no]:
edgeofwindow= REAL:
flow, fhigh : REAL:
2dplotopts= ANY STRING CONTAING OPTIONS FOR mymtv2:
plotopts= ANY STRING CONTAING OPTIONS FOR gd1-3dplot:
showtext= [yes|no]:
onlyplotfiles= [yes|no]:
doit:
 ##############################################################################
 # Flags: nomenu, noprompt, nomessage,                                        #
 ##############################################################################
 # Section: -fexport                                                          #
 ##############################################################################
 # symbol  = h_1                                                              #
 # quantity= h                                                                #
 # solution= 1                                                                #
 #   phase =  45.0000         -- Only for Portmodes.                          #
 # bbxlow  =    -1.0000e+30, bbylow =    -1.0000e+30, bbzlow =    -1.0000e+30 #
 # bbxhigh =     1.0000e+30, bbyhigh=     1.0000e+30, bbzhigh=     1.0000e+30 #
 # outfile = ./gdfidl-exported-field                                          #
 ##############################################################################
 # doit, ?, return, end, help, ls                                             #
 ##############################################################################
symbol= QUAN_ISOL:
quantity= QUAN:
solution= ISOL:
bbxlow=,bbxhigh=,bbylow=bbyhigh=,bbzlow=,bbzhigh=:
outfile=:
doit:
-fexport or
gd1.pp's Section -fexport can be used to create GIF-Files.
 ##############################################################################
 # Flags: nomenu, noprompt, nomessage,                                        #
 ##############################################################################
 # Section: -2dmanygifs                                                       #
 ##############################################################################
 # 1stinfile = /tmp/UserName/fexported--000000000.gz                          #
 # outfiles  = auto                                                           #
 # mpegfile  = 2dmanygifs.mpeg                                                #
 # uptonfiles= 1000000000                                                     #
 # ixoffset  = 0                                                              #
 # iyoffset  = 0                                                              #
 # stride    = 1                                                              #
 # width     = 1000                                                           #
 # scale     = 1.0                                                            #
 # what      = rHy                      -- rHx,rHy,Hx,Hy,Ezx,Ezy              #
 # log       = no                       -- plot log(1+|scale*f|)              #
 # zerolines = yes                      -- Plot Lines at f=0                  #
 # show      = yes                      -- Show the mpeg.                     #
 ##############################################################################
 # doit, ?, return, end, help                                                 #
 ##############################################################################
1stinfile= FILENAME-NUMBER:
outfiles:
outfiles=auto,
the GIF-Files will have the same Name as the read fexported Files, with
the Letters .gif attached.
mpegfile:
uptonfiles=NFILES:
1stinfile=FILENAME,
and guess the next Files from the Name of the first File, ie. it will
count up the trailing Number. It will read up to NFILES.
ixoffset=IX0, iyoffset= IY0, what= [rHx|rHy]:
what=rHx gives Plots of the x-Component of the Field, multiplied by the
distance from the Axis, what=rHy gives Plots of the y-Component of the
Field, multplied by the Distance from the Axis.
doit:
-fexport, what=honmat can be used to create GIF-Files.
 ##############################################################################
 # Flags: nomenu, noprompt, nomessage,                                        #
 ##############################################################################
 # Section: -3dmanygifs                                                       #
 ##############################################################################
 # 1stinfile = /tmp/UserName/H-onmat--000000001.gz                            #
 # outfiles  = auto                                                           #
 # uptonfiles= 1000000000                                                     #
 # stride =              1                                                    #
 # what      = abs                      -- abs, logabs, loglogabs             #
 # mpegfile  = ./3dmanygifs.mpeg                                              #
 # eyeposition  = ( undefined, undefined, undefined )                         #
 # rotsequence= xyz                                                           #
 # xrot = -30.0                                                               #
 # yrot = 40.0                                                                #
 # zrot = 0.0                                                                 #
 # dxrot= 0.0                                                                 #
 # dyrot= 0.0                                                                 #
 # dzrot= 0.0                                                                 #
 # scale= 1.0                           -- Plot scale*f.                      #
 # width= 1000                          -- Width of the GIFs.                 #
 # show= yes                            -- Show the mpeg                      #
 ##############################################################################
 # doit, ?, return, end, help                                                 #
 ##############################################################################
1stinfile= FILENAME-NUMBER:
outfiles:
outfiles=auto,
the GIF Files will have the same Name as the read fexported Files, with
the Letters .gif attached.
uptonfiles=NFILES:
1stinfile=FILENAME,
and guess the next Files from the Name of the first File, ie. it will
count up the trailing Number. It will read up to NFILES.
what= [absh | logabs]:
mpegfile:
xrot= XROT, yrot= YROT, zrot= ZROT:
dxrot= DXROT, dyrot= DYROT, dzrot= DZROT:
boxed:
doit:
sdefine(name, value)
or a Sequence
define(name, value).
sdefine(name, value),
the Value of the Variable may be up to 132 Characters long.
It may contain any Characters inside, except for '(\)'.
Leading and trailing Blanks in the Value are ignored.
define(name, expr),
the Value of the Variable is the Value of the arithmetic Expression
expr.
gd1 -Dname=value.
This way, you can e.g. compute Sispersion relations with simple Shell Scripts.
Variables defined in this way are not automatically evaluated. ( sdefine(..,..) )
#!/bin/sh
  # Given the proper "inputfile.gdf", this shell-Script computes the
  # dispersion Relation of some periodic Structure.
  for PHASE in 0 20 40 60 80 100 120 140 160 180
  do
      gd1 -DThisPhase=$PHASE < inputfile.gdf > out.Phase=$PHASE
  done
eval(, the matching closing
Brace is searched and the String inside the enclosing Braces is interpreted
as an arithmetic Expression. The Value of the expression is transformed to
a String and substituted for eval(expression).
 echo (2*3)      # this outputs "(2*3)"
 echo eval(2*3)  # this outputs "6"
The arithmetic Expression may contain the arithmetic operators
+,-,*,/,**,%.
In addition to that, the boolean Operators ==,!=,<,>,<=,>= are handled.
The result of applying a boolean Operator is an integer 0 or 1.
Zero stands for false, and 1 for true.
The Functions
abs(x), min(x,y), max(x,y),
log(x), cos(x), sin(x), tan(x),
atan(x), atan2(x,y), mod(x,y), pow(x,y) are recognised and evaluated.
In every Context where a Number is required as a Parameter, an arithmetic
Expression may be used. In these Contexts, enclosing the Expression in
eval() is not required.
  do M1, M2, M3
     # Loop-Body
  enddo  # or 'end do'
The Loop-Body may itself contain do-loops, Macro Calls, whatever.
The iteration Variable M1 is not restricted to Integer Values.
  do i= 1, 100, 1   # count upwards
     echo I is i
  end do
  do i= 100, 1, -1  # count downwards
     echo I is i
  end do
  do i= 1, 2, 0.1   # non integer step
     echo I is i
     echo 2*I is eval(2*i)
  end do
if Blocks.
if Block is:
  if (ARITHMETIC-EXPRESSION) then
     #
     # if-body
     #
  endif # or 'end if'
If the ARITHMETIC-EXPRESSION evaluates to something else than '0'
then the Body of the If-Block is interpreted.
A general if block is:
  if (ARITHMETIC-EXPRESSION) then
     #
     # if-body
     #
  elseif (ARITHMETIC-EXPRESSION) then
     #
     # elseif-body
     #
  else
     #
     # else-body
     #
  endif
If-Blocks may be nested.
macro followed by the Name of the Macro.
All Lines until a Line with only the Keyword endmacro are considered
the Body of the Macro.
When gd1 or gd1.pp find such a Macro, they read it and store the Body of the
Macro in an internal Buffer.
   #
   # This defines a macro with name 'foo'
   #
   macro foo
      echo I am foo, my first argument is @arg1
      echo The total number of arguments supplied is @nargs
   endmacro
When gd1 or gd1.pp find a Call of the Macro, the Number of the supplied
Arguments is assigned to the Variable @nargs, and the Variables
@arg1, @arg2, .. are assigned the Values of the supplied Parameters
of the Call.
Similiar to the user definable Variables (via sdefine),
the Values of the Arguments are Strings. Of course, it is possible to have a
String, e.g. '1e-4', which happens
to be interpreted in the proper Context as a real Number.
   #
   # this calls 'foo' with the arguments 'hi', 'there'
   #
   call foo(hi, there)
Macro Calls may be nested. The Body of a Macro may call another Macro.
@.
The exact Name can be found in the Description of the Sections of gd1.pp.
There are some other Variables as well that have not yet been described.
@pi, @clight:
These are the Values of @nx, @ny, @nz: These contain the Number of Grid Planes in the
three coordinate Directions.
@x(i), @y(i), @z(i): These are the Positions of the i.th Gridplane.
@xmin, @xmax, @ymin, @ymax:
These are the extreme Coordinates of the computational Volume.
@path. Its Value is a command String
that would enter the current Section.
This Section documents four Macros that define a Sequence of secondary
Computations to be performed in the Postprocessor gd1.pp.
All four Macros are contained in the File
/usr/local/gd1/postprocessor-macros.
 |
(4.1) |
-wlosses we compute the wall Wosses via the
Perturbation Formula. In the Section -energy we compute the stored
Energy in the H-Field.
macro contains the Commands to evaluate the above
Formula for a given resonant Field.
This Macro is contained in the file /usr/local/gd1/postprocessor-macros.
macro QValue
  pushflags, noprompt, nomenu, nomessage
  define(QValue_PATH, @path)                  # remember current section
  -base                                       # goto the base of the branch-tree
  -energy                                     # compute stored energy
      quantity= h                             # ... we dont need to compute the
      solution= @arg1                         #     energy in the electric field
      doit                                    #     -- it has to be the same
  -wlosses                                    # Wall-losses
      doit
 echo
echo *** h-Energy   is @henergy
echo *** metalpower is @metalpower
  return
  define(QValue_value, eval(2*@pi*@frequency*2*@henergy/@metalpower))
  echo *** mode number       is @arg1
  echo *** frequency         is @frequency {Hz}
  echo *** QValue            is QValue_value {1}
# echo return path is : QValue_PATH
  QValue_PATH                                 # back to where we came from ...
  undefine(QValue_PATH)
  popflags
endmacro
With the Definition of the Macro available, we can compute the
Q-Value of the first resonant Mode by saying:
call QValue(1)To compute the Q-Values of the first five Modes, we may say:
 do i= 1, 5
    call QValue(i)
 enddo
macro perQValue
  pushflags, noprompt, nomenu, nomessage
  define(perQValue_PATH, @path)               # remember current section
  -base                                       # goto the base of the branch-tree
  -energy                                     # compute stored energy
      quantity= hre                           # ... we dont need to compute the
      solution= @arg1                         #     energy in the electric field
      doit                                    #     -- it has to be the same
# echo *** W_h of real part is @henergy
      define(hre_energy, @henergy)
      quantity= him
      doit
      define(him_energy, @henergy)
define(htot_energy, eval(hre_energy+him_energy) )
  -wlosses                                    # Wall-losses
      quantity= hre, doit
      define(hre_metalpower, @metalpower)
      quantity= him, doit
      define(him_metalpower, @metalpower)
      define(htot_metalpower, eval(hre_metalpower+him_metalpower))
# echo *** total h-Energy   is htot_energy
# echo *** total metalpower is htot_metalpower
  define(perQValue_value, eval(2*@pi*@frequency*2*htot_energy/htot_metalpower))
  echo
  echo *** mode number       is @arg1
  echo *** frequency         is @frequency {Hz}
  echo *** QValue            is perQValue_value {1}
# echo return path is : perQValue_PATH
  perQValue_PATH                              # back to where we came from ...
  undefine(perQValue_PATH)
  popflags
endmacro
With the definition of the Macro available, we can compute the
Q-Value of the first resonant Mode by saying:
call perQValue(1)To compute the Q-Values of the first five Modes, we may say:
 do i= 1, 5
    call perQValue(i)
 enddo
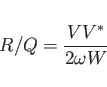 |
(4.2) |
 |
(4.3) |
macro contains the Commands to evaluate the above
Formula for a given Real-Valued resonant Field.
This Macro is contained in /usr/local/gd1/postprocessor-macros.
macro rshunt
  pushflags, noprompt, nomenu, nomessage
  define(rshunt_PATH, @path)                # remember current section
  -base                                     # goto the base of the branch-tree
  -energy                                   # compute stored energy
      quantity= e                           # ... we dont need to compute the
      solution= @arg1                       #     energy in the magnetic field
      doit                                  #     -- it has to be the same
# echo *** W_e is @eenergy
  return
  -lintegral                                # accelerating voltage
      direction= z, component= z
      startpoint= (0,0, @zmin)
      length= auto
      doit
# echo *** vabs is @vabs
  return
  define(rshunt_value_a, eval(@vabs **2/(2*@pi*@frequency*(2*2*@eenergy))))
  define(rshunt_value_r, eval(@vreal**2/(2*@pi*@frequency*(2*2*@eenergy))))
  define(rshunt_value_i, eval(@vimag**2/(2*@pi*@frequency*(2*2*@eenergy))))
  echo
  echo *** mode number         is @arg1
  echo *** frequency           is @frequency {Hz}
  echo ***
  echo *** shunt impedances as computed from | U * conjg(U) | :
  echo *** Shunt Impedance/Q   is rshunt_value_a {Ohms}
  echo *** Shunt Impedance/Q/m is eval(rshunt_value_a/@length) {Ohms/m}
  echo ***
  echo *** shunt impedances as computed from | Re(U) * Re(U) | :
  echo *** Shunt Impedance/Q   is rshunt_value_r {Ohms}
  echo *** Shunt Impedance/Q/m is eval(rshunt_value_r/@length) {Ohms/m}
  echo ***
  echo *** shunt impedances as computed from | Im(U) * Im(U) | :
  echo *** Shunt Impedance/Q   is rshunt_value_i {Ohms}
  echo *** Shunt Impedance/Q/m is eval(rshunt_value_i/@length) {Ohms/m}

## echo return path is : rshunt_PATH
  rshunt_PATH                               # back to where we came from ...
  undefine(rshunt_PATH)
## echo return path is : rshunt_PATH
  popflags
endmacro
macro perrshunt
  pushflags, noprompt, nomenu, nomessage
  define(rshunt_PATH, @path)                  # remember current section
  -base                                       # goto the base of the branch-tree
  -energy                                     # compute stored energy
      quantity= ere                           # ... we dont need to compute the
      solution= @arg1                         #     energy in the magnetic field
      doit                                    #     -- it has to be the same
# echo *** W_e of real part is @eenergy
      define(ere_energy, @eenergy)
      quantity= eim
      doit
      define(eim_energy, @eenergy)
define(etotenergy, eval(ere_energy+eim_energy) )
  return
  -lintegral                                  # accelerating voltage
      direction= z, component= z
      startpoint= (0,0, @zmin)
      length= auto
      quantity= ere, doit
# echo *** vabs of real part is @vabs
      define(V_ere_re, @vreal) define(V_ere_im, @vimag)
      quantity= eim, doit
# echo *** vabs of imaginary part is @vabs
      define(V_eim_re, @vreal) define(V_eim_im, @vimag)
  return
define(vztotre, eval(V_ere_re-V_eim_im))
define(vztotim, eval(V_ere_im+V_eim_re))
define(vztotabs, eval((vztotre**2+vztotim**2)**0.5) )
  define(rshunt_value, eval(vztotabs**2/(2*@pi*@frequency*(2*etotenergy))))
  echo
  echo *** mode number       is @arg1
  echo *** frequency         is @frequency {Hz}
  echo *** Shunt Impedance   is rshunt_value {Ohms}
  echo *** Shunt Impedance/m is eval(rshunt_value/@length) {Ohms/m}
# echo return path is : rshunt_PATH
  rshunt_PATH                                 # back to where we came from ...
  undefine(rshunt_PATH)
  popflags
endmacro
A OpenCascade-based STEP to STL File Converter is provided. The Converter reads a STEP-File and writes a STL-File. The Parameter '-deflection=XX' controls the Accuracy of the generated STL-File. A sample Shell Script which generates two STL-Files from the same STEP-File but with different Values for '-deflection=XX' is shown below.
#!/bin/sh

 for DEFL in 1e-4 1e-5
 do
    $GDFIDL_HOME/Linux-x86_64/stp2stl \
        -infile=/usr/local/gd1/examples/Vac-Quart_12WNSDVG1.8.stp \
        -deflection=$DEFL -outfile=/tmp/UserName/$DEFL.stl
 done
Parts of the generated STL-Data are shown in Figures 5.1 and
5.2.
There is no Example for computing Eigenvalues, as this is mentioned in great Detail in the Tutorial.
The Computation of Wakepotentials occurs in two Steps.
 # /usr/local/gd1/examples-from-the-manual/wake-example-1.gdf

define(LargeNumber, 1000)
#
# The following picture shows a cut through the structure to be
# modelled and the variables associated to the lengths.
#
#
#                a               a               a
#        |<------------->|<-------------->|<----------->|
#
#                 -      ------------------
#                 ^      |                |
#               b |      |                |
#                 |      |                |
#        -----------------                ---------------  -
#        |                     beam                     |  |
#        |<-------------------------------------------->|  | d
#        |                                              |  |
#        ------------------------------------------------  -
#
#    x^
#    |-> z
#
 define( a, 1e-2 )
 define( b, 5e-3 )
 define( c, 5e-3 )
 define( d, 1e-2 )

 -general
    outfile= /tmp/UserName/wake-example
    scratch= /tmp/UserName/wake-example-scratch

    text()= A strange Device,
    text()= it serves only as an Example
    text()= for computing Wakepotentials.

 -mesh
define(STPSZE, 3*a/60 )
    spacing= STPSZE
    perfectmesh= no

    pxlow= 0, pxhigh= c+b
    pylow= -STPSZE, pyhigh= d
    pzlow= 0, pzhigh= 3*a

    cxlow= ele, cxhigh= ele
    cylow= ele, cyhigh= ele
    czlow= ele, czhigh= ele

    #
    # We enforce a Meshline at the Position of the Linecharge
    # by enforcing two Meshplanes.
    #
    xfixed(1, c/2, 0)
    yfixed(1, d/2, 0)

 -brick
    #
    # Fill the universe with Metal.
    #
    material= 1
       volume= (-LargeNumber, LargeNumber,\
                -LargeNumber, LargeNumber,\
                -LargeNumber, LargeNumber)
    doit

    #
    # Carve out the Waveguide.
    #
    mat 0
       xlow= 0, xhigh= c
       ylow= 0, yhigh= LargeNumber
       zlow= -LargeNumber, zhigh= LargeNumber
    doit

    #
    # Carve out the Resonator Box.
    #
    mat 0
       xlow= 0, xhigh= c+b
       ylow= 0, yhigh= LargeNumber
       zlow= a, zhigh= 2*a
    doit

 -volumeplot
   eyepos= ( 1.0, 2.30, 0.5 )
   showlines= yes
   scale= 2.5
   doit

 -fdtd
    -ports
       name= zlow, plane= zlow, modes= 0, doit
       name= zhigh, plane= zhigh, modes= 0, doit

    -lcharge
       charge= 1e-12   # 1 pAs
       sigma= 5e-3
       xposition= c/2
       yposition= d/2

 -fdtd
     doit
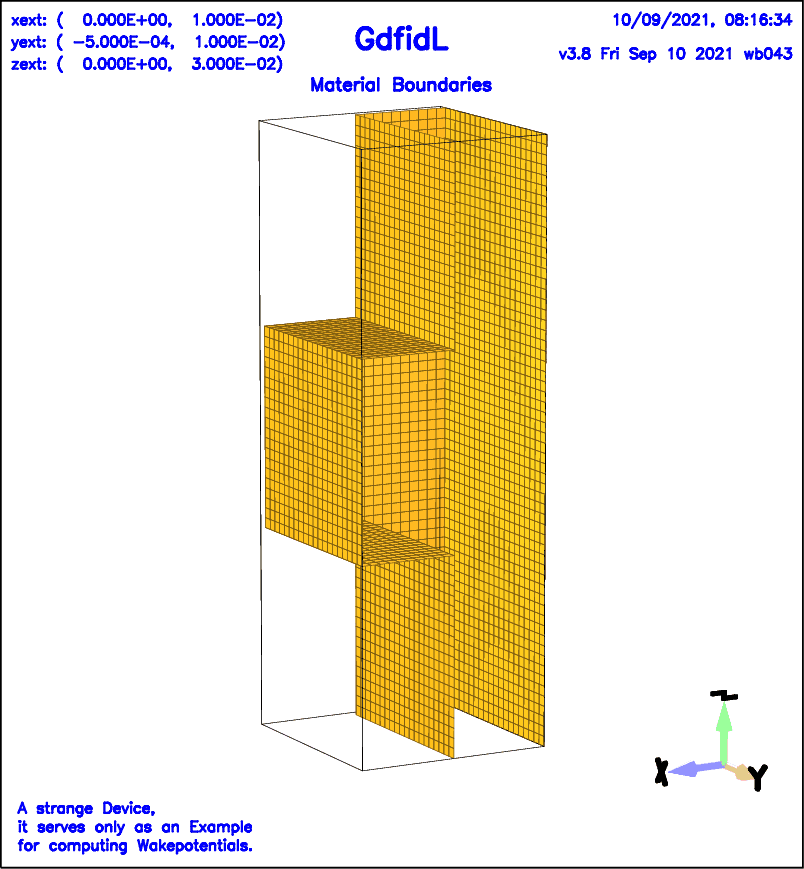 |
gd1 < wake-example-1.gdf | tee out
The next Step is to tell the Postprocessor that we wish to see the Wakepotentials: The Commands for the Postprocessor gd1.pp are:
 -general, infile= @last
 -wakes
    doit
We get three Plots for the three Components of the Wakepotential at
the (x,y) Position where the Line-Charge was travelling.
 |
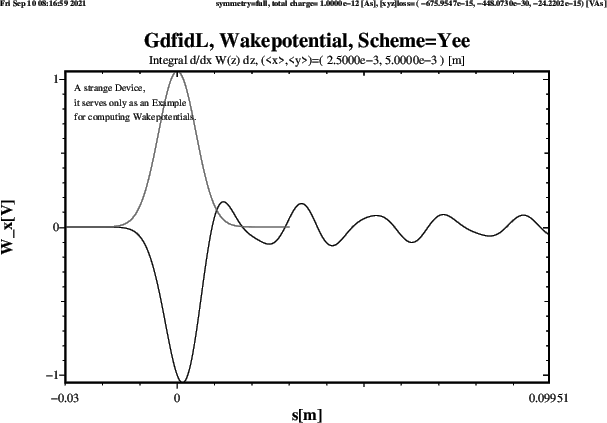
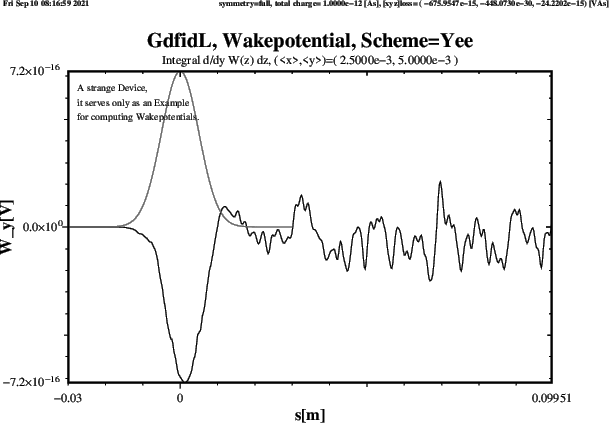 |
The Computation of scattering Parameters is via two Steps.
 # /usr/local/gd1/examples-from-the-manual/spar-example-1.gdf

 define(LargeNumber, 1000)

 define( a, 1e-2 )
 define( b, 5e-3 )
 define( c, 5e-3 )
 define( d, 1e-2 )

 define(FREQ, 20e9)

 -general
    outfile= /tmp/UserName/spar-example
    scratch= /tmp/UserName/spar-example-scratch

    text()= A strange Geometry, just an Example.

 -mesh
 define(STPSZE, 3*a/60 ) # Too large for MPI
# define(STPSZE, a/60 )
    spacing= STPSZE
    graded= yes, qfgraded= 1.2, dmaxgraded= @clight / FREQ / 40
    perfectmesh= no

    pxlow= 0, pxhigh= c+b
    pylow= -STPSZE, pyhigh= d
    pzlow= 0, pzhigh= 3*a

    cxlow= ele, cxhigh= ele
    cylow= ele, cyhigh= ele
    czlow= ele, czhigh= ele

 -brick
    #
    # Fill the Universe with Metal.
    #
    material= 1
       volume= (-LargeNumber, LargeNumber,\
                -LargeNumber, LargeNumber,\
                -LargeNumber, LargeNumber)
    doit

    #
    # Carve out the Waveguide.
    #
    mat 0
       xlow= 0, xhigh= c
       ylow= 0, yhigh= LargeNumber
       zlow= -LargeNumber, zhigh= LargeNumber
    doit

    #
    # Carve out Resonator Box.
    #
    mat 0
       xlow= 0, xhigh= c+b
       ylow= 0, yhigh= LargeNumber
       zlow= a, zhigh= 2*a
    doit

 -volumeplot
   eyepos= ( 1.0, 2.30, 0.5 )
   showlines= yes
   scale= 3
   doit

 -fdtd
    -ports
       name= Input, plane= zlow, modes= 1, doit
       name= Output, plane= zhigh, modes= 1, doit

    -pexcitation
       port= Input
       mode= 1
       amplitude= 1
       frequency= FREQ
       bandwidth= 0.7*FREQ

    -time
       #
       # tminimum: the minimum Time to be simulated
       # tmaximum: the maximum Time to be simulated
       #   If the Amplitudes have died down sufficiently
       #   at a Time between tmin and tmax,
       #   the Computation will stop.
       #
       tmin=   10/FREQ
       tmax= 1000/FREQ
       amptresh= 1e-3

 -fdtd
     doit
We start gd1 with the Unix-Command:
gd1 < spar-example-1.gdf | tee out
The next Step is to tell the Postprocessor that we wish the scattering Parameters to be computed and plotted. In addition to the default Values, we want to see (Parts of) the Timedata that were recorded during the Time-Domain Computation, and we want to see the scattering Parameters in a Smith-Chart. The Commands for the Postprocessor gd1.pp are:
 -general, infile= @last
 -sparameter
    ports= all, modes= 1
    timedata= yes
    smithplot= yes, markerat 19e9, markerat 20e9, markerat 21e9
    doit
We get in total 9 Plots.
 |
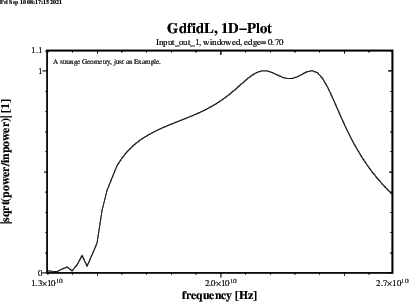
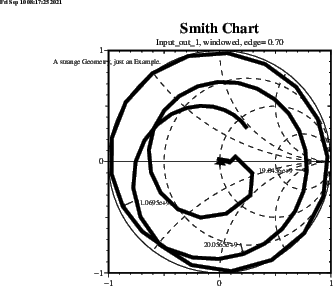 |
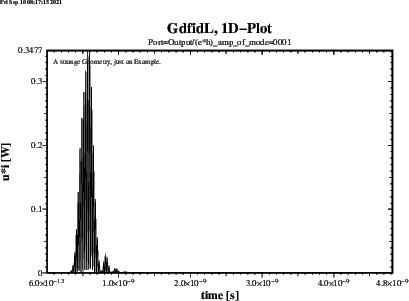
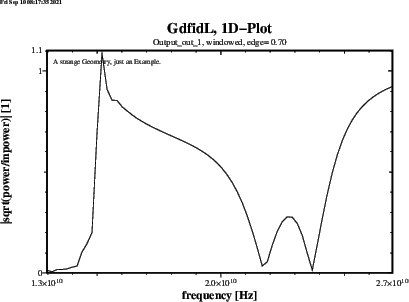
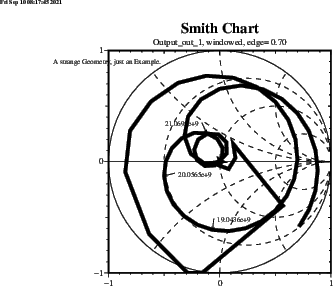 |
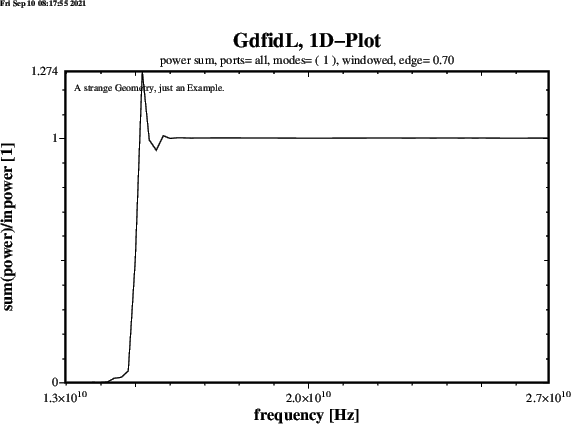 |
Brillouin Diagrams are Plots of Eigenvalues (resonante Frequencies) as a Function of the Phase-Shift in periodic Structures. GdfidL allows Computation with specified Phase Shifts in x- y- and z-Direction simultaneously. So we can compute Brillouin diagrams in 3D-Periodic Structures, where the Plane-Normals of the Planes of Periodicity are in x- y- and z-Direction simultaneously.
The following Input defines an elemental Cell of such a periodic Structure.
 # /usr/local/gd1/examples-from-the-manual/brillo.gdf

 #
 # Assign a value to "PHASE", if it is not yet defined
 # via  "gd1 -DPHASE=XX"
 #
 if (! defined(PHASE) ) then
    define(PHASE, 45)
 endif

 #
 # What Part of the Brillouin-diagram do we want to compute?
 #
 #
 # part==1 : from Gamma to H : 0<kx<pi/d, ky=0,      kz=0
 # part==2 : from H to N     : kx=pi/d,   0<ky<pi/d, kz=0
 # part==3 : from N to P     : kx=pi/d,   ky=pi/d,   0<kz<pi/d
 # part==4 : from P to Gamma : 0 < (kx=ky=kz) < pi/d
 #

 #
 # Get the Value of PART by inclusion of a File:
 # the Content of the File is just
 #    "define(PART, 1)"
 # or "define(PART, 2)"
 # or "define(PART, 3)"
 # or "define(PART, 4)"
 include(this-part-of-brillo)

 if ( PART == 1 ) then
    define(XPHASE, PHASE)
    define(YPHASE, 000)
    define(ZPHASE, 000)
 endif

 if ( PART == 2 ) then
    define(XPHASE, 180)
    define(YPHASE, PHASE)
    define(ZPHASE, 000)
 endif

 if ( PART == 3 ) then
    define(XPHASE, 180)
    define(YPHASE, 180)
    define(ZPHASE, PHASE)
 endif

 if ( PART == 4 ) then
    define(XPHASE, PHASE)
    define(YPHASE, PHASE)
    define(ZPHASE, PHASE)
 endif

 define(INF, 10000.0 * @clight)
 define(MAG, 2) define(EL, 1)

 ##
 ## Geometry definitions
 ##
 define(LATTICE_D, @clight / 2 )
 define(RADIUS, LATTICE_D * 0.375 )

 #
 # Default Mesh Spacing.
 #
 define(STPSZE, RADIUS/10 )

 ##############
 ##############
 ##############
 ##############
 ##############
 -general
    outfile= /tmp/UserName/outfile
    scratchbase= /tmp/UserName/delete-me-

    text()= Lattice Constant d= LATTICE_D
    text()= Radius of the Spheres= RADIUS
    text()= r/d = eval(RADIUS/LATTICE_D)
    text()= 2r/d = eval(2*RADIUS/LATTICE_D)
    text()= stpsze= STPSZE
    text()= xphase: XPHASE
    text()= yphase: YPHASE
    text()= zphase: ZPHASE

 -mesh
    spacing= STPSZE
    graded= yes, dmaxgraded= 10*STPSZE
    qfgraded= 1.3
    perfectmesh= yes
 perfectmesh= no

    pxlow= -0.5*LATTICE_D, pxhigh= 0.5*LATTICE_D
    pylow= -0.5*LATTICE_D, pyhigh= 0.5*LATTICE_D
    pzlow= -0.5*LATTICE_D, pzhigh= 0.5*LATTICE_D

    xperiodic= yes, xphase= XPHASE
    yperiodic= yes, yphase= YPHASE
    zperiodic= yes, zphase= ZPHASE

    do ii= -1, 1, 1
       xfixed( 2, ii*LATTICE_D-RADIUS, ii*LATTICE_D+RADIUS )
       xfixed( 2, (ii-0.1)*LATTICE_D, (ii+0.1)*LATTICE_D )

       yfixed( 2, ii*LATTICE_D-RADIUS, ii*LATTICE_D+RADIUS )
       yfixed( 2, (ii-0.1)*LATTICE_D, (ii+0.1)*LATTICE_D )

       zfixed( 2, ii*LATTICE_D-RADIUS, ii*LATTICE_D+RADIUS )
       zfixed( 2, (ii-0.1)*LATTICE_D, (ii+0.1)*LATTICE_D )
    enddo

 ##############

 -brick
    #
    # Fill the Universe with Vacuum.
    #
    material= 0
       volume= (-INF,INF, -INF,INF, -INF,INF)
    doit


 define(M3, 1)
 #
 # Define square Lattice.
 # Only a Part of these Spheres end up being within
 # computational Volume.
 #
 do iz= 0, 1, 1
    do ix= 0, 1, 1
       do iy= 0, 1, 1
          #
          # A Sphere with Center at
          # ( ix*LATTICE_D, iy*LATTICE_D, iz*LATTICE_D )
          #
          -gbor
             material= M3
                origin= ( ix*LATTICE_D, \
                          iy*LATTICE_D, \
                          iz*LATTICE_D )
                rprimedirection= ( 1, 0, 0 )
                zprimedirection= ( 0, 0, 1 )
                range= ( 0, 360 )

                clear
                point= ( -RADIUS, 0 )
                   arc, radius= RADIUS, type= clockwise, size= small
                point= ( RADIUS, 0)
             doit
       enddo
    enddo
 enddo

 #
 # The connecting Rods in x-Direction.
 #
 do iz= 0, 1, 1
    do iy= 0, 1, 1
       -gccylinder
          material= M3
             radius= 0.1*LATTICE_D
             length= INF
             origin= ( -INF/2, \
                       iy*LATTICE_D, \
                       iz*LATTICE_D )
             direction= ( 1, 0, 0 )
          doit
    enddo
 enddo

 #
 # The Connecting Dods in y-Direction.
 #
 do iz= 0, 1, 1
    do ix= 0, 1, 1
       -gccylinder
          material= M3
             radius= 0.1*LATTICE_D
             length= INF
             origin= ( ix*LATTICE_D, \
                       -INF/2, \
                       iz*LATTICE_D )
             direction= ( 0, 1, 0 )
          doit
    enddo
 enddo

 #
 # The connecting Rods in z-Direction.
 #
 do ix= 0, 1, 1
    do iy= 0, 1, 1
       -gccylinder
          material= M3
             radius= 0.1*LATTICE_D
             length= INF
             origin= ( ix*LATTICE_D, \
                       iy*LATTICE_D, \
                       -INF/2 )
             direction= ( 0, 0, 1 )
          doit
    enddo
 enddo

 #
 # Definition of the Material Properties.
 #
 -material
    material= M3, type= electric


 #
 # What does the Materialdistribution look like?
 #
 -volumeplot
##    doit

 #################
 #
 # Computation of the Eigenvalues.
 #
 -eigenvalues
    solutions= 20
    estimation= 2.8
    pfac2= 1e-2
    passes= 2

    doit

 end
To compute the four Parts of the Brillouin-Diagram, we use a
Shell-Script.
This Shell-Script starts a Program four times. That Program starts gd1
several times to compute the Frequencies for different Phase-Shifts.
This is the Shell-Script:
#!/bin/sh

 #
 # Compile the program which starts "gd1" several times
 #
 f77 brillo.f -o brillo.a.out

 for part in 1 2 3 4
 do
    #
    # (re)create the file that defines which part of the
    # Brillouin diagram is to be computed:
    #
    echo "define(PART, $part)" > this-part-of-brillo

    #
    # compute..
    ./brillo.a.out

    #
    # save the result, and display
    #
    cp brillo.mtv brillo.part=$part.mtv
    mymtv brillo.part=$part.mtv &

 done

 #
 # compile the program that combines the four parts
 # to a single Brillouin diagram of a 3D structure,
 # execute it,
 # and display the result..
 #
 f90 a3dbrillo.f
 cat brillo.part=[1-4].mtv | a.out
 mymtv2 3D-brillo.mtv &
The following is the Source of the Program that starts gd1 several times to compute the Frequencies for different Phase-Shifts:
!
! /usr/local/gd1/examples-from-the-manual/brillo.f90
!
 PROGRAM Bla

 IMPLICIT NONE
 CHARACTER(LEN= 400) cmd

 REAL, DIMENSION(300,1000) :: f0
 REAL, DIMENSION(1000) :: ph0

 INTEGER :: i11, i19, NMode, np, ip, Mode, iDum
 REAL :: af, ap, p0, p1, Phase, Acc, f

    i11= 11
    i19= 19
    OPEN (UNIT= i19, &
          FILE= 'brillo.mtv')

    WRITE (UNIT= i19, FMT= 90)
 90 FORMAT( &
      '$ DATA= CURVE2D NAME= "Brillouin-Diagramm"',/, &
      '% linetype= 0',/, &
      '% markertype= 3',/, &
      '% equalscale= false',/, &
      '% fitpage= false',/, &
      '% xyratio= 3',/, &
      '% xlabel= "Phase-shift"',/, &
      '% ylabel= "Frequency"',/, &
      '% comment= "no comment"',/  )

    af= 0
    ap= 0

    NMode= 15

! p0: First Phase
! p1: Last Phase
! np: Number of Phases

    p0= 0.
    p1= 180.
    np= 41

    DO ip= 1, np, 1
       Phase= p0+(ip-1)*(p1-p0)/FLOAT(np-1)
       ph0(ip)= Phase
       WRITE (UNIT= cmd, FMT= 81) Phase
 81    FORMAT( &
         ' gd1 "-DPHASE=', F8.2, '"< brillo.gdf ', &
         '| tee brillo.tmp | grep "for me" > brillo.out' )
 write (UNIT= 0, FMT= '(1X,4711(A))') ' cmd:', TRIM(cmd)
       CALL system( cmd )
       OPEN (UNIT= i11, &
             FILE= 'brillo.out')
       Mode= 0
  100    CONTINUE
       DO
          READ (UNIT= i11, FMT= *, ERR= 199, END= 199) iDum, f, acc
          IF (acc < 0.5) THEN
             Mode= Mode+1
             IF (Mode <= NMode) f0(Mode,ip)= f
             WRITE (UNIT= i19, FMT= 71) Phase,f
 write (0,*) Phase, f, acc
             af= MAX(af, f)
             ap= MAX(ap, Phase)
          END IF
       END DO
 199   CONTINUE
       CLOSE (UNIT= i11)
    END DO

 71 FORMAT( '@ point x1=', 1P, E12.6, ' y1=', E12.6, &
            ' z1= 0 markertype=1', ' markersize= 1' )

    DO Mode= 1, NMode, 1
       WRITE (UNIT= i19, FMT= *)
       DO ip= 1, np, 1
          WRITE (UNIT= i19, FMT= *) ph0(ip),f0(Mode,ip)
       END DO
    END DO
    WRITE (UNIT= i19, FMT= *)
    WRITE (UNIT= i19, FMT= 99) 0., 0., 0., af, ap, af
 99 FORMAT( 3(1X, 1P, 2(E12.6, 1X), /), /)
!
!   **
!   ** write the uninterpreted data
!   **
!
    DO ip= 1, np, 1
       WRITE (UNIT= i19, FMT= '(//,A,F14.2)') ' # Phase:', ph0(ip)
       DO Mode= 1, NMode, 1
          WRITE (UNIT= i19, FMT= '(A,1X,1P,E20.7)') '#', f0(Mode,ip)
       END DO
    END DO

 END PROGRAM Bla
The resulting Plots are presented in figure 6.9.
The following is the Sourcecode of the Program that combines the four Parts of the Brillouin-Diagram into a single Plot:
*
* /usr/local/gd1/examples-from-the-manual/a3dbrillo.f
*
* usage:
*
* cat brillo.part=[1-4].mtv | a.out
* mymtv2 3D-brillo.mtv
*
*
      DIMENSION f0(300,1 000), ph0(1 000)
      REAL, DIMENSION(100) :: Phase0, scale
      CHARACTER(LEN=1000) :: str
*
      i11= 11
      i19= 19
      OPEN (UNIT= i19
     1    , FILE= '3D-brillo.mtv')
*
      WRITE (UNIT= i19, FMT= 9000)
 9000 FORMAT(
     1 '$ DATA= CURVE2D NAME= "Brillouin-Diagramm"',/,
     2 '% linetype= 0',/,
     3 '% markertype= 3',/
     4 '% equalscale= false',/,
     5 '% fitpage= false',/,
     6 '% xyratio= 3',/,
     7 '% xlabel= "normalised Phase-shift"',/,
     8 '% ylabel= "Frequency"',/,
     9 '% comment= "no comment"',/
     x )
*
      af= 0.
      ap= 0.
*
      NMode= 10
*
      phase0(1:4)= (/ 0.0,
     1                1.0,
     2                2.0,
     3                4.0  /)
      scale(1:4)= (/ 1./180.0,    !! Gamma to H
     2               1./180.0,    !!     H to N
     3               1./180.0,    !!     N to P
     4              -1./180.0 /)  !!     P to Gamma
*
      Phase Last= 0.
      np= 1
      str= ' '
      DO
         DO
            IF (INDEX(str, '# phase:') .NE. 0) THEN
               jj= INDEX(str, '# phase:')+LEN('# phase:')
               READ (UNIT= str(jj:), FMT= *) phase
               IF (phase .LT. Phase Last) THEN
                  np= np+1
               ENDIF
               Phase Last= phase
               EXIT
            ENDIF
            READ (UNIT= *, FMT= '(A)', END= 10) str
         ENDDO
      write (*,*) ' phase:', phase
         pp= Phase0(np)
         ph0(np)= pp+phase*scale(np)
*
         mode= 0
         DO mode= 1, NMode, 1
            READ (UNIT= *, FMT= '(A)', END= 10) str
            READ (UNIT= str(2:), FMT= *, IOSTAT= iostat) f
            IF (iostat .NE. 0) EXIT
      write (*,*) ' pp, f:', pp+phase*scale(np), f
            f0(mode,np)= f
            WRITE  (UNIT= i19, FMT= 7010) pp+phase*scale(np),f
            af= MAX(af,f)
            ap= MAX(ap,pp+phase*scale(np))
         ENDDO
      ENDDO
   10 CONTINUE
*
 7010 FORMAT(
     1 '@ point x1=',E12.6,' y1=',E12.6,' z1= 0 markertype=1',
     2 ' markersize= 1')
*
      WRITE (UNIT= i19, FMT= *)
      WRITE (UNIT= i19, FMT= 99) 0.,0.,0.,af,ap,af
 99 FORMAT(3(' ',2(E12.6,' ')/),/)
*
      END
The resulting Plot is presented in Figure 6.10.
This is the End of this Document